… for Adobe Premiere Pro CC

Tip #1022: The Pen Tool

Larry Jordan – LarryJordan.com

The Pen tool creates shapes we can use standalone or under text.

I have no idea what this it, but it’s kinda cute – and has a drop shadow.

Topic $TipTopic

The Pen tool allows us to draw shapes directly in the Program Monitor, fill them with color, add a border or drop shadow, then animate them. We are used to using the Pen tool as part of Effect Controls. But there is also the Pen tool in the Tools palette. We use this to draw shapes on-screen.

  • Put the playhead in the timeline where you want a shape to start, then, select the Pen tool from the Tools palette.
  • In the Program Monitor, click and draw a shape. Click to create a corner, click and drag to create a curve.
  • Re-click the starting point to create a closed shape, or don’t to create an open shape. (We most often use open shapes to create a curved line – it is a border with no fill.)
  • To move a shape, select the clip, then use the Move tool.
  • To adjust a shape, select the Pen tool, then, in Effect Controls, twirl down the Shape, and select Path.

NOTE: The shapes created by the Pen tool are vectors, which means they can be scaled as much as you want without losing edge sharpness.

EFFECT CONTROLS

The Shape controls, in the Effect Controls panel, provide:

  • Path. Redraw the shape, using the Pen tool.
  • Appearance. Change fill, stroke and shadow settings.
  • Transform. Change size, position and rotation, along with adding keyframe animation.

Please rate the helpfulness of this tip.

Click on a star to rate it!

… for Adobe Premiere Pro CC

Tip #1023: Tricks of the Zoom Tool

Larry Jordan – LarryJordan.com

The Zoom tool is the fastest way to zoom into a timeline segment.

The Zoom tool is located in the Hand menu. (Shortcut: Z)

Topic $TipTopic

Hidden, but accessible with a keyboard shortcut, is the Zoom tool. This is often faster than using keyboard shortcuts to zoom into the timeline! As a certified keyboard junkie, it often hard to believe that anything with the mouse is faster – but the Zoom tool may be the exception that proves the rule.

Click and hold the cursor on the Hand tool, then select Zoom tool from the menu that appears. (See screen shot.)

NOTE: The keyboard shortcut for the Zoom tool is: Z.

While we can simply zoom into the timeline by typing + [plus] or [minus], the Zoom tool is faster when we want to get more specific. To zoom into a specific section of the timeline, select the Zoom tool, then drag a rectangle around the section of the timeline you want to see.

Poof! That region instantly fills the timeline!

EXTRA CREDIT

The Zoom tool only works with clips in the timeline.

Type \ [back-slash] to fit everything back into the timeline again.


Please rate the helpfulness of this tip.

Click on a star to rate it!

… for Adobe Premiere Pro CC

Tip #1024: Moving the Anchor Point

Larry Jordan – LarryJordan.com

The Anchor Point can be easily moved using the Move tool.

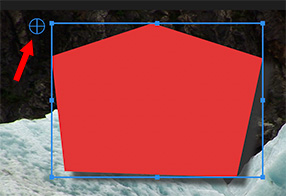
The Anchor point (red arrow) is set by moving the cross-hair icon.

Topic $TipTopic

The Anchor point is that spot in an element around which it rotates or scales. Clips, shapes and text each have separate anchor points, but moving them is the same.

  • Select the clip who’s anchor point you want to move.
  • Select the Move tool.
  • In the Program Monitor, drag the small circle with the cross-hair to the position you want. The EXACT position is the center of the cross-hair.

If you need more precision, or need to match anchor points for multiple clips, select the clip, then, in the Effect Controls panel, enter the precise numbers you need for the Anchor point for the selected clip.

EXTRA CREDIT

Here’s where to find the appropriate Anchor point. Using the Move tool, select the object in the Program Monitor you want to adjust. It will highlight in the Effect Controls panel.

  • Video: Effect Controls > Motion
  • Shapes: Effect Controls > Shape > Transform
  • Text: Effect Controls > Text > Transform

Please rate the helpfulness of this tip.

Click on a star to rate it!

… for Random Weirdness

Tip #976: 11 Practical Tips to Film Yourself

Larry Jordan – LarryJordan.com

It doesn’t take a lot of gear, but planning helps.

(Image courtesy of pexels.com.)

Topic $TipTopic

This article, written by Joe Frederick, first appeared in PremiumBeat.com. This is a summary.

As production equipment has become more accessible, the amount of people looking to regularly film themselves is on the rise. However, there’s a real art to filming yourself successfully. Here are some tips from Jonty Egginton (“The Video Creators”) and Sarah Outen (Filmmaker).

  1. Use the Right Camera
  2. Stabilize the Camera
  3. Get Quality Audio
  4. Control Your Lighting
  5. Film in 4K
  6. Go with Multiple Cameras
  7. Be Creative
  8. Be Natural
  9. Re-Watch Your Previous Videos
  10. Edit Your Videos Yourself
  11. Know How and Where to Distribute Videos

The article has more details and example videos to illustrate these points.


Please rate the helpfulness of this tip.

Click on a star to rate it!

… for Visual Effects

Tip #992: Mask Basics in Adobe After Effects

Larry Jordan – LarryJordan.com

Masks are the secret to successful compositing in After Effects.

(Image courtesy of pexels.com.)

Topic $TipTopic

This article first appeared in MotionArray.com. This is a summary.

In Adobe After Effects, masks are one of the tools you will likely use the most. They either hide or reveal elements of a layer, and can be used in conjunction with animation to create fun, stylish wipes. They’re an incredibly versatile tool but can be a little confusing to get your head around at first.

The article is divided into three sections:

  1. What is a Mask? A mask is an invisible shape that tells After Effects to only pay attention to a specific section of your composition.
  2. How to Create and Manage Masks. This is a step-by-step tutorial on using “Reveal Masking” or the Pen tool. It also covers how to work with multiple masks.
  3. How to Add Animation and Movement. Masks can be animated like other assets in After Effects.

EXTRA CREDIT

The article has step-by-step illustrations, additional links and a video that shows these techniques in operation.


Please rate the helpfulness of this tip.

Click on a star to rate it!

… for Visual Effects

Tip #993: Tutorials to Repair Video – from Adobe

Larry Jordan – LarryJordan.com

Adobe provides tutorials on stabilization and color repair.

(Repair image courtesy of Pexels.com.)

Topic $TipTopic

Adobe posted a series of tutorials on how to repair footage in After Effects. Here’s a summary.

This webpage has sample files and tutorials that show how to:

  • Stablize shaky footage using the Warp Stabilizer.
  • Fix exposure issues using the Lumetri Color effect.
  • Enhance the color in your video, again with the Lumetri Color effect.

Click the link at the top to learn more.


Please rate the helpfulness of this tip.

Click on a star to rate it!

… for Visual Effects

Tip #994: Top 50 After Effects Tutorials

Larry Jordan – LarryJordan.com

Short After Effects video tutorials that go from basic to advanced.

(Image courtesy of MotionArray.com.)

Topic $TipTopic

This article first appeared in CreativeBlog.com. This is a summary.

The team at CreativeBlog compiled “the best After Effects tutorials for motion graphics, animation and more. After Effects is at the core of the workflows of most VFX, motion graphics and 3D artists and animators. It offers a wide range of features, which can be used for everything from simple titles to full 3D stero compositing.

“Sorting through the vast number of tuts out there takes time, so we’ve done the hard work for you and scoured the web to find the very best After Effects tutorials around. We’ve even grouped them together in sections so it’s easy to find what you’re looking for.”

With 50 tips to choose from, here are the categories:

  1. Beginner: Get started with AE
  2. Beginner: Build your skills
  3. Intermediate: Use AE tools
  4. Intermediate: Connect other apps
  5. Intermediate: Create effects
  6. Advanced: After Effects projects

Each tutorial is illustrated with video and a short text description. Click the link at the top to learn more.


Please rate the helpfulness of this tip.

Click on a star to rate it!

… for Apple Final Cut Pro X

Tip #982: The Event Viewer Offers Preview

Larry Jordan – LarryJordan.com

The Event Viewer previews whatever clip is selected in the Browser.

The Event Viewer (left) mirrors the controls in the Viewer’s View menu.

Topic $TipTopic

Another feature that is often overlooked in Final Cut is the Event Viewer. Unlike the Comparison Viewer (Tip #981) which just displays still frames, the Event Viewer provides playback and preview of whatever clips you are skimming or playing in the Browser.

Choose Window > Show in Workspace > Event Viewer (Shortcut: Cntrl + Cmd + 3) to display the Event Viewer.

Once open, any clip you select, skim, or play in the Browser is displayed at a much larger size in the Event Viewer.

The key benefit is enabling you to better select the precise In and Out for a clip by presenting a larger image. (Think of this as the “Preview monitor” in Final Cut Pro 7 or other NLEs.)

If you need it, it’s there. If you don’t, you can hide it so it doesn’t take up any extra space.

EXTRA CREDIT

It has the same controls for both size and view as the Viewer’s View menu (red arrows in the screen shot).


Please rate the helpfulness of this tip.

Click on a star to rate it!

… for Random Weirdness

Tip #975: How to Succeed Even With Competition

Larry Jordan – LarryJordan.com

Competition challenges us to focus on what we do best.

(Racing image courtesy of Pexels.com.)

Topic $TipTopic

A couple of years ago I wrote an article: “How to Succeed When There’s So Much Competition.” Finding consistent paying work back then was hard, today it is even harder. Here are my thoughts.

A reader asked: “How can editors retain their important role and convince the client that they are still important and worth their normal rate?”

DaVinci Resolve is free, Adobe Premiere is available on a subscription basis, and Final Cut Pro X is affordable for just about anyone interested in editing. Therefore, everyone now has the tools necessary for professional video editing. Does that make them an editor?

No.

In my workshop, I have a hammer, a saw and a level – but I can’t build a house. I have the tools, but not the skills.

This illustrates a problem we’ve had for a long time. All too often, video editors define themselves by the tools they use, not the skills they have. If you define yourself solely by the tools you use, you’re going to be competing with the next college graduate that has Photoshop, or Final Cut, or Premiere installed on their laptop. And you are going to lose.

It isn’t our tools – it’s the stories that we tell, our dependability, and the client relationships that we build that sets us apart. The more that we focus on creative story-telling – in all of its different phases – the more people will demand our services.

EXTRA CREDIT

Here’s the full article.

And here’s a follow-up: Tips to Build Your Media Career.


Please rate the helpfulness of this tip.

Click on a star to rate it!

… for Visual Effects

Tip #978: Better Ways to Create Custom LUTs

Larry Jordan – LarryJordan.com

LUT software allows us to create looks that can’t be achieved any other way.

A red car, re-colored to blue simply by changing the LUT.

Topic $TipTopic

Tip #977 showed how to create LUTs using Photoshop. However, what if you need a radically different look for your media? That requires a 3rd-party LUT utility.

Consider 3D LUT Creator.

3D LUT Creator makes 3D LUTs that can be imported into many programs such as Adobe Photoshop, DaVinci Resolve, Adobe Premiere Pro, Final Cut Pro X, Motion, and Adobe After Effects.

Color correction in 3D LUT Creator is made by bending the grid tied to the color plane containing saturation and hue. The use of this interface allows you, in just a few clicks, to completely change the color scheme of the image or work with the desired color ranges separately.

A free trial version, and more details, are available here.

EXTRA CREDIT

LUTs don’t require rendering, making these the fastest way to change the colors in your clip.


Please rate the helpfulness of this tip.

Click on a star to rate it!