Most often, frequent crashes means something is out of date.
David M. reports:
FYI, I updated to Big Sur & FCP 10.5.2. I got continuous crashes on opening FCP until I uninstalled all Core Melt apps.
Everything is now fine. Didn’t lose any work.
Larry adds: Thanks, David, for the heads up.
Please rate the helpfulness of this tip.
Click on a star to rate it!
https://www.theinsidetips.com/wp-content/uploads/2019/09/Tips-Logo-700x150.jpg00Larry Jordanhttps://www.theinsidetips.com/wp-content/uploads/2019/09/Tips-Logo-700x150.jpgLarry Jordan2021-07-12 01:30:002021-07-10 09:03:39Tip #1769: Fix for FCP Crashes in Big Sur
Final Cut provides very powerful and flexible search across all media.
The Keyword Editor (shortcut: Cmd+K) in Final Cut Pro.
Looking for better ways to organize and find media in Final Cut Pro? The secret is keywords. These three articles illustrate how keywords can help you get organized.
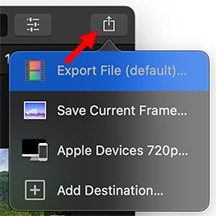
The Quick Export menu (yours may look different) in the top right corner.
Hidden in a corner of the Final Cut Pro interface is the Quick Export button. This is a fast way to get your projects out of Final Cut using just the mouse.
As the screen shot illustrates, in the top right corner of the Final Cut interface is the Send icon.
Click it to display the list of all current export destinations.
Using this menu, you can export the current project in the timeline using a single mouse click.
EXTRA CREDIT
To change the options displayed in this menu, either choose Add Destination from the bottom of this menu or go to: Final Cut Pro > Preferences > Destinations.
Neat Video renders very slowly. Here’s how to speed it up.
Neat Video makes an effect that removes video noise, which occurs when shooting in low-light situations. The filter creates amazing results, but takes forever to render.
This workaround was suggested by Brian Galford.
The Neat Video filter will render the entire duration of any clip it is applied to. So the key to faster rendering is to only apply the effect to those portions of a clip that need it.
For example, if you apply the filter to a ten second clip, but five seconds are covered by B-roll, cut the underlying clip containing the effect at the start and end of the shot above it. That way, only the visible part of the clip will render.
As well, if you’ve applied the filter to the entire underlying clip, be sure to remove or disable it from those portions that are covered by another clip.
Keywords are a fast, highly-flexible way to organize clips.
The Keyword Editor in Final Cut Pro.
In the old days, we would create a timeline, then add clips to it based upon the shots we liked. This worked, but it wasn’t very efficient.
The reason it wasn’t efficient was that these timelines containing “selects” didn’t tell us anything about the contents of the clips. Suddenly, our selects morphed into multiple timelines, renaming clip segments… like Topsy, it could quickly get out of control.
Instead, FCP offers keywords.
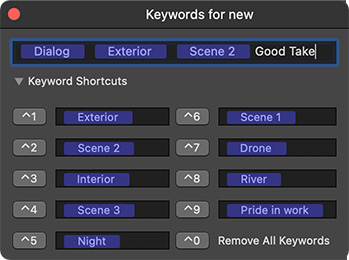
In the Browser, set an In and an Out marking a clip range that you like, then assign one or more keywords describing that section. For example: Scene, actor, interior/exterior, angle, content… whatever is important to you.
NOTE: To open the Keyword Editor either click the key icon in the top left corner of Final Cut, or type Cmd + K.
Enter as many keywords as you like, separated by commas. (See screen shot).
To view all the clips containing a specific keyword, twirl down the Event containing the media you want to search and click the name of the keyword. Only those segments containing that keyword are displayed in the Browser.
EXTRA CREDIT
To reveal all clips, again, click the name of the Event.
For more powerful searches, use the Search Filter. Here’s a tutorial from my website that illustrates this in more detail.
Please rate the helpfulness of this tip.
Click on a star to rate it!
https://www.theinsidetips.com/wp-content/uploads/2019/09/Tips-Logo-700x150.jpg00Larry Jordanhttps://www.theinsidetips.com/wp-content/uploads/2019/09/Tips-Logo-700x150.jpgLarry Jordan2021-07-05 01:30:002021-07-03 09:47:00Tip #1751: Create Selects with Keywords
One of the new features in the 10.5.3 update to Final Cut Pro is custom Column Sets. These determine the columns of metadata that appear in List view in the Browser.
In the past, we could Control-click any column header when in List view in the Browser and choose from a variety of data fields. Then, we could drag column headers left or right to change the order. Those options were expanded in this update.
Now, we can create an unlimited number of Column Sets, each with different data fields and organization.
NOTE: Here’s a link that explains this feature in more detail.
The tip behind this feature is to avoid starting with the Column Editor (simply because it provides an overwhelming list of choices).
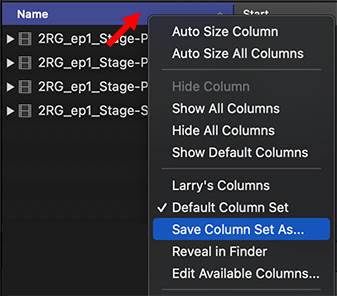
Instead, Control-click any column header (red arrow in screen shot), make sure the Default Column Set is checked, then choose Save Column Set As.
This duplicates the default set, allowing you to configuring columns with many of the fields you will ultimately want to use already included in the set.
EXTRA CREDIT
Once you create the duplicate, you can open the Column Editor and add any missing fields that you need. It is always easier to start with a mostly-complete project than build a new one from scratch.
We are all familiar with importing clips using the Media Import window. However, there are two lesser known ways to import clips; one of which was broken until the latest release. Both of these are faster.
DRAG and DROP
We can drag clips from the Finder into either the Timeline or Browser.
NOTE: All clips that you drag into Final Cut will follow current Import preferences.
Clips dragged into the Browser will sort according to your current Browser sort settings.
Clips dragged into the Timeline will edit into the Primary storyline in the order in which they were selected.
COPY / PASTE
You can copy clips from the Finder and paste them into the Final Cut timeline.
NOTE: All clips that are pasted into Final Cut will follow current Import preferences.
Clips pasted into the Timeline will edit into the Primary storyline in the order in which they were selected.
EXTRA CREDIT
While you can copy/paste clips into the Timeline, you can not copy/paste clips into the Browser.
Please rate the helpfulness of this tip.
Click on a star to rate it!
https://www.theinsidetips.com/wp-content/uploads/2019/09/Tips-Logo-700x150.jpg00Larry Jordanhttps://www.theinsidetips.com/wp-content/uploads/2019/09/Tips-Logo-700x150.jpgLarry Jordan2021-06-28 01:30:002021-06-28 01:30:00Tip #1733: Two Hidden Ways to Import Clips
The latest version includes new Browser and search features.
The Final Cut Pro logo, along with the latest release number.
Last week, as part of updates to all their media applications, Apple updated Final Cut Pro to version 10.5.3. The new version improves the Browser, metadata and search, as well as quashing a variety of bugs.
Here’s the complete list of new features and fixes, as released by Apple:
Create and edit custom column views with the new column editor.
Search for media in the browser using expanded criteria including clip names, markers, and notes.
Sort clips in the browser according to type, including proxy, optimized, and missing media.
Fixes an issue where adjusting audio keyframes on one side of a blade edit shifts keyframes unexpectedly on the other side.
Restores support for copying clips from the Finder and pasting into the timeline.
Improves stability when copying events in the browser to a library stored on an external hard drive.
Fixes an issue in which the timeline index was not displaying active angle information for multicam clips.
Fixes an issue where Canon Cinema RAW Light and RED RAW media could not be imported if a camera card was mounted when launching Final Cut Pro.
Improves reliability when importing an FCPXML file with missing media.
Fixes an issue with the Color Mask in which dragging to select a range with the eyedropper did not display the selection circle.
Improves reliability when using the Select Next Clip command.
Improves reliability when app switching to Final Cut Pro with an external hard drive connected.
Improves reliability when quitting Final Cut Pro during a background render.
Improves stability and performance when working with multicam clips that contain corrupt media.
Fixes an issue in which audio waveforms would sometimes not update when using the Trim tool to perform a slip edit.
Here’s a link to Apple’s Release Notes for Final Cut Pro.
Please rate the helpfulness of this tip.
Click on a star to rate it!
https://www.theinsidetips.com/wp-content/uploads/2019/09/Tips-Logo-700x150.jpg00Larry Jordanhttps://www.theinsidetips.com/wp-content/uploads/2019/09/Tips-Logo-700x150.jpgLarry Jordan2021-06-21 01:30:002021-06-21 01:30:00Tip #1713: Apple Updates Final Cut Pro
Column sets are a great way to organize the display of Browser data.
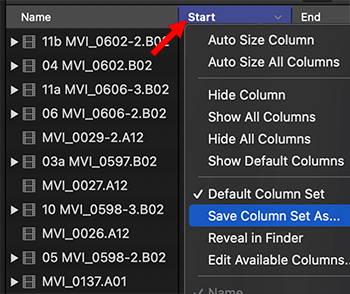
Control-click any column header in the Browser to access the new column set features.
The Browser in Final Cut Pro holds a wealth of technical information about clips and projects. While we’ve always been able to view this information, we’ve never been able to organize it.
Until now.
With the 10.5.3 update to Final Cut, Apple added the ability to create and share column sets. That is, we can select which columns we want to display in the Browser, save those changes and share them with others.
“The column settings include available columns, column order, column width, column visibility, and custom metadata fields. You can easily copy column sets to another computer, or share them with friends and colleagues so that the same column sets are available in their browser.” (Apple Help)
Control-click any column header in the Browser and choose Edit Available Columns. This determines which fields are displayed when you Control-click a column header.
Since the default column set can’t be changed, you’ll be asked to create a new column set.
NOTE: This is exactly the same concept as creating a new keyboard shortcut command set.
You are then presented with a list of HUNDREDS of metadata fields to add or remove from the Browser.
Check those you want, uncheck those you don’t.
Click OK when you are done.
What you’ve done is create a master list of fields that can be displayed in the Browser. However, just because you have access, doesn’t mean you need to display all of them.
EXTRA CREDIT
What works best for me is to use the Column Editor to make sure you have the fields you want, then Control-click a Browser column header and uncheck those items you don’t want to view at this time.
Then, save the Column set so that the next time you open the Browser, your new custom column organization will be retained.
You can create as many different column sets as you need, depending upon the tasks you need to accomplish at that time.
We may request cookies to be set on your device. We use cookies to let us know when you visit our websites, how you interact with us, to enrich your user experience, and to customize your relationship with our website.
Click on the different category headings to find out more. You can also change some of your preferences. Note that blocking some types of cookies may impact your experience on our websites and the services we are able to offer.
Essential Website Cookies
These cookies are strictly necessary to provide you with services available through our website and to use some of its features.
Because these cookies are strictly necessary to deliver the website, refuseing them will have impact how our site functions. You always can block or delete cookies by changing your browser settings and force blocking all cookies on this website. But this will always prompt you to accept/refuse cookies when revisiting our site.
We fully respect if you want to refuse cookies but to avoid asking you again and again kindly allow us to store a cookie for that. You are free to opt out any time or opt in for other cookies to get a better experience. If you refuse cookies we will remove all set cookies in our domain.
We provide you with a list of stored cookies on your computer in our domain so you can check what we stored. Due to security reasons we are not able to show or modify cookies from other domains. You can check these in your browser security settings.
Google Analytics Cookies
These cookies collect information that is used either in aggregate form to help us understand how our website is being used or how effective our marketing campaigns are, or to help us customize our website and application for you in order to enhance your experience.
If you do not want that we track your visit to our site you can disable tracking in your browser here:
Other external services
We also use different external services like Google Webfonts, Google Maps, and external Video providers. Since these providers may collect personal data like your IP address we allow you to block them here. Please be aware that this might heavily reduce the functionality and appearance of our site. Changes will take effect once you reload the page.
Google Webfont Settings:
Google Map Settings:
Google reCaptcha Settings:
Vimeo and Youtube video embeds:
Other cookies
The following cookies are also needed - You can choose if you want to allow them:
Privacy Policy
You can read about our cookies and privacy settings in detail on our Privacy Policy Page.