… for Apple Final Cut Pro X

Tip #1661: Three Quick Video Scope Tricks

Larry Jordan – LarryJordan.com

Final Cut’s scopes can be selected and modified using these controls.
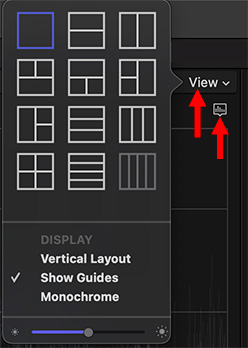
The View menu determines video scope layout, the small menu selects which scope to display in each panel.

Topic $TipTopic

The video scopes in Apple Final Cut Pro are both flexible and powerful. Even so, we can still tweak them further. Here are three tips I find useful in almost every project.

TIP 1: CHANGE LAYOUT

Open the video scopes (Cmd + 7). Click the word View to select how many scopes you want to view. I tend to prefer the “two side-by-side option” in the top right corner of the View menu.

This allows me to see both Waveform monitor and Vectorscope at the same time.

TIP #2: REMOVE COLOR

By default, Final Cut’s video scopes display the color associated with a specific pixel values, for instance dark green, in the Waveform monitor.

While very cool, you can turn these colors off by selecting Monochrome.

TIP #3: PICK YOUR SCOPES

When you have one or more scopes selected using the View menu, click the small icon below the word View and choose which scope goes in each scope panel.

Most of the time, I’m looking at Waveform (Luma) and Vectorscope (100% Vector).

Until I get into very specific color grading, these two scopes tell me everything I need to know to gauge color and grayscale values during my edit.


Please rate the helpfulness of this tip.

Click on a star to rate it!

… for Apple Final Cut Pro X

Tip #1640: A Really Fast Still Frame Trick

Larry Jordan – LarryJordan.com

Create still frames fast with these two shortcuts.

Topic $TipTopic

I re-discovered this technique while researching my recent webinar: Clip Speed Effects in Apple Final Cut Pro.

Here’s a very fast way to create a still frame from any video clip in the Browser and edit it as a connected clip in the Final Cut timeline.

  • In the Timeline, put the playhead where you want to insert the still frame.
  • In the Browser, put the playhead (or skimmer) on the frame you want to insert into the timeline.
  • Type Option + F

EXTRA CREDIT

To create a still frame of the current frame under the playhead in the timeline:

  • Make sure the timeline is active
  • Type Shift + F
  • Type Option + F

If the clip edits into the Primary Storyline, undo, deselect the clip and try again. Done.


Please rate the helpfulness of this tip.

Click on a star to rate it!

… for Apple Final Cut Pro X

Tip #1641: How to Create a Fit-to-Fill Edit

Larry Jordan – LarryJordan.com

A Fit-to-Fill edit is uncommon – but easy to do when you need one.

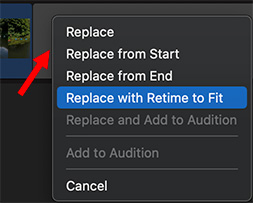
The Replace clip options menu.

Topic $TipTopic

I re-discovered this technique while researching my recent webinar: Clip Speed Effects in Apple Final Cut Pro.

A Fit-to-Fill edit automatically alters the speed of a clip in the Browser to fit a specific duration in the Timeline. While specialized, they are often used when editing clips to music and you can’t change the timing of the music, but need the action to finish in the duration available.

To create it:

  • Add a gap, placeholder or other clip into the timeline with the duration you need. (For simplicity, I’ll call this the “gap.”)
  • In the Browser, mark an In and Out for the clip you want to insert into the gap.
  • Drag the clip from the Browser on top of the gap in the Timeline.
  • In the pop-up window, select Replace with Retime to Fit.

Because the Browser clip has both an In and an Out, Final Cut can change the speed of the Browser clip so it exactly fills the gap you created in the Timeline.

EXTRA CREDIT

A Fit-to-Fill edit always changes the speed of the Browser clip, unlike any other replace edit.


Please rate the helpfulness of this tip.

Click on a star to rate it!

… for Apple Final Cut Pro X

Tip #1642: How to Add A Speed Transition

Larry Jordan – LarryJordan.com

Speed transitions will often make hold frames look much more believeable.

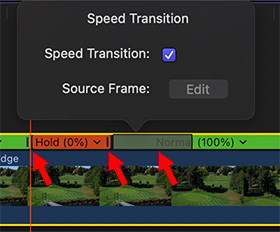
A hold frame (red bar) followed by a speed transition (gray bar).

Topic $TipTopic

I re-discovered this technique while researching my recent webinar: Clip Speed Effects in Apple Final Cut Pro.

A speed transition gradually alters the playback speed of a clip, for example, from a Hold frame back to normal speed. Here’s how to add a speed transition to smooth speed changes in Apple Final Cut Pro.

NOTE: Speed transitions are added automatically to speed ramps, but they can also be added to coming into or out of a Hold frame.

In this example, let’s add a speed transition coming out of a Hold frame:

  • Put the timeline playhead on the frame you want to freeze and type Shift + H. This creates a Hold frame, indicated by a red bar.
  • At the end of the Hold frame, in the red bar, is a vertical black bar, called the “thumb.” Double-click the thumb.
  • In the speed menu that appears, check Speed Transition.
  • A gray bar appears to the right of the Hold frame. This is the speed transition. Grab the right edge and drag it to change the duration of the speed transition.

Play this and you’ll see how it smooths the transition from still to full speed.

EXTRA CREDIT

In the screen shot:

  • The left arrow indicates the frame that is held (frozen)
  • The middle arrow indicates the Hold frame “thumb.”
  • The right arrow indicates the speed transition.
  • The Speed Transition menu is displayed above the timeline clip.

Speed transitions can be added at any speed thumb by double-clicking.


Please rate the helpfulness of this tip.

Click on a star to rate it!

… for Apple Final Cut Pro X

Tip #1630: Simplify Transferring a Final Cut Library

Larry Jordan – LarryJordan.com

Store custom Motion templates in the Library to simplify transfers.

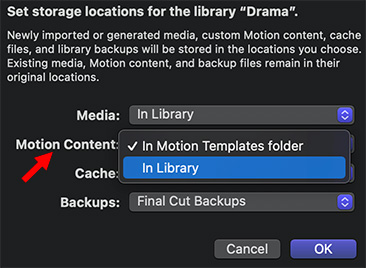
Library Storage Locations dialog.

Topic $TipTopic

Here’s a quick tip that makes sharing Final Cut Libraries between editors less stressful by consolidating custom Motion templates into the Library.

Normally, Motion stores – and Final Cut accesses – Motion templates in [ Home Directory ] > Movies > Motion Templates. However, when you send a Library to another editor, none of those templates transfer with it.

Here’s how to fix it:

  • Open a Final Cut Library.
  • Select the Library in the Library List (to the left of the Browser).
  • Open the Inspector and click Storage Locations > Modify Settings
  • Change Motion Content to In Library.
  • Then, click Motion Content > Consolidate. This copies all custom Motion templates used by that Library from the Motion Templates folder into the Library.

Now, wherever you transfer that Library, all custom templates will travel with it.


Please rate the helpfulness of this tip.

Click on a star to rate it!

… for Apple Final Cut Pro X

Tip #1631: Learn Where Your Library Media Is Stored

Larry Jordan – LarryJordan.com

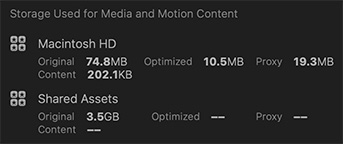
This lists media by type, storage space used and drive.

Media storage data displayed in the Info Inspector in Final Cut Pro.

Topic $TipTopic

Here’s a fast way to learn how much space the media for a Final Cut Library takes, what type of files are using that space, and where it’s stored.

Select a Library in the Library List, then go to the Info Inspector.

At the bottom (see screen shot) is a list of where your media is stored by drive and category.


Please rate the helpfulness of this tip.

Click on a star to rate it!

… for Apple Final Cut Pro X

Tip #1632: Change Default Color Grading Options

Larry Jordan – LarryJordan.com

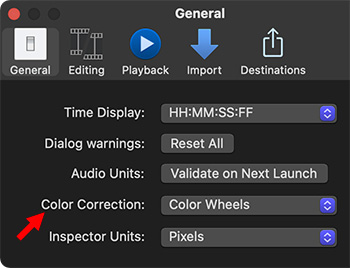
My personal preference is for Color Wheels.

Set the default Color Correction option using the General preferences tab.

Topic $TipTopic

The Color Board is the default color grading setting for Final Cut Pro. Some people like the Color Board, other folks prefer other color grading options. Here’s how to change the default setting.

  • Open Final Cut.
  • Go to Final Cut Pro > Preferences.
  • Go to the General tab and change Color Correction to the default color tool you want to use.

This choice remains in effect until you either change it, or trash preferences.

NOTE: This sets the default setting. You can always change to something different using the Color Inspector.


Please rate the helpfulness of this tip.

Click on a star to rate it!

… for Apple Final Cut Pro X

Tip #1605: How to Reset a Slomo Clip to Normal

Larry Jordan – LarryJordan.com

Shift + N is the shortcut to reset clips to 100% speed.

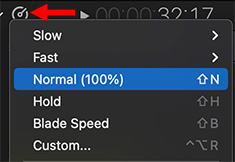
The Retiming menu under the Viewer.

Topic $TipTopic

When you need to reset a slow motion clip back to 100% speed, the easiest way to do this is to choose Modify > Retiming > Normal (100%).

This matches the speed of the clip to the frame rate of your project.

EXTRA CREDIT

You can also use the Retiming menu underneath the Viewer (see screen shot) or the shortcut: Shift + N.


Please rate the helpfulness of this tip.

Click on a star to rate it!

… for Apple Final Cut Pro X

Tip #1606: Change Metadata Labels for Video Exports

Larry Jordan – LarryJordan.com

Metadata can be embedded into ProRes, MP4, MP3 and QuickTime files.

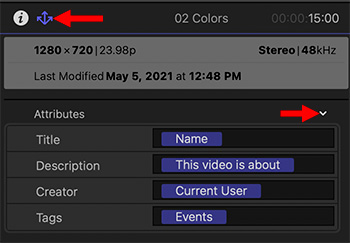
The Project Metadata Inspector (top red arrow). The white arrow displays more metadata fields (bottom red arrow).

Topic $TipTopic

Have you ever wondered where those labels come from when you share (export) a file? These labels are stored as project metadata.

Here’s how to change them:

  • Select the project in the Browser.
  • Click the “trident” arrow in the Inspector (top arrow in screen shot). This displays the project metadata.
  • Change the text in any field.
  • Or, click the white down arrow (bottom red arrow in screen shot) to display more than a dozen other metadata fields that can be added to your export.

These will be retained in the project until you change them.

EXTRA CREDIT

You can also add metadata to videos using Compressor.


Please rate the helpfulness of this tip.

Click on a star to rate it!

… for Apple Final Cut Pro X

Tip #1607: Add Metadata to Videos in Compressor

Larry Jordan – LarryJordan.com

Metadata can be read by many different applications, as well as asset managers.

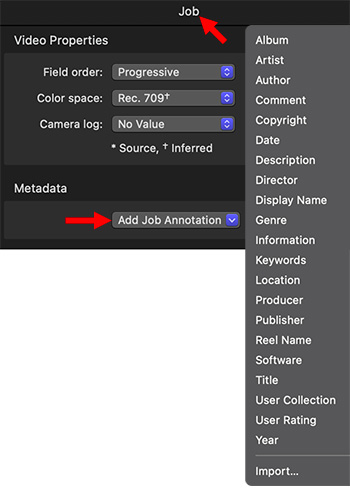
Custom metadata fields that can be added to any ProRes, MP4, MP3 or QuickTime movie.

Topic $TipTopic

You can use Apple Compressor to add metadata (labels) to your videos during compression using Compressor. Here’s how.

  • Import one or more files into Apple Compressor.
  • Select the file name in the Job list, not the compression setting.
  • In the Job Inspector (top red arrow in screen shot), scroll down to the Metadata menu (bottom red arrow).
  • Click it and select as many custom fields as you need.

NOTE: No, you can’t add fields that aren’t on this list. However, you can import an XML Property List, if you know how to create XML files.

Metadata can be added to ProRes, MP4, MP3 and QuickTime files.


Please rate the helpfulness of this tip.

Click on a star to rate it!