New with the 10.5.3 update to Final Cut Pro is an enhanced search capability in the Browser.
To get started:
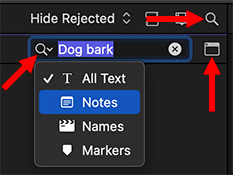
Select a library, event(s) or folders that you want to search. (You can’t search across multiple libraries.)
Click the Search button (top arrow, the magnifying glass) in the top-right corner of the Browser.
Enter the text you want to search for. By default, FCP will search in notes, clip names, project names and marker text.
NOTE: It won’t search for text stored in titles.
If you want to restrict your search, click the Search button (left red arrow), then choose where you want to limit the search.
EXTRA CREDIT
You can also search on multiple criteria by clicking the small “clapperboard” icon (lower red arrow) to the right of the search box.
This feature allows extensive searching on a variety of criteria, even the ability to save searches. But explaining how this feature works requires more than a tip.
https://www.theinsidetips.com/wp-content/uploads/2019/09/Tips-Logo-700x150.jpg00Larry Jordanhttps://www.theinsidetips.com/wp-content/uploads/2019/09/Tips-Logo-700x150.jpgLarry Jordan2021-06-21 01:30:002021-06-21 01:30:00Tip #1717: New! Improved Search in Final Cut Pro
Two workarounds for apparent bugs in Final Cut Pro.
Image detail courtesy of Pexels.com.
Scott Newell reports on two workarounds for Final Cut Pro.
BROKEN RENDERS
Just wanted to share two FCP X stories with you. I was trying to output (share) a fairly complex video with lots of various video sources and found it stopped at 94% each time. Online searches said it could be a corrupt file somewhere and many suggested trashing preferences. Nothing worked.
So I rendered out a section at a time to see where the problem was. Turned out to be a plugin from Pixel Film Studios near the end and it was in a very dense portion of the timeline.. I’ve used many of their plugins successfully before, but it must have been taxing my system beyond its capabilities. Removed the effect and it rendered without a hitch.
My takeaway (which I suspect is something you already do) is to look at 3rd party plugins first when there is a problem like that.
LARRY ADDS: The two biggest issues that cause renders to fail are corrupt stock media and broken plugins.
MISSING SHORTCUTS
One other question that doesn’t involve plugins. Sometimes when I start a new project and copy and paste from another project to start things going, the enlarge and shrink keyboard shortcuts (CMD+ and CMD-) don’t have any effect. I have to go to the appearance icon in the top right corner of the Timeline and move the timeline resize slider to enable the keystrokes again. Wonder why that is?
Just recently a friend called me to ask why his CMD+ and CMD- key combinations weren’t working and I knew exactly what he was talking about, so I must not be the only one this is happening with.
NOTE: Scott sent me this note before the latest FCP 10.5.3 update. I don’t know whether these were fixed in that version or not.
Please rate the helpfulness of this tip.
Click on a star to rate it!
https://www.theinsidetips.com/wp-content/uploads/2019/09/Tips-Logo-700x150.jpg00Larry Jordanhttps://www.theinsidetips.com/wp-content/uploads/2019/09/Tips-Logo-700x150.jpgLarry Jordan2021-06-21 01:30:002021-06-21 01:30:00Tip #1730: Final Cut Pro Bug Workarounds
These automated features help find and fix problem clips.
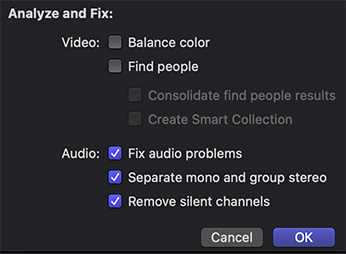
The Final Cut Analyze and Fix dialog box, with audio fixes enabled.
Final Cut provides an option – Analyze and Fix – that will review clips either during or after import to find and, potentially fix, any problems with the clip.
This process runs in the background and can be monitored in the Background Tasks window (Shortcut: Cmd + 9)
If you want to check clips after they are imported, simply select the clips you want to check in the Browser and choose File > Analyze and Fix.
VIDEO OPTIONS
Here’s what the options mean (according to Apple’s Help files):
Balance Color: Analyzes video clips to detect color balance and contrast. Color is automatically balanced when you add the clip to the timeline. You can turn automatic color adjustments on and off at any time using the Video Inspector.
Find People: Analyzes video clips and still images for the number of people present and shot types. After analysis, any of the following keywords are added to the clips or clip ranges: One Person, Two Persons, Group, Close Up Shot, Medium Shot, and Wide Shot.
Consolidate find people results: Consolidates all of the “find people” analysis keywords into one shot type keyword and one people keyword for every 2-minute segment of video. The shot type keyword chosen is the one for the widest shot type, and the people keyword chosen is the one representing the most people. For example, if a video segment contains Medium Shot, Wide Shot, One Person, and Group keywords, the segment’s analysis keywords are reduced to Wide Shot and Group during consolidation.
Create Smart Collections after analysis: Creates a Smart Collection for each keyword applied when video clips and still images are analyzed for the presence of people. The Smart Collections are listed alphabetically in a People folder inside the event in the Libraries sidebar.
AUDIO OPTIONS
Analyze and fix audio problems: Analyzes the audio for hum, noise, and loudness. Final Cut Pro automatically fixes problems that are considered severe (marked in red) and flags problems that are considered moderate (marked in yellow). See Enhance audio in Final Cut Pro.
Separate mono and group stereo audio: Audio channels are analyzed and grouped as dual mono or stereo, depending on the results of the analysis. Automatically corrected audio channels are marked as Autoselected. For more information about audio channels, see Configure audio channels in Final Cut Pro.
Remove silent channels: Audio channels are analyzed, and silent channels are removed. Clips that have had channels removed are marked as Autoselected. For more information about audio channels, see Configure audio channels in Final Cut Pro.
EXTRA CREDIT
Personally, i don’t like the results of video analysis, so I always turn these off. However, I do like the results of audio analysis so I always turn these on.
Please rate the helpfulness of this tip.
Click on a star to rate it!
https://www.theinsidetips.com/wp-content/uploads/2019/09/Tips-Logo-700x150.jpg00Larry Jordanhttps://www.theinsidetips.com/wp-content/uploads/2019/09/Tips-Logo-700x150.jpgLarry Jordan2021-06-14 01:30:002021-06-14 01:30:00Tip #1694: What Does “Analyze & Fix” Do?
The Video Animation Editor bar, showing the Transform keyframe controls menu.
Attached, but hidden, to each clip in the Final Cut timeline is the Video Animation Editor. This “bar” provides anther way to adjust effect parameters, or change timing using keyframes.
The Video Animation Editor appears above the clip. To make it appear, select one or more clips in the timeline, then type Control + V or choose Clip > Show Video Animation. (See screen shot.)
Click the check boxes on the left to turn an effect on or off (they are on by default).
Click the small down-pointing arrow to select a specific parameter to adjust (red arrow).
Double-click the box on the right side (not shown) to expand the setting vertically to make adjustments easier to make.
NOTE: This expansion box appears for Opacity, but not most other effects.
The dotted line that appears is used to set, adjust or remove keyframes for that parameter.
To create a keyframe: Option-click the line
To move a keyframe for timing, drag horizontally.
To adjust a keyframe setting, drag vertically.
NOTE: Once you start dragging, Final Cut constrains movement. For example, once you start dragging horizontally, FCP will only allow horizontal movement until you let go of the mouse. This prevents unintended changes to settings when all you wanted to do was change the time, or vice-versa.
To convert a keyframe from a corner to a curve, Control-click it and select from the menu.
To delete a keyframe, Control-click it and select from the menu.
NOTE: As you add effects to a clip, they are also added to the Video Animation Editor.
EXTRA CREDIT
You can also add keyframes using the Inspector and they will appear in the Video Animation Editor. This bar is faster than the Inspector to change keyframe timing, but the Inspector is easier to change settings.
Please rate the helpfulness of this tip.
Click on a star to rate it!
https://www.theinsidetips.com/wp-content/uploads/2019/09/Tips-Logo-700x150.jpg00Larry Jordanhttps://www.theinsidetips.com/wp-content/uploads/2019/09/Tips-Logo-700x150.jpgLarry Jordan2021-06-14 01:30:002021-06-11 17:30:00Tip #1695: The Hidden Video Animation Editor
This makes keyframe timing changes faster than the Inspector.
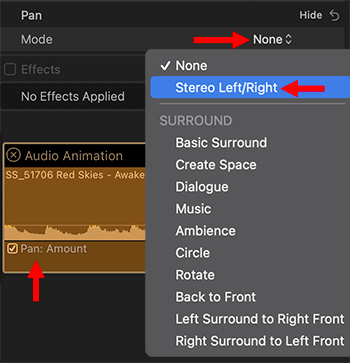
This composite image shows where to enable pan controls, the Pan Mode menu and the clip’s Audio Animation bar, with pan enabled.
Attached, but hidden, to each clip in the Final Cut timeline is the Audio Animation Editor. This “bar” provides another way to adjust effect parameters, create fade-ins or fade-outs, or change effects over time using keyframes.
The Audio Animation Editor appears above a timeline clip. To make it appear, select one or more clips in the timeline, then type Control + A or choose Clip > Show Audio Animation. (See screen shot.)
By default, when this bar first appears, no adjustable settings are displayed.
NOTE: Audio volume is already displayed as a horizontal line in the audio clip.
To enable an audio effect, either apply one from the Effects Browser, or go to the Audio Inspector and change the Pan Mode from None to Stereo Left/Right. (See screen shot)
This displays the Pan: Amount setting in the Audio Animation Editor. (See screen shot)
Click the check boxes on the left to turn an effect on or off (they are on by default).
Double-click the box on the right side (not shown) to expand the setting vertically to make adjustments easier to make.
The dotted line that appears is used to set, adjust or remove keyframes for that parameter.
To create a keyframe: Option-click the line
To move a keyframe for timing, drag horizontally.
To adjust a keyframe setting, drag vertically.
NOTE: Once you start dragging, Final Cut constrains movement. For example, once you start dragging horizontally, FCP will only allow horizontal movement until you let go of the mouse. This prevents unintended changes to settings when all you wanted to do was change the time, or vice-versa.
To convert a keyframe from a corner to a curve, Control-click it and select from the menu.
To delete a keyframe, Control-click it and select from the menu.
NOTE: As you add effects to a clip, they are also added to the Audio Animation Editor.
EXTRA CREDIT
You can also add keyframes using the Inspector and they will appear in the Audio Animation Editor. This bar is faster than the Inspector to change keyframe timing, but the Inspector is easier to change settings.
Transferring files does not affect the current project.
Every Event has a secret menu simplifying media handling.
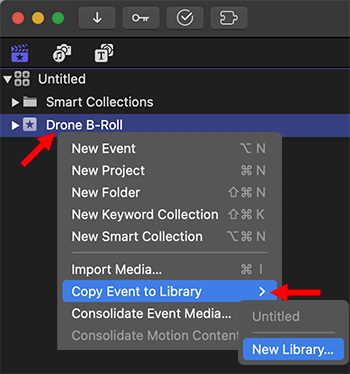
Final Cut has a very useful utility that allows you to create new libraries from existing events. A good example of this might be an event in your documentary that contains all the drone footage (or other B-roll) from your current project that you want to offer for sale on stock footage websites.
Clearly, you don’t want to keep opening your documentary just to access B-roll footage. On the other hand, manually transferring all those clips is a pain.
Instead, let FCP transfer the footage, along with all keywords and other metadata, for you.
Control-click the name of the Event in the Library List.
Choose Copy Event to Library > New Libary.
Done.
NOTE: You can also use this technique to move media or projects from one library to another.
All the contents of that event, including media, projects and metadata, are copied to the new location. Because this is a copy, your current project is not altered.
Please rate the helpfulness of this tip.
Click on a star to rate it!
https://www.theinsidetips.com/wp-content/uploads/2019/09/Tips-Logo-700x150.jpg00Larry Jordanhttps://www.theinsidetips.com/wp-content/uploads/2019/09/Tips-Logo-700x150.jpgLarry Jordan2021-06-07 01:30:002021-06-07 01:30:00Tip #1676: Create A New Library from an Event
Final Cut Pro makes handling multi-channel audio easy and very flexible.
Converting stereo to mono audio is easy using Audio Configuration.
Normally, when you import a two-channel audio clip, Final Cut Pro treats it as stereo. But Final Cut makes working with multi-channel audio easy. Here’s how:
Select the clip in either the Browser or the Timeline.
Open the Audio Inspector.
Scroll down to Audio Configuration.
Click the menu – which, for two-channel clips, should say Stereo – and change it to 2 Mono.
NOTE: In this screen shot, I’m working with a six-channel audio clip, where only the first two channels have audio. Here, I selected “6 Mono.”
Once you see the different channels you can:
Skim a channel to review it at high-speed
Click inside a channel, then press spacebar to play just that channel.
Uncheck a channel to mute it.
EXTRA CREDIT
Converting a 2-channel Mono clip to Stereo is just as easy: Change the menu from 2 Mono to Stereo.
Please rate the helpfulness of this tip.
Click on a star to rate it!
https://www.theinsidetips.com/wp-content/uploads/2019/09/Tips-Logo-700x150.jpg00Larry Jordanhttps://www.theinsidetips.com/wp-content/uploads/2019/09/Tips-Logo-700x150.jpgLarry Jordan2021-06-07 01:30:002021-06-04 19:17:14Tip #1677: Working with Dual-Channel Audio
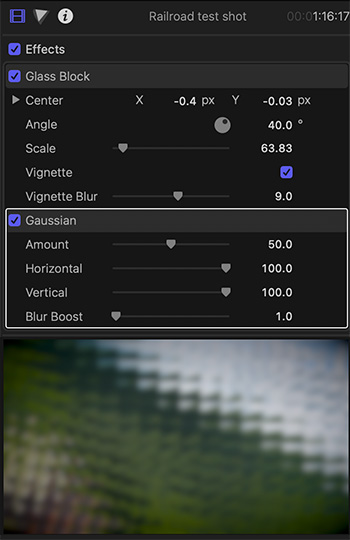
Be sure to apply a blur to keep the background from decreasing readability.
(top to bottom) Glass Block & Gaussian Blur effects, with the effects applied to a video clip.
Here’s a fast and fun way to create an animated background for text, graphics or other uses where you need the background animated, but not distracting.
Apply Effects Browser > Distortion > Glass Block to a clip.
Then, apply Effects Browser > Blur > Gaussian Blur to the same clip.
NOTE: The effects order is important, apply Glass Block first, then the blur. This softens the block edges so they don’t distract from foreground text.
Adjust the Angle in the Glass Block effect to make it a little less geometrically static.
Play the clip and watch what happens. The animation will be based on the amount of movement in the video clip. Some movement is good, too much movement will be distracting.
Hold frames are a very fast way to add still frames to a project.
The Speed Transition dialog (top) and the “edit hold frame” box (bottom).
A hold frame is a still frame that is attached to a clip in the Final Cut Pro timeline. Hold frames can be added to any video clip, with any duration you want.
The good news is that hold frames are attached to the clip itself, wherever a clip moves, the hold frame moves with it.
NOTE: Adding a Hold frame pauses the video and puts a gap into the audio. For this reason, hold frames are not recommended for clips with sync sound.
ADD A HOLD FRAME
To add a hold frame, put the playhead where you want to insert a pause, and type Shift + H. (Modify > Retime > Hold)
A 2-second hold frame is inserted into the selected clip at the position of the playhead.
MODIFY A HOLD FRAME
To change the duration of a hold frame, drag the vertical black line (called the “thumb”) at the end of the hold frame left (to shorten it) or right (to lengthen it).
To modify the hold frame itself, double-click the black thumb at the start of the hold frame to display the Speed Transition dialog.
Click Edit and a box appears around the frame that’s current being held. Drag this box left or right to change the frame that’s being held, without deleting either the hold frame or its duration.
To remove a hold frame, select the clip and type Shift + N (Modify > Retime > Normal (100%))
Please rate the helpfulness of this tip.
Click on a star to rate it!
https://www.theinsidetips.com/wp-content/uploads/2019/09/Tips-Logo-700x150.jpg00Larry Jordanhttps://www.theinsidetips.com/wp-content/uploads/2019/09/Tips-Logo-700x150.jpgLarry Jordan2021-05-31 01:30:002021-05-31 01:30:00Tip #1643: Add and Modify a Hold Frame in FCP
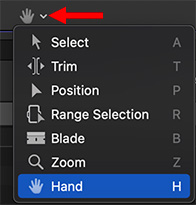
This is a very handy trick to help navigate the timeline.
The Hand tool in the Tools menu.
Here’s a very handy keyboard shortcut to help you move quickly around the Timeline.
You know that the Tools menu has an option for the Hand tool (Shortcut: H). Select it, and you can drag left or right to change your position in the timeline.
NOTE: This is the same as dragging the light gray bar at the bottom of the timeline, but easier to grab.
What you may not know is that if you press and HOLD the H key, you can drag to a new location, then, when you let go, Final Cut returns to the tool that was selected before you pressed H.
This is a very cool timesaver – especially for people like me who don’t edit using a Magic Trackpad.
Thanks and a tip of the hat to Francisco Carrasco, who reminded me of this tip.
We may request cookies to be set on your device. We use cookies to let us know when you visit our websites, how you interact with us, to enrich your user experience, and to customize your relationship with our website.
Click on the different category headings to find out more. You can also change some of your preferences. Note that blocking some types of cookies may impact your experience on our websites and the services we are able to offer.
Essential Website Cookies
These cookies are strictly necessary to provide you with services available through our website and to use some of its features.
Because these cookies are strictly necessary to deliver the website, refuseing them will have impact how our site functions. You always can block or delete cookies by changing your browser settings and force blocking all cookies on this website. But this will always prompt you to accept/refuse cookies when revisiting our site.
We fully respect if you want to refuse cookies but to avoid asking you again and again kindly allow us to store a cookie for that. You are free to opt out any time or opt in for other cookies to get a better experience. If you refuse cookies we will remove all set cookies in our domain.
We provide you with a list of stored cookies on your computer in our domain so you can check what we stored. Due to security reasons we are not able to show or modify cookies from other domains. You can check these in your browser security settings.
Google Analytics Cookies
These cookies collect information that is used either in aggregate form to help us understand how our website is being used or how effective our marketing campaigns are, or to help us customize our website and application for you in order to enhance your experience.
If you do not want that we track your visit to our site you can disable tracking in your browser here:
Other external services
We also use different external services like Google Webfonts, Google Maps, and external Video providers. Since these providers may collect personal data like your IP address we allow you to block them here. Please be aware that this might heavily reduce the functionality and appearance of our site. Changes will take effect once you reload the page.
Google Webfont Settings:
Google Map Settings:
Google reCaptcha Settings:
Vimeo and Youtube video embeds:
Other cookies
The following cookies are also needed - You can choose if you want to allow them:
Privacy Policy
You can read about our cookies and privacy settings in detail on our Privacy Policy Page.