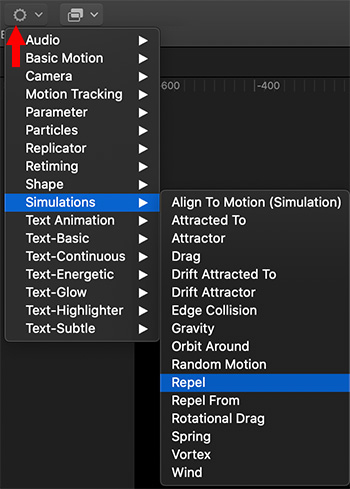
… for Apple Motion

Tip #793: What Is a “Light Setup”?

Larry Jordan – LarryJordan.com

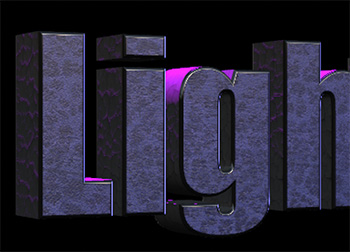
Light Setups provide a variety of placed and pre-aimed lights to shape 3D text.

A “Drama Top Right” light setup, with blue and purple colors added to the lights.

Topic $TipTopic

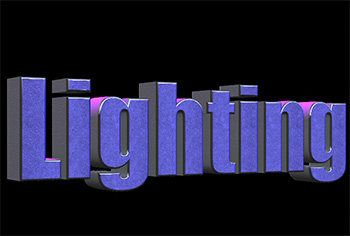
An element in the Object menu is “Light Setup.” What are these and how do we use them? A Light Setup is like having your own lighting grid and instruments that you can hang around any 3D object in Motion. Most of the time, this means 3D text.

In the screen shot, I created a 3D text clip, then applied grayish textures to the letters. In this case, I used Concrete > Sidewalk for the front and Plaster > Eggshell Plaster for the sides. (Using gray textures allows the greatest freedom in applying color using light.)

Next, in Inspector > Text > Lighting, I changed Lighting Style between different setups to see which one I liked the best.

For my example, given the shape and angle of the text, Drama Top Right worked great.

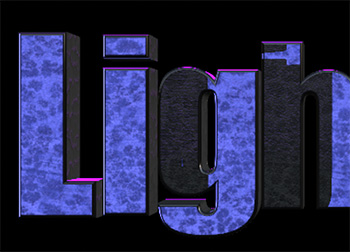
Finally, I selected each individual light in the Layers panel and changed color and intensity using Inspector > Light > Light Controls.

EXTRA CREDIT

Switching the light from Directional to Spot provides even greater control over fall-off and shading.

This is an effect you can play with forever, just like real lights, to get exactly the look you need.


Please rate the helpfulness of this tip.

Click on a star to rate it!

… for Apple Motion

Tip #794: The Texture Adjuster

Larry Jordan – LarryJordan.com

3D text provides a wealth of lighting, texture and format controls.

3D text, using the Drama Top Right light setup and customized texture.

Topic $TipTopic

Hidden at the bottom of the Material section for 3D text – below where you select surfaces – are additional controls that allow changing the texture of each surface.

These controls vary depending upon which surface is selected. For instance, with Plaster, you can adjust:

  • Color type
  • Paint color
  • Sheen (reflectivity)
  • Surface texture
  • Texture depth
  • Opacity
  • Placement

One of the benefits to working with 3D text is the vast amount of control we have over the texture and lighting of the text.

If you haven’t explored these options yet, when you do you’ll discover a whole lot more texture control than you ever expected.


Please rate the helpfulness of this tip.

Click on a star to rate it!

… for Apple Motion

Tip #795: Rotate Text in 3D

Larry Jordan – LarryJordan.com

3D Text can rotate and cast shadows on the text next to it.

3D Text with custom lighting, where each character is rotated invidually and casting shadows.

Topic $TipTopic

A hidden feature in Motion is the ability to rotate individual letters of 3D text. Here’s how.

We use Inspector > Properties to rotate the entire text element.

However, if you select the 3D text in the Layers panel, then go to Inspector > Text > Advanced and adjust Rotation, yo


Please rate the helpfulness of this tip.

Click on a star to rate it!

… for Apple Motion

Tip #795: Rotate Text in 3D

Larry Jordan – LarryJordan.com

3D Text can rotate and cast shadows on the text next to it.

3D Text with custom lighting, where each character is rotated invidually and casting shadows.

Topic $TipTopic

A hidden feature in Motion is the ability to rotate individual letters of 3D text. Here’s how.

We use Inspector > Properties to rotate the entire text element.

However, if you select the 3D text in the Layers panel, then go to Inspector > Text > Advanced and adjust Rotation, you can rotate each individual text character.

Not only does this give your text a different look, it also changes how it responds to different lighting based on direction. Plus, each letter can cast a shadow on the text next to it, adding depth and interest.

EXTRA CREDIT

To turn shadows off, select the text layer, then go to Inspector > Properties > Shadows and turn off Cast Shadows.


Please rate the helpfulness of this tip.

Click on a star to rate it!

… for Apple Motion

Tip #775: Examine and Alter Media Clip Properties

Larry Jordan – LarryJordan.com

Inspector > Media changes the character of the media itself.

The Inspector > Media pane for a selected clip in Apple Motion.

Topic $TipTopic

Have you ever selected a clip in Motion, then looked at the source media controls in the Inspector? Yeah, me neither. But there’s some cool stuff there. Take a look.

To show this pane:

  • Click Media in the Project pane.
  • Select the clip you want to review.
  • Open Inspector > Media (see screen shot).

This pane allows you to change:

  • Alpha (transparency)
  • Color space
  • Pixel aspect ratio
  • Field order (interlacing)
  • Frame rate
  • And more…

EXTRA CREDIT

Here’s an Apple Support page with more details.


Please rate the helpfulness of this tip.

Click on a star to rate it!

… for Apple Motion

Tip #776: Copy & Paste Into a Region in Motion

Larry Jordan – LarryJordan.com

We can select a region in the timeline, then copy and paste into it.

A region (lighter color) selected in the timeline.

Topic $TipTopic

In Motion, we can make changes to a range of frames, known as a region. For example, you can cut or copy a section of time to remove it from your project completely, or just move it to a new position in Timeline. Regions need not align with object edges in the Timeline—you can create a region that begins midway through an object.

You can also paste objects into a defined region using the Paste Special command, which lets you insert, overwrite, or exchange objects in the Timeline. Additionally, you select a region and insert blank frames, creating an empty placeholder for a clip you don’t yet have.

Here’s how to paste into a selected region:

  1. In Motion, select an object.
  2. Press Cmd + C to copy or Command-X to cut your selection.
  3. Press and hold the Command and Option keys, drag in the timeline ruler to select a region.
  4. Choose Edit > Paste Special.
  5. The Paste Special dialog appears.
  6. Select “Insert into time region” or “Overwrite into time region,” then click OK.

The Clipboard contents are pasted into the region using the method you specified.

NOTE: This requires selecting a region in the Timeline, not the mini-timeline.

EXTRA CREDIT

Here’s an Apple Support page with more options about working with regions.


Please rate the helpfulness of this tip.

Click on a star to rate it!

… for Apple Motion

Tip #777: Keyframes vs. Behaviors

Larry Jordan – LarryJordan.com

Use Keyframes for precise control over specific parameters.

Keyframes illustrated in the Motion Timeline.

Topic $TipTopic

When should you use keyframes instead of Behaviors? This Apple KnowledgeBase post has the answer.

As an alternative to animating with behaviors, you can animate most text parameters using keyframes. The text animation method you use (keyframing or behaviors) depends on your project, or more specifically, your timing needs:

  • Use keyframes if you need an action to happen at a specific point in time in your project. For example, if you want text to be completely transparent at frame 1, become completely opaque at frame 60, become transparent again at frame 90, and opaque again at frame 120, use keyframing. Keyframes apply specific values to an object’s parameters at specific frames.
  • Use behaviors if the timing of the animation doesn’t need to be precise. For example, if you want the text to be completely transparent at frame 1, become opaque over frames 60–90, and become transparent by frame 120, use the Fade In/Fade Out behavior. Behaviors generate a range of values that are applied to an object’s parameters.

You can combine keyframing and behaviors to animate any object in Motion. For example, if you keyframe text opacity, you can then apply the Tracking behavior to animate text tracking, or you can keyframe the Tracking parameter. However, if you keyframe the text Opacity parameter and then apply a Fade In/Fade Out behavior to the text, unexpected results may occur.


Please rate the helpfulness of this tip.

Click on a star to rate it!

… for Apple Motion

Tip #750: What Are Simulation Behaviors?

Larry Jordan – LarryJordan.com

Simulation behaviors are very simple ways to create complex motion.

The Simulation Behavior submenu in Apple Motion.

Topic $TipTopic

The following text is from the Apple Motion Help files.

Simulation behaviors perform one of two tasks. Some Simulation behaviors, such as Gravity, animate the parameters of an object in a way that simulates a real-world phenomenon. Other Simulation behaviors, such as Attractor and Repel, affect the parameters of objects surrounding the object to which they’re applied. These behaviors allow you to create sophisticated interactions among multiple objects in your project with minimal adjustments. Like the Basic Motion behaviors, Simulation behaviors also affect specific object parameters. Examples include Attractor, Gravity, and Repel.

Important: Several Simulation behavior parameters contain object wells into which you drag target objects used as attractors, repellers, orbiters, and so on. Dragging an object to a well can be tricky—be sure to drag the object name (or thumbnail) from the Layers list to the object well in the Inspector without releasing the mouse button until the pointer is over the object well. If you click the object in the Layers list and release the mouse button, that behavior object is deselected its parameters are no longer displayed in the Inspector. This applies to all object wells, including mask source wells and image wells.


Please rate the helpfulness of this tip.

Click on a star to rate it!

… for Apple Motion

Tip #751: 16 Simulation Behaviors & What They Do

Larry Jordan – LarryJordan.com

The easiest way to learn these is to play with them and see what they do.

The Simulation Behavior submenu in Apple Motion.

Topic $TipTopic

The following text is from the Apple Motion Help files.

There are 16 Simulation behaviors in Motion:

  • Align to Motion behavior changes the orientation of an object to match its direction along an animation path.
  • Attracted To behavior in Motion pulls an affected object toward a designated target.
  • Attractor behavior in Motion pulls objects toward the affected object.
  • Drag behavior in Motion simulates the force of friction on a moving object, slowing it down over time.
  • Drift Attracted To behavior in Motion pulls an affected object toward a designated target, then makes the object come to rest, rather than overshooting the target and bouncing around.
  • Drift Attractor behavior in Motion pulls other objects toward the affected object, then makes those objects come to rest, rather than overshooting the affected object and bouncing around.
  • Edge Collision behavior in Motion causes an object to collide with and bounce off the edges of the canvas frame.
  • Gravity behavior in Motion causes an object to fall over time.
  • Orbit Around behavior in Motion causes the affected object to circle around a designated target.
  • Random Motion behavior animates an object along a random path.
  • Repel behavior in Motion pushes objects away from the affected object.
  • Repel From behavior in Motion pushes the affected object away from a designated target.
  • Rotational Drag behavior in Motion simulates the force of friction on spinning objects.
  • Spring behavior in Motion causes the affected object to move back and forth around a designated target.
  • Vortex behavior in Motion causes objects to circle around the affected object.
  • Wind behavior in Motion “blows” an object in a specified direction.

Please rate the helpfulness of this tip.

Click on a star to rate it!

… for Apple Motion

Tip #752: 3 Highly-Intriguing Simulation Behaviors

Larry Jordan – LarryJordan.com

These behaviors have lots of uses – and are fun to play with.

Orbit Around and Align to Motion behaviors applied to the arrow.

Topic $TipTopic

Here are three behaviors that are fun to play with – and useful at the same time. (This text is from the Apple Motion Help files.)

  • Align to Motion. This changes the rotation of an object to match changes made to its direction along an animation path. This behavior is meant to be combined with Simulation behaviors that animate the position of an object or with a keyframed animation path you create yourself. Unlike the Snap Alignment to Motion behavior, which produces absolute changes in rotation that precisely match changes in direction, Align to Motion has a springy reaction and creates a more lively effect.

NOTE: The Align to Motion behavior does not work on objects animated using the Motion Path behavior. Instead, use the Snap Alignment to Motion behavior (in the Basic Motion subcategory).

  • Orbit Around. This causes the affected object to circle around a designated target. Similar to the Attracted To behavior, the Orbit Around behavior’s default parameter settings give the object sufficient initial velocity to orbit around another object in a perfect circle.
  • Repel. This pushes objects away from the affected object. If you apply the Repel behavior to an object, that object pushes away all other objects within the area of influence in the canvas. The strength with which objects are pushed away can be increased or decreased, as can the distance repelled objects travel. I find this simulation works really well flying an object through a field of particles, pushing the particles away from the object.

Please rate the helpfulness of this tip.

Click on a star to rate it!