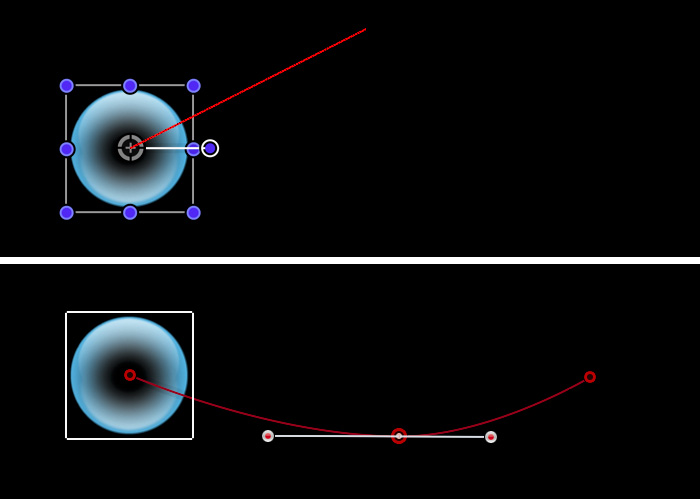
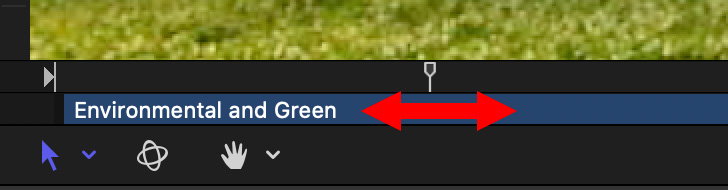
Throw is straight-line movement. Motion Path offers more complexity.
The Throw behavior, top, versus Motion Path, bottom.
Apple Motion has two behaviors that seem to do the same thing: Throw and Motion Path. What’s the difference?
The Throw behavior (Basic Motion > Throw) moves the selected object in a straight line, based upon settings in the HUD.
The Motion Path behavior (Basic Motion > Motion Path) provides a fixed starting point, a fixed ending point and the ability to add curves along the path.
NOTE: To add a curve to a Motion Path, double-click the red line, then adjust the two white curve controls.
As with all Motion effects, the speed of the effect is based upon its duration in the timeline (or mini-timeline).
Please rate the helpfulness of this tip.
Click on a star to rate it!
https://www.theinsidetips.com/wp-content/uploads/2019/09/Tips-Logo-700x150.jpg00Larry Jordanhttps://www.theinsidetips.com/wp-content/uploads/2019/09/Tips-Logo-700x150.jpgLarry Jordan2020-06-04 01:30:002020-05-29 17:19:10Tip #720: Motion Path vs. Throw
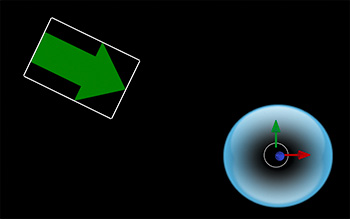
The Move behavior moves an element to or from a target.
The green arrow is moving toward the target, which was placed inside the blue ball.
The Move behavior (Basic Motion > Move) moves a selected element to or from a target. This is a really easy way to create directed movement. Here’s how it works.
The Move behavior provides more control than a Throw, but less than a Motion Path.
Select a layer in the Layers panel.
Choose Behavior > Basic Motion > Move
Position the playhead at the start of the effect
Drag the element to its starting position
Drag the target (white circle) where you want the element to move
When you play the project, the selected object (green arrow, in my example) moves in a straight line to or from the target.
NOTE: You can’t add curves to the Move behavior.
EXTRA CREDIT
Select the Move behavior. In the Inspector, you can change the direction of the movement (To or From), as well as the acceleration.
Please rate the helpfulness of this tip.
Click on a star to rate it!
https://www.theinsidetips.com/wp-content/uploads/2019/09/Tips-Logo-700x150.jpg00Larry Jordanhttps://www.theinsidetips.com/wp-content/uploads/2019/09/Tips-Logo-700x150.jpgLarry Jordan2020-06-04 01:30:002020-06-04 01:30:00Tip #722: Apple Motion: The Move Behavior
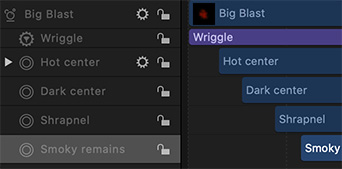
A particle system in the Apple Motion timeline, with elements offset.
This tip originally appeared as an Apple KnowledgeBase article. This is an excerpt.
When you create a particle system, its duration can be as long or short as necessary, regardless of the duration of the original source layers used to create the particle system. The duration of a particle system is defined by the duration of the emitter object. Changing the In or Out point of an emitter in the Properties Inspector, Timeline, or mini-Timeline changes the duration of the entire particle system.
By default, particles are generated by every cell in a system for the duration of the emitter. The duration of each generated particle is defined by the Life parameter of the cell that generated it, and not by the duration of the cell itself.
The duration of the cell governs the time span over which new particles are generated. You can change a cell’s duration by dragging its position or its In and Out points in the Timeline. In this way, you can adjust the timing that defines when each cell’s particles emerge.
For example, you can create a particle system that simulates an explosion by offsetting the appearance of different types of particles. First, dense white sparks emerge from the center. Half a second later, more diffuse orange blast particles appear around a larger area. One second after that, hot smoke emerges from underneath both of these layers, and smoky remains are left as the particles fade away.
You can offset a cell in the Timeline or mini-Timeline so that the cell starts before the emitter. This creates a “pre-roll” in which the particle simulation begins before the particles are drawn.
Please rate the helpfulness of this tip.
Click on a star to rate it!
https://www.theinsidetips.com/wp-content/uploads/2019/09/Tips-Logo-700x150.jpg00Larry Jordanhttps://www.theinsidetips.com/wp-content/uploads/2019/09/Tips-Logo-700x150.jpgLarry Jordan2020-05-28 01:30:002020-05-28 01:30:00Tip #717: Particle System Timing in Motion
Slipping adjusts content without affecting duration.
Press the Option key, while dragging in the mini-timeline, to slip a clip.
This tip originally appeared as an Apple KnowledgeBase article. This is an excerpt.
Slipping adjusts a clip so that, while the duration remains the same, the in and out points shift to different positions in the clip.
NOTE: You can’t slip a clip if it hasn’t been trimmed first. You need handles at each end to slip a clip.
The mini-Timeline lies just above the canvas toolbar and below the canvas, providing an at-a-glance look at where selected objects fit into your overall project. To slip a clip:
In Motion, select the clip you want to modify so that it appears in the mini-Timeline.
Position the pointer over the body of the clip in the mini-Timeline, then press and hold the Option key. The pointer changes to a slip pointer.
Continue to press and hold the Option key, drag left or right in the mini-Timeline to use a later or earlier part of the clip.
A tooltip appears, indicating the new In and Out points.
Please rate the helpfulness of this tip.
Click on a star to rate it!
https://www.theinsidetips.com/wp-content/uploads/2019/09/Tips-Logo-700x150.jpg00Larry Jordanhttps://www.theinsidetips.com/wp-content/uploads/2019/09/Tips-Logo-700x150.jpgLarry Jordan2020-05-28 01:30:002020-05-22 20:45:18Tip #718: Use Slip to Change Shot Content in Motion
Sequence Text animates font position, size, rotation, color, opacity and more.
Animated text.
This tip originally appeared as an Apple KnowledgeBase article. This is an excerpt.
You can build custom text sequence animations using the Sequence Text behavior (in the Text Animation category of behaviors in the Library). The Sequence Text behavior (not to be confused with the Text Sequence category of preset behaviors in the Library) lets you animate text attributes—scale, position, color, opacity, glow, and so on—in sequence, character by character. For example, you can create a sequence in which text characters fall vertically into place as they scale down, fade in, and rotate.
Because the Sequence Text behavior is not a preset, applying and activating it is a two-step process:
Step 1: Apply the Sequence Text behavior to a text layer in your project.
Step 2: In the Behaviors Inspector, assign the parameters you want to animate, then adjust controls to set the animation’s direction, speed, number of loops, and other qualities. (Optionally, you can assign the Position, Rotation, and Scale parameters by dragging onscreen controls in the canvas.)
EXTRA CREDIT
Using the Transform Glyph tool, you can modify individual text characters independently of the influence of the applied Sequence Text behavior.
https://www.theinsidetips.com/wp-content/uploads/2019/09/Tips-Logo-700x150.jpg00Larry Jordanhttps://www.theinsidetips.com/wp-content/uploads/2019/09/Tips-Logo-700x150.jpgLarry Jordan2020-05-28 01:30:002020-05-28 01:30:00Tip #719: Secrets of the Sequence Text Behavior
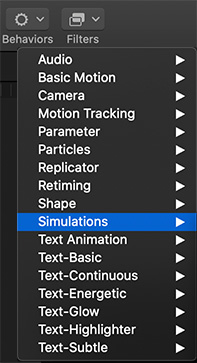
Keyframes are processed first, then simulations, then behaviors.
The Behavior menu in Apple Motion.
This tip originally appeared as an Apple KnowledgeBase article. This is an excerpt.
There’s no limit to the number of behaviors you can add to an object. Multiple behaviors applied to a single object work together to create a final animated effect. But, what happens when you have multiple behaviors, keyframes and simulations applied? Here’s how Motion handles this.
When combining different behavior types (such as Parameter and Simulation behaviors) or combining behaviors and keyframes, it’s important to understand the behaviors’ order of operations. Motion evaluates behaviors and keyframes in the following order:
Keyframes
Simulation behaviors
All other behaviors
Parameter behaviors are applied in the order in which they are added, from the bottom of the Layers list up (like the order of filters and the compositing order of image layers).
IMPORTANT: The order of operations is always in effect—regardless of the order in which behaviors are applied or keyframes are added to a layer or group.
When you animate an object with keyframes and then apply a behavior, the effect of the keyframes is evaluated first.
When you animate an object with any behavior and then add keyframes, the effect of the keyframes is evaluated first.
When you animate an object with a behavior and then apply a Simulation behavior, the Simulation behavior is evaluated before the first behavior (and therefore may have no effect).
NOTE: Although the Spin behavior appears in the Basic Motion category, Spin is treated as a Simulation behavior in the order of operations.
EXTRA CREDIT
The article, linked above, has more details and examples.
Please rate the helpfulness of this tip.
Click on a star to rate it!
https://www.theinsidetips.com/wp-content/uploads/2019/09/Tips-Logo-700x150.jpg00Larry Jordanhttps://www.theinsidetips.com/wp-content/uploads/2019/09/Tips-Logo-700x150.jpgLarry Jordan2020-05-21 01:30:002020-05-21 01:30:00Tip #683: How Motion Processes Behaviors and Keyframes
The 3D Transform tool is the fastest and easiest way to rotate an element in 3D.
The on-screen controls in the Viewer when 3D Transform is active.
The 3D Transform tool controls element position and rotation in 3D space.
To select it, either click the “World” icon in the tool bar, or type the shortcut Q. Dragging an arrow changes position, dragging a white circle changes rotation.
3D uses the mnemonic: RGB = XYZ. Arrows and circles are color-coded so you know when way an object will move:
Red. Horizontal movement and rotation on the X-axis.
Green. Vertical movement and rotation on the Y-axis.
Blue. Movement to or from the camera and rotation on the Z-axis.
You don’t need to switch a group into 3D space to take advantage of 3D perspective.
EXTRA CREDIT
When working with Z-space:
If the group is set for 2D, the stacking order in the Layers panel determines foreground and background.
If the group is set to 3D, an element’s position in Z space determines foreground and background.
Please rate the helpfulness of this tip.
Click on a star to rate it!
https://www.theinsidetips.com/wp-content/uploads/2019/09/Tips-Logo-700x150.jpg00Larry Jordanhttps://www.theinsidetips.com/wp-content/uploads/2019/09/Tips-Logo-700x150.jpgLarry Jordan2020-05-21 01:30:002020-05-15 16:21:45Tip #704: What Does 3D Transform Do?
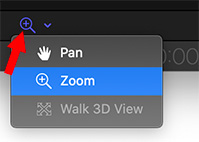
The fastest way to reposition the display is to press and drag with Pan or Zoom.
The Hand menu in Motion, has three different options: Pan, Zoom and Walk 3D View.
The Hand menu in Motion, has three different options: Pan, Zoom and Walk 3D View. Most of the time, we use the hand (Pan) tool. But, there’s a lot more you can do. Watch.
Pan. (Shortcut: H). This option moves the image in the Viewer horizontally or vertically. This only affects the display in the Viewer, no changes are made to the project.
Zoom. (Shortcut: Z). This option zooms in when clicking in the Viewer. Press Option and click to zoom out. Press, hold and drag the cursor to zoom in or out. This only affects the display in the Viewer, no changes are made to the project.
Walk 3D View. The Walk 3D View tool lets you position a camera in 3D space as you would in a computer game, using a keyboard-and-mouse navigation method.
MORE ON THE WALK 3D VIEW OPTION
The pointer changes to indicate that the Walk 3D View tool is active.
Use the Up Arrow, Down Arrow, Right Arrow, and Left Arrow keys to move the camera in 3D space; press and hold the Option key while using the arrow keys to move the camera more slowly.
You can also drag in the canvas to orient the camera.
If you’re using a scene camera, you can also record the movement you create using the Walk 3D View tool, by creating keyframes.
NOTE: The Walk 3D View tool is available only when Active Camera, Camera, or Perspective is selected from the Camera pop-up menu.
Please rate the helpfulness of this tip.
Click on a star to rate it!
https://www.theinsidetips.com/wp-content/uploads/2019/09/Tips-Logo-700x150.jpg00Larry Jordanhttps://www.theinsidetips.com/wp-content/uploads/2019/09/Tips-Logo-700x150.jpgLarry Jordan2020-05-21 01:30:002020-05-15 16:20:27Tip #705: 3 Functions of the Hand Tool
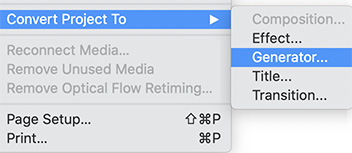
You can convert a Motion project for Final Cut at any time.
The File > Convert Project menu in Apple Motion.
Normally, you need to decide when you first create a Motion project whether you want to save it as a template for Final Cut Pro X. However, there’s a hidden menu that gives you other options.
The File > Convert Project To menu converts any Motion project into an FCP X effect, generator, title or transition – even after you’ve already created the project. The next time you save the project, even if you’ve already saved it, Motion displays a dialog where you can name the template and determine which effect category to store it in.
This means that if you find yourself with a project you really like, creating a template from it is easy.
Please rate the helpfulness of this tip.
Click on a star to rate it!
https://www.theinsidetips.com/wp-content/uploads/2019/09/Tips-Logo-700x150.jpg00Larry Jordanhttps://www.theinsidetips.com/wp-content/uploads/2019/09/Tips-Logo-700x150.jpgLarry Jordan2020-05-14 01:30:002020-05-14 01:30:00Tip #649: Convert a Motion Project for Final Cut
We may request cookies to be set on your device. We use cookies to let us know when you visit our websites, how you interact with us, to enrich your user experience, and to customize your relationship with our website.
Click on the different category headings to find out more. You can also change some of your preferences. Note that blocking some types of cookies may impact your experience on our websites and the services we are able to offer.
Essential Website Cookies
These cookies are strictly necessary to provide you with services available through our website and to use some of its features.
Because these cookies are strictly necessary to deliver the website, refuseing them will have impact how our site functions. You always can block or delete cookies by changing your browser settings and force blocking all cookies on this website. But this will always prompt you to accept/refuse cookies when revisiting our site.
We fully respect if you want to refuse cookies but to avoid asking you again and again kindly allow us to store a cookie for that. You are free to opt out any time or opt in for other cookies to get a better experience. If you refuse cookies we will remove all set cookies in our domain.
We provide you with a list of stored cookies on your computer in our domain so you can check what we stored. Due to security reasons we are not able to show or modify cookies from other domains. You can check these in your browser security settings.
Google Analytics Cookies
These cookies collect information that is used either in aggregate form to help us understand how our website is being used or how effective our marketing campaigns are, or to help us customize our website and application for you in order to enhance your experience.
If you do not want that we track your visit to our site you can disable tracking in your browser here:
Other external services
We also use different external services like Google Webfonts, Google Maps, and external Video providers. Since these providers may collect personal data like your IP address we allow you to block them here. Please be aware that this might heavily reduce the functionality and appearance of our site. Changes will take effect once you reload the page.
Google Webfont Settings:
Google Map Settings:
Google reCaptcha Settings:
Vimeo and Youtube video embeds:
Other cookies
The following cookies are also needed - You can choose if you want to allow them:
Privacy Policy
You can read about our cookies and privacy settings in detail on our Privacy Policy Page.