Formatting options for the Shape tool are limited compared to the Select tool.
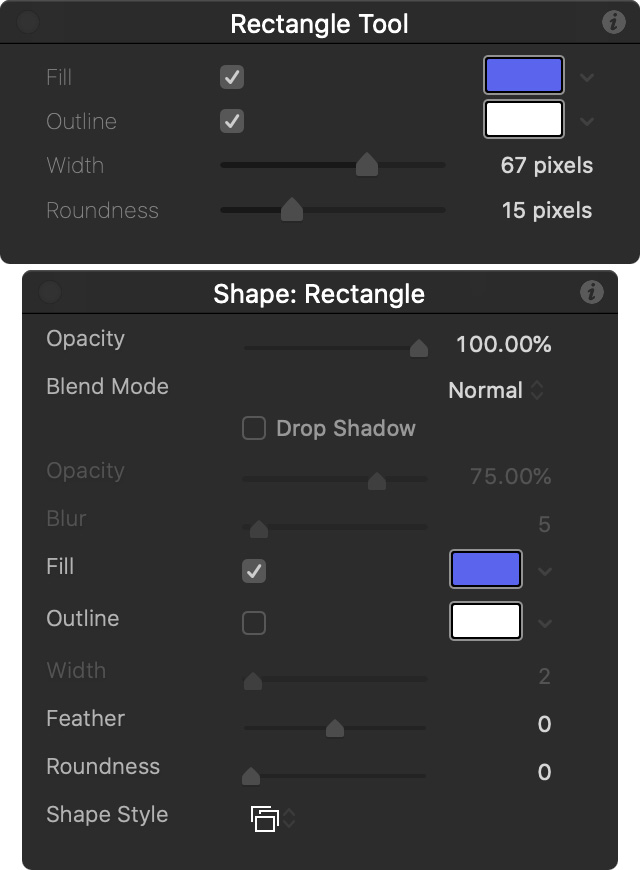
Top: Options for the Rectangle tool. Bottom: Options for the Arrow tool.
…to change an existing rectangle. Or any geometric shape.
The settings in the HUD for the rectangle tool only apply to the NEXT rectangle you draw. If you want to change an existing rectangle, first select the Select tool (Shortcut: Shift + S).
As the screen shot makes clear, the formatting options for the Rectangle tool are very limited. Especially when compared to after you draw the rectangle, then select the Select tool.
Please rate the helpfulness of this tip.
Click on a star to rate it!
https://www.theinsidetips.com/wp-content/uploads/2019/09/Tips-Logo-700x150.jpg00Larry Jordanhttps://www.theinsidetips.com/wp-content/uploads/2019/09/Tips-Logo-700x150.jpgLarry Jordan2020-08-06 01:30:002020-08-01 10:25:47Tip #896: Don’t Use the Rectangle Tool…
This article describes ways to continue production during lockdown.
“American Idol” got creative to finish its 18th season.
The folks at TV Technology released an article on “How Did the Lockdown Impact Video Production Workflows.” This is an excerpt.
Joseph Hopkins writes:
A number of major video productions have managed to continue successfully despite having their workflows disrupted by COVID-19 and the restrictions lockdown measures enforce. One of the main reasons some producers endure is because their teams have been able to adapt to working in the “new normal” by utilizing a combination of emerging technologies and time-tested IP transport solutions.
Yet, these are not simply band-aid solutions, but instead are examples of an acceleration in the evolution of production workflows taking place across the media and sports industries. This transition to IP infrastructure has exposed new capabilities not available through traditional satellite and is proving to be a framework on which to build solutions that will overcome the challenges facing the media industry today, and in the future.
https://www.theinsidetips.com/wp-content/uploads/2019/09/Tips-Logo-700x150.jpg00Larry Jordanhttps://www.theinsidetips.com/wp-content/uploads/2019/09/Tips-Logo-700x150.jpgLarry Jordan2020-07-24 01:30:002020-07-24 01:30:00Tip #862: How the Lockdown Affects Production
Producers do a bit of everything. Here are the details.
Saul Zaentz on set of The Mosquito Coast with Harrison Ford. Image via Warner Bros.
This article, written by Logan Baker, first appeared in PremiumBeat.com. This is an excerpt.
A film begins and ends with the producer. The producer is the catalyst for a project coming together, its complete production cycle, and its eventual release, marketing, and distribution. A good producer will cultivate a kernel of an idea into something significant, tangible, and bright on screen. So, with all that being said, on a day-to-day level, starting from story inception to hitting the silver screen — what does a producer actually do? Let’s take a look.
Here are the steps:
Find the literary property
Shape the idea into a viable film
Raise the money
Hire the director
Choose the cast
Oversee production
Oversee post
Mastermind the marketing
Negotiate worldwide rights
So, when all is said and done — what does a producer do? Well, a little bit of everything. They’re absolutely essential for a production to get off the ground running, as smoothly as possible. See, there’s a reason producers receive the Oscar for Best Picture.
Here’s a link to an interview in Time, with Saul Zaentz, who details the process.
Please rate the helpfulness of this tip.
Click on a star to rate it!
https://www.theinsidetips.com/wp-content/uploads/2019/09/Tips-Logo-700x150.jpg00Larry Jordanhttps://www.theinsidetips.com/wp-content/uploads/2019/09/Tips-Logo-700x150.jpgLarry Jordan2020-07-17 01:30:002020-07-17 01:30:00Tip #844: What Does a Film Producer Do?
This article, written by Jourdan Aldredge, first appeared in PremiumBeat.com. This is an excerpt.
Knowing how to quickly and safely solve problems on set can save an entire production. Here are the critical areas to focus on. This article provides videos and links to handling problems.
Let’s face it, when working in film and video production, there are going to be problems that pop up on even the most tightly-run sets. It just comes with the territory. That’s why it’s critical for any filmmaker, director, or producer to plan well, schedule accordingly, take real measures up front to address all potential safety concerns, and, you know, still expect the unexpected.
Here’s what Jourdan covers:
Serious Emergencies
Safety Measures for Stunts
Schedules and Delays
Locations and Weather
See a Problem, Report a Problem
The article linked above also includes links to five other articles covering film and video production.
Consolidate either moves or copies all library media into one place.
Control-click a Library name to reveal this option.
A hidden feature for any library in Apple Final Cut Pro is: “Consolidate Media Content.” You only see this option when Control-clicking the library name in the library sidebar (to the left of the browser). Here’s what it does.
If you, like me, tend to store media separately from the library when you are editing, you can end up with files scattered across your storage.
According to Apple’s Help files:
The Consolidate command places the files in the current library storage location. You view and set storage locations for media, Motion content, cache files, and library backup files using the File > Library Properties inspector.
The Consolidate command follows these rules:
When you consolidate files out of a library to an external folder, the files are moved.
When you consolidate files into a library from an external folder, or from an external folder to another external folder, the files are copied.
These rules prevent broken links from other libraries.
NOTE: If the media is already external, and no other libraries are using it, you can manually delete the original media after consolidating to save storage space.
Please rate the helpfulness of this tip.
Click on a star to rate it!
https://www.theinsidetips.com/wp-content/uploads/2019/09/Tips-Logo-700x150.jpg00Larry Jordanhttps://www.theinsidetips.com/wp-content/uploads/2019/09/Tips-Logo-700x150.jpgLarry Jordan2020-07-06 01:30:002020-07-06 01:30:00Tip #817: Here’s How to Consolidate Your Media
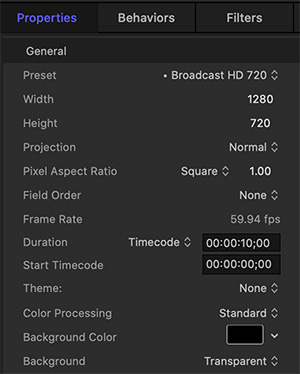
Every project setting can be adjusted after you start, except for frame rate.
The Project Properties pane in Apple Motion. Frame rate can only be adjusted for empty projects.
Once you’ve created a Motion project, you can always go back and adjust its basic settings. Except… Well, let me illustrate.
Select the Project in the Layers panel.
Then, go to Inspector > Properties.
This is where you can change frame size, duration, and other settings.
NOTE: Keep in mind that you can only change frame rate in an empty project. Once even one element is added, frame rate is locked.
EXTRA CREDIT
Changing the duration does not extend or contract the timing of any elements. This is a good reason to set the duration before you start creating a project.
Also, when you change the duration, Motion sets an In and Out to match the duration of the original project. This means that you will need to remove these marks, as well as manually adjust the timing of any clips that need to extend beyond the original duration.
Creating the perfect key starts in production; not post.
Screen shot from the BorisFX Guide to Green-Screen Keys
The folks at BorisFX (Continuum, Mocha Pro and Sapphire) have published a guide covering production techniques that improve green-screen key results.
It starts:
Think of all the top movies from the past decade. What do they all have in common? Epic worlds that are so stunningly realistic you feel like you are really there. These films are created in no small part thanks to the power of the chroma key and a visual effect artist’s ability to “pull a perfect key,” i.e. removing a subject from green or blue screen footage.
In this guide, you’ll get a brief history of the chroma key, how to prepare your green screen set to avoid common shooting pitfalls, a glossary of terms, and discover why Primatte technology delivers the best solution to accomplish seamless composites fast whether a subject is placed over live-action or a CG background.
Safari Technology Preview provides an early look at “what’s coming.”
The Safari Technology Preview logo.
Apple’s Safari Technology Preview provides an early look at upcoming web technologies in macOS and iOS. It showcases the latest layout technologies, visual effects, developer tools, and more, so users can provide input on how they are implemented.
Designed more for web developers than end users, this free software:
Previews the latest web technologies. Get a preview of the latest advances in Safari web technologies, including HTML, JavaScript, and CSS.
Easy to update. You can update Safari Technology Preview right from the Mac App Store. Updates occur every few weeks.
Access powerful developer tools. Use the latest version of the powerful Web Inspector and Responsive Design Mode to modify, debug, and optimize your websites.
Provide feedback. Use Feedback Assistant to send feedback directly to Apple about issues and enhancement requests. Simply select Report an Issue from the Help menu in Safari Technology Preview.
Run side-by-side with Safari. Safari Technology Preview is a standalone app that works side-by-side with the current version of Safari, so you can continue to use and reference the current release.
Surf seamlessly with iCloud. Safari Technology Preview works with iCloud, so you can access your latest Safari Favorites, bookmarks, and Reading List.
Here’s the link to learn more and download the latest version, or beta copies of upcoming versions.
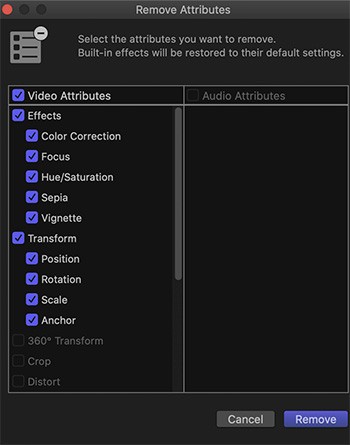
Remove Effects is faster, Remove Attributes provides more control.
The Remove Attributes window. Blue checkboxes indicate applied effects or changed effect settings.
In the Edit menu for Final Cut Pro X are two options, both of which relate to removing effects. The key question is: what’s the difference?
Remove Attributes
Remove Effects
Here’s the difference:
When you select Edit > Remove Effects, all effects settings applied to all selected clips are instantly removed. This is the fastest way to reset one or more clips to its default (native) settings.
When you select Edit > Remove Attributes (screen shot), you are presented with a screen where you can select which effects you want to keep or remove from all the selected clips.
Remove Effects is the fastest way to totally reset a clip. Remove Attributes gives you more control over what is actually reset.
NOTE: It is important to note that both of these menu options can apply to one or more clips. Simply the select the clips you want to reset before choosing one of these two menues.
Use Keyframes for precise control over specific parameters.
Keyframes illustrated in the Motion Timeline.
When should you use keyframes instead of Behaviors? This Apple KnowledgeBase post has the answer.
As an alternative to animating with behaviors, you can animate most text parameters using keyframes. The text animation method you use (keyframing or behaviors) depends on your project, or more specifically, your timing needs:
Use keyframes if you need an action to happen at a specific point in time in your project. For example, if you want text to be completely transparent at frame 1, become completely opaque at frame 60, become transparent again at frame 90, and opaque again at frame 120, use keyframing. Keyframes apply specific values to an object’s parameters at specific frames.
Use behaviors if the timing of the animation doesn’t need to be precise. For example, if you want the text to be completely transparent at frame 1, become opaque over frames 60–90, and become transparent by frame 120, use the Fade In/Fade Out behavior. Behaviors generate a range of values that are applied to an object’s parameters.
You can combine keyframing and behaviors to animate any object in Motion. For example, if you keyframe text opacity, you can then apply the Tracking behavior to animate text tracking, or you can keyframe the Tracking parameter. However, if you keyframe the text Opacity parameter and then apply a Fade In/Fade Out behavior to the text, unexpected results may occur.
Please rate the helpfulness of this tip.
Click on a star to rate it!
https://www.theinsidetips.com/wp-content/uploads/2019/09/Tips-Logo-700x150.jpg00Larry Jordanhttps://www.theinsidetips.com/wp-content/uploads/2019/09/Tips-Logo-700x150.jpgLarry Jordan2020-06-18 01:30:002020-06-18 01:30:00Tip #777: Keyframes vs. Behaviors
We may request cookies to be set on your device. We use cookies to let us know when you visit our websites, how you interact with us, to enrich your user experience, and to customize your relationship with our website.
Click on the different category headings to find out more. You can also change some of your preferences. Note that blocking some types of cookies may impact your experience on our websites and the services we are able to offer.
Essential Website Cookies
These cookies are strictly necessary to provide you with services available through our website and to use some of its features.
Because these cookies are strictly necessary to deliver the website, refuseing them will have impact how our site functions. You always can block or delete cookies by changing your browser settings and force blocking all cookies on this website. But this will always prompt you to accept/refuse cookies when revisiting our site.
We fully respect if you want to refuse cookies but to avoid asking you again and again kindly allow us to store a cookie for that. You are free to opt out any time or opt in for other cookies to get a better experience. If you refuse cookies we will remove all set cookies in our domain.
We provide you with a list of stored cookies on your computer in our domain so you can check what we stored. Due to security reasons we are not able to show or modify cookies from other domains. You can check these in your browser security settings.
Google Analytics Cookies
These cookies collect information that is used either in aggregate form to help us understand how our website is being used or how effective our marketing campaigns are, or to help us customize our website and application for you in order to enhance your experience.
If you do not want that we track your visit to our site you can disable tracking in your browser here:
Other external services
We also use different external services like Google Webfonts, Google Maps, and external Video providers. Since these providers may collect personal data like your IP address we allow you to block them here. Please be aware that this might heavily reduce the functionality and appearance of our site. Changes will take effect once you reload the page.
Google Webfont Settings:
Google Map Settings:
Google reCaptcha Settings:
Vimeo and Youtube video embeds:
Other cookies
The following cookies are also needed - You can choose if you want to allow them:
Privacy Policy
You can read about our cookies and privacy settings in detail on our Privacy Policy Page.