… for Adobe Premiere Pro CC

Tip #417: How Do Color Wheels Work?

Larry Jordan – LarryJordan.com

Color wheels combine precision with ease-of-use.

The Midtones color wheel in Adobe Premiere Pro CC.

Topic $TipTopic

I much prefer modifying colors using color wheels than curves. Partly, I think, this is due to long years working with Vectorscopes in video.

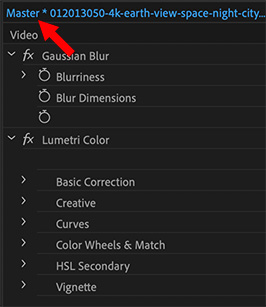
In Premiere, when you switch to the Lumetri Color panel in the Color workspace, one of the options is Color Wheels & Match.

Color wheels adjust all three color elements of a pixel: gray-scale, hue and saturation. Each wheel affects one-third of the image: shadows, mid-tones and highlights separately. This gives us a lot of control over different elements of the image.

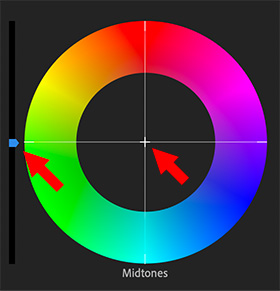
The slider on the left alters gray-scale; up makes things brighter. The center cross-hair simultaneously alters hue and saturation. Grab the cross-hair and drag it toward the color you want to add. The farther you drag it from the center, the greater the saturation.

The color wheel has a black center when no changes have been made and a solid center when a color adjustment is in place.


Please rate the helpfulness of this tip.

Click on a star to rate it!

… for Visual Effects

Tip #459: Improve Your Visuals with Pre-Viz

Larry Jordan – LarryJordan.com

The more you think about your shots before you start production, the better your production will be.

Original concept art for “2001: A Space Odyssey;” courtesy of Dr. Robert McCall.

Topic $TipTopic

This article first appeared in RocketStock.com. This is an excerpt.

Pre-visualization is critical for any visual project. The script is your foundation, while the art for pre-production is the frame that rests upon that foundation. Previsualization, or Previs, is a process of visualizing the scenes of a film before production even begins.

Concept art enables the producer and director to think about the look of a scene, as well as use it early in pre-production as an asset for the pitch, which is the process of selling your idea to a production company.

Concept art is the overall look and feel. Storyboards provide a shot-by-shot breakdown. The great thing about storyboards is that you don’t have to be a master artist to create them. In fact, all you really need is enough visual information that makes sense to you as a director. There is a great interview from AFI with Steven Spielberg where he talks about the importance of storyboarding. He also discusses how he begins the process by using stick figures and cues and then gives this rough draft to his sketch artist, George Jensen, who fleshes out the final storyboards.

When developing concept art and storyboards, you aren’t just developing them for the director and production crew. You’re also developing them for the VFX team that will work to make things happen in post. In order to make sure you film everything correctly during production, sometimes you have to take those concepts or storyboards and run tests to see if it will all work.

The article in RocketStock is filled with examples and film excerpts. It is worth reading.


Please rate the helpfulness of this tip.

Click on a star to rate it!

… for Adobe Premiere Pro CC

Tip #389: Two Fast Ways to Configure a Sequence

Larry Jordan – LarryJordan.com

While you can customize your settings, these tips are faster.

The Change Sequence Settings dialog in Adobe Premiere Pro CC.

Topic $TipTopic

Premiere’s Sequence Settings panel is daunting. Even experienced editors scratch their heads over some of these options.

Fortunately, Premiere has two fast ways to configure a sequence – provided you have a clip that’s in the format you want to edit.

OPTION 1

Drag a clip from the Project panel on top of the New Item icon in the low right corner of the Project panel. This creates a new sequence, configures it to match the clip and edits the clip into the start of the sequence.

OPTION 2

Create a new sequence using any setting option. Then, DRAG a clip from the Project panel into the new sequence.

A dialog appears asking if you want to change the sequence to match the clip.

NOTE: If you use a keyboard shortcut to edit a clip into the sequence, the clip will match the sequence settings.

EXTRA CREDIT

Once a sequence has a clip in it, many of the Sequence settings can’t be changed.

For those situations where the first clip you want in your project does not match the sequence you want to create, edit a clip that does match into the sequence first. After you add a few more clips, which locks the settings, you can delete the first clip.

These two tricks are far faster than wrestling with the sequence settings themselves.


Please rate the helpfulness of this tip.

Click on a star to rate it!

… for Random Weirdness

Tip #442: Find the Funny

Larry Jordan – LarryJordan.com

Funny takes work.

(Image courtesy of Pexels.com.)

Topic $TipTopic

This article, written by Jourdan Aldredge, first appeared in PremiumBeat.com. This is an excerpt.

The art of the comedy short film is actually nothing new, and can be traced back to the earliest days of film and cinema with the works of Buster Keaton and Charlie Chaplin. Here are some tips to finding the funny and creating quality comedy shorts and videos.

The initial planning helps set the tone. The goal is to explore ideas. You can do free association with just yourself and a piece of paper. Ideally, once you’ve “found the funny,” you can start putting those ideas to paper by planning your outline, script, and shots.

A good way to work is to cover your bases and make sure you have every shot you’d need to put together an edit. Then, once the rigid work is done, loosen things up and do as many takes as you can stand.

Another simple trick that can help out in the edit is to shoot several reaction shots. Comedy very much lives in faces.

When is comes to editing, comedy lends itself to quick cuts, especially to reactions.


Please rate the helpfulness of this tip.

Click on a star to rate it!

… for Random Weirdness

Tip #423: 7 Reasons to Add Narration

Larry Jordan – LarryJordan.com

Narration adds power, speeds action and consolidates back-story.

Narration adds power, speeds action and consolidates back-story. (Image courtesy of pexels.com.)

Topic $TipTopic

This article, written by Jourdan Aldredge, first appeared in PremiumBeat. This is an excerpt.

For filmmakers, narration is truly a powerful tool — voice-over narration helps us understand what we’re seeing. Regardless of where you are in production, here are seven reasons you should consider using voice-over narration in your project.

  • Beef Up Your Narrative. Adding narration can be a great way to beef up your narrative to turn a section from a weakness into a strength.
  • Accelerate Exposition. Set things up much more quickly than otherwise possible.
  • Add Depth to a Character.
  • Lay Out the Broad Strokes. Especially with sequels, this helps jump start the action by quickly filling in the back-story.
  • Make Your Film More Active.
  • Add Humor to Your Scenes. Similar to making films more active, adding voice-over narration can also add more humor to your scenes.
  • Raise Issues of Reliability. If you are looking to add narration to your project, it’s also worth considering making it less than reliable. An unreliable narrator can cause a very drastic thematic response when the truth is revealed to the audience.

Please rate the helpfulness of this tip.

Click on a star to rate it!

… for Apple Motion

Tip #433: Why Display Alpha Channels

The alpha channel displays the transparency in a clip.

The top image is in color, the lower image shows its transparency.

Topic $TipTopic

One of the options in the top right corner of the Motion Viewer is the ability to display the alpha channel of the current project. (You’ll find it in the menu under the color square.) But, why would you need this?

The alpha channel, like the red, blue and green channels, displays the amount of transparency associated with each pixel. For instance, in this screen shot, does the gradient in the top, color, image fade to black or transparent? It’s impossible to tell.

However, when you look at the bottom image, which displays transparency, it is easy to see that the image fades from solid black (transparent) to solid white (opaque). (Shades of gray represent differing amounts of translucency.)

Remember, the alpha channel doesn’t show color, it shows transparency.


Please rate the helpfulness of this tip.

Click on a star to rate it!

… for Visual Effects

Tip #403: Blue or Green: Which Keys Better?

Larry Jordan – LarryJordan.com

Green and blue background yield different results.

Typical green-screen background and lighting.

Topic $TipTopic

This article, written by Charles Yeager, first appeared in PremiumBeat.com. This is an excerpt.

Chroma key compositing is the actual technique of layering two images together based on color hues. The solid color background essentially acts like a matte for your footage. Later, in post-production, you can remove the solid color background to make it transparent, allowing for compositing.

We use green and blue backgrounds because they are the furthest colors from human skin tones. But the two colors don’t give the same results. In an EXCELLENT article, Charles Yeager explains when to use green and when to use blue backgrounds. Here are the highlights:

Green Screens Pros:

  • Results in a cleaner key because digital cameras pick up more information
  • Requires less lighting
  • High luminance is good for daytime scenes
  • Uncommon color in clothing

Green Screen Cons:

  • Color spill can be too heavy, especially on fine details and edges (or blonde hair)
  • High luminance is not great for dark or night scenes

Blue Screen Pros:

  • Less color spill is great for subjects with fine details and edges
  • Lower luminance is good for dark or night scenes

Blue Screen Cons:

  • Requires more lighting, which can be expensive
  • Common clothing color, making it difficult to key in post

Please rate the helpfulness of this tip.

Click on a star to rate it!

… for Adobe Premiere Pro CC

Tip #295: Save Time – Use Master Effects

Larry Jordan – LarryJordan.com

Master effects apply to all related clips in the Timeline.

Effects applied to clips in the Project panel, also apply to segments of that clip edited into the Timeline.

Topic $TipTopic

This article first appeared in MotionArray.com. This is an excerpt. You’ve edited a flock of clips into your sequence in the Timeline – only to discover that all the segments from Clip #23 are a bit too blue; or need some other effect applied to all of them.

Fixing all these clips at once is what master effects are designed to do. A Master clip is a clip in the Project panel, from which you edited clips into the sequence in the Timeline. Apply a change to the Master clip, and all clips derived from it change as well.

  • Drag the Effects panel somewhere else in the interface so that you can see both the Projects panel and the Effects panel.
  • Apply an effect to a master clip by dragging the effect from the Effects panel on top of the clip in the Project panel, Source Monitor, or Effect Controls panel.
  • To apply an effect to multiple master clips, select the items in the Project panel, and then drag the effect on top of the selected clips.
  • Double-click the Master clip to load it into the Effect Controls panel.
  • Adjust the effect parameters using the Effect Controls panel.
  • All the effects applied to the master clip instantly ripple through all portions of the master clip edited into sequences.

  • Please rate the helpfulness of this tip.

    Click on a star to rate it!

    … for Codecs & Media

    Tip #416: Closed Caption Formats for Social Media

    Larry Jordan – LarryJordan.com

    As you might expect, there’s no one subtitle format that works everywhere.

    Topic $TipTopic

    Erin Myers, at Rev.com, summarized the closed caption formats used by social media. Here’s her article. This is an excerpt.

    Closed caption file formats vary depending on which site you’re using to host your videos and which platform you use to obtain the closed caption transcripts.

    Adobe Premiere supports:

    • Scenarist (.scc)
    • MacCaption (.mcc)
    • XML (.xml)
    • Spruce Subtitle File (.STL).

    Apple Final Cut Pro X supports:

    • iTunes Timed Text (.iTT)
    • SubRip (.srt)
    • SCC (CEA-608 format)

    YouTube recommends Scenarist (.scc) format. But is compatible with:

    • SubRip (.srt)
    • WebVTT (.vtt)
    • DFXP/TTML (.dxfp)
    • Scenarist (.scc)
    • SAMI (.sami)

    Vimeo recommends WebVTT (.vtt) but is compatible with:

    • SubRip (.srt)
    • DXFP/TTML (.dxfp)
    • Scenarist (.scc)
    • SAMI (.SAMI)

    Facebook recommends the SubRip (.srt) format.

    Netflix has two recommended formats. The EMA Closed Captions Working Group has identified Scenarist (.scc) as a preferred format due to its status as the de facto standard for CEA-608 and CEA-708 data.  SMPTE-TT is also recommended as, under the applicable laws, it is considered safe if captions are compliant. It is also compatible with:

    • SubRip (.srt)
    • Scenarist (.scc)
    • Timed Text (.ttml)
    • DXFP (.dxfp)
    • WebVTT (.vtt)
    • Cheetah CAP (.cap)
    • MacCaption (.mcc)
    • Quicktime Subtitle (.qt.txt)
    • Spruce Subtitle File (.stl).
    • XML (.xml)

    Amazon Video Direct requires closed captions on all new videos uploaded to the service, but has not recommended a favorite. It supports:

    • Scenarist (.scc)
    • SMPTE-TT (.xml)
    • EBU-TT (.xml)
    • DFXP Full/TTML (.dfxp)
    • iTunes Timed Text (.iTT)

    iTunes asks for a Scenarist-formatted file (with an .scc extension), or a QuickTime file with a closed captioning track. Compatible formats:

    • Scenarist (.scc)
    • DFXP Full/TTML (.dfxp)
    • iTunes Timed Text (.iTT)

    Please rate the helpfulness of this tip.

    Click on a star to rate it!

    … for Apple Motion

    Tip #387: Motion Tracking Strategies

    Larry Jordan – LarryJordan.com

    These tips from Apple can help improve your motion tracking.

    Image courtesy of 2ReelGuys.com.

    Topic $TipTopic

    This is an excerpt from the Apple Motion User Guide. Motion tracking in Apple Motion isn’t always perfect. Here are some tips that can improve the quality of your tracks.

    Find a Good Reference Pattern

    In Motion, play the footage several times to locate a reference pattern that satisfies as many of the following rules as possible:

    • Contains perpendicular edges, such as dots, intersections, and corners. (Lines and straight boundaries should be avoided.)
    • Is a high-contrast pattern.
    • Contains smooth or even changes in brightness or color. An example of an uneven color or brightness change is a sharp-edged shadow that passes over your reference pattern.
    • Appears in every frame of the clip (does not move offscreen or become obscured by other objects).
    • Is distinct from other patterns in the same region in the clip.

    Ask Motion for a Hint

    You can have Motion display suggested tracking points. You need at least one tracker in the Canvas to display suggested tracking reference points.

    • In Motion, press and hold the Option key, place the pointer over a tracker in the canvas, then press and hold the mouse button.
      The suggested reference points appear in the canvas and in the magnified inset as small red crosshairs.
    • When you move a tracker toward a suggested point, the tracker snaps to the point. The suggested points are not necessarily ideal tracking reference points for the feature you want to track in the clip. Motion merely picks locations in the current frame that meet the reference pattern criteria, such as an area of high contrast.

    Other tips include:

    • Manually modify track points
    • Delete bad keyframes in the Keyframe Editor
    • Delete bad track points in the Canvas

    Please rate the helpfulness of this tip.

    Click on a star to rate it!