… for Apple Final Cut Pro X

Tip #1149: Audio Effects Stacking Order is Important

Larry Jordan – LarryJordan.com

Audio effects process from top to bottom in Final Cut Pro X

Audio effects (just like video effects) process from top to bottom in the Inspector.

Topic $TipTopic

When adding effects to audio clips in Final Cut Pro X (or Motion), the order in which those effects are applied makes a difference. Here’s what you need to know.

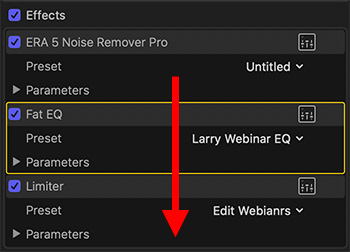
Audio effects are processed from the top of the Inspector to the bottom. (See screen shot.)

The first effect to apply – if you need it – is noise reduction. Get rid of what you don’t want before you start shaping the sounds you do. Remember, your goal is to reduce noise, not eliminate it. If you want it gone, re-record in a studio.

NOTE: Noise reduction can often degrade the spoken voice. By processing noise first, you can then use effects farther down the “stack” to try to replace what noise reduction took away. This is why we reduce, not remove, noise.

Next, add any EQ or special effects you need to shape the sounds the way you want. You can add any reasonable number of filters here. You can always change the stacking order by dragging the name of the clip up or down.

Finally, at the bottom and ALWAYS last, apply either a compression or limiter filter. This makes sure that audio levels don’t exceed the level you specify. In Final Cut, I prefer to use Audio > Levels > Logic > Limiter.

NOTE: I should also mention that you don’t apply both a compression filter AND a limiter filter to the same track. Pick one or the other.


Please rate the helpfulness of this tip.

Click on a star to rate it!

… for Apple Final Cut Pro X

Tip #1172: Apple Updates Final Cut Pro X, et al.

Larry Jordan – LarryJordan.com

New versions are mostly bug fixes, with support for Big Sur and Apple silicon.

Spiffy new logos for Motion (top), Final Cut (right) and Compressor (bottom).

Topic $TipTopic

On Thursday, Nov. 12, Apple updated their suite of video applications to support improved performance and efficiency on Mac computers with Apple silicon, as well as support for Big Sur.

At the same time, all three applications sport new icons, illustrated in the screen shot.

NOTE: The new versions of Final Cut, Motion & Compressor can be installed on systems running either Big Sur or Catalina. GarageBand was also updated, but requires Big Sur for installation.

FINAL CUT PRO X (v.10.5)

In addition to support for Apple silicon, the latest version of Final Cut Pro 10.5 also enables users to:

  • Accelerate machine learning analysis for Smart Conform using the Apple Neural Engine on Mac computers with Apple silicon
  • Create a copy of your library and automatically transcode media to ProRes Proxy or H.264 at various resolutions to reduce file sizes and speed up editing.

This update to Final Cut Pro X also includes:

  • Export HLG high-dynamic-range projects with Dolby Vision 8.4 metadata for optimized playback on Apple devices.
  • Fixes an issue in which LUTs were not available in optimized or proxy clips.
  • Improves appearance of HDR thumbnails in the browser and timeline.
  • Improves reliability when previewing built-in sound effects in the browser.
  • Fixes an issue in which audio waveforms would not update in the inspector after adding a filter or making a volume change.
  • Fixes an issue in which chapter markers were not available when sharing.
  • Improves reliability when creating proxy media from non-square pixel interlaced clips.
  • Improves stability when applying stabilization and color balance during import.
  • Fixes an issue in which audio sync could drift when retiming clips.
  • Improves reliability with Social Media content positioning when using Smart Conform to switch between vertical and horizontal frame sizes.
  • Improves reliability when using onscreen Crop controls in the viewer.
  • Fixes an issue in which copying stills between libraries would result in duplicate files.
  • Includes built-in support for Avid DNxHR® and Avid DNxHD® decoding and playback.

NOTE: Here’s a link to the Final Cut Pro X Release Notes from Apple.

MOTION (v.5.5)

In addition to support for Apple silicon, the Motion 5.5 update includes:

  • Export HLG high-dynamic-range projects with Dolby Vision 8.4 metadata for optimized playback on Apple devices.
  • Improves stability when clicking in an empty canvas on on a Mac Pro with two AMD Radeon Pro Vega II Duo GPUs and a Blackmagic eGPU Pro.
  • Improves stability when manipulating groups of keyframes selected across multiple parameters.
  • Improves stability using the Stroke filter when selecting a stroke type in the HUD.
  • Fixes an issue in which the Poke filter center is offset from the onscreen control.
  • Improves stability when deleting layers after removing a marker.
  • Includes built-in support for Avid DNxHR® and Avid DNxHD® decoding and playback.

NOTE: Here’s a link to the Motion Release Notes from Apple.

COMPRESSOR (v. 4.5)

In addition to support for Apple silicon, the Compressor 4.5 update includes:

  • Export HLG high-dynamic-range projects with Dolby Vision 8.4 metadata for optimized playback on Apple devices.
  • Fixes an issue where audio sync could drift when changing the frame rate of a clip.
  • Fixes an issue where creating a BluRay disc from a DV-PAL source would fail.
  • Includes built-in support for Avid DNxHR® and Avid DNxHD® decoding and playback.

NOTE: Here is a link to the Compressor Release Notes from Apple.


Please rate the helpfulness of this tip.

Click on a star to rate it!

… for Random Weirdness

Tip #1100: What is a Showrunner?

Larry Jordan – LarryJordan.com

The showrunner is the lead producer of a show from concept to marketing.

(Image courtesy of Vince Gilligan.)

Topic $TipTopic

This article, written by Jourdan Aldredge, first appeared in PremiumBeat.com. This is a summary.

Take a look at the day-to-day of the all-important television or streaming program showrunner. What can you can learn from this multifaceted role? The show-runner is the lead producer on a film or video project who oversees every element of the project’s creation, from the initial pitch to the final edits and marketing.

Jourdan divides the roles of a showrunner into five categories — development, pre-production, production, post-production, and marketing. Let’s take a look at each.

  • Development: While not always the case, more often than not a showrunner is the one who comes up with the initial idea or inspiration for a program and begins the process of pitching it around and fleshing it out. Whether it’s to Hollywood producers, studio heads, or local television, the showrunner spends months — if not years — in development just trying to get the concept green-lit.
  • Pre-Production: Once the project is tapped to move forward, the showrunner begins to put together a core crew — including writers, director(s), cast and crew, and a group of fellow producers that will oversee everything from budgets to contracts to scripts and shooting schedules.
  • Production: Again, not every showrunner’s role will be the same. Some might be more hands off on the actual production, but there are plenty of examples of showrunners who also serve as directors or remain close to the day to day of production. With so much invested already, a showrunner makes sure production goes as smoothly — and correctly — as possible.
  • Post-Production: Depending on how a program is being shot and released, the post-production process could overlap with production. This requires a steady hand, as the showrunner guides individual episodes along toward broadcast/release while still keeping an eye on the rest of the season. Additionally, a showrunner’s post-production duties involve managing specialists like narrative editors and color experts while keeping tabs on things like sound design and graphics/VFX.
  • Marketing: Finally, the role of a showrunner doesn’t end once a program goes live. Instead, it takes on a new life of its own, as a showrunner would be highly invested in making sure the program is favorably reviewed and heavily marketed in order to finds its audience. From viral campaigns to television spots, a showrunner would work with their marketing team to do everything they can to help their show take off.

EXTRA CREDIT

The article, linked above has several videos with showrunners talking about their work, as well as a variety of links that go deeper into this subject.


Please rate the helpfulness of this tip.

Click on a star to rate it!

… for Random Weirdness

Tip #1064: MotionArray Announces Team Plans

Larry Jordan – LarryJordan.com

MotionArray bundles all their services and prices it for team use.

Manage all MotionArray resources in one place.

Topic $TipTopic

In an email, the team at MotionArray announced the launch of Team Plans to provide better account options for groups of two or more editors needing access to the same MotionArray resources. The primary feature is all team accounts can now download unlimited assets and manage their licenses in one place!

NOTE: MotionArray describes itself as: “The all-in-one video & filmmakers platform. Take projects from concept to completion with unlimited asset downloads, exclusive plugins, video collaboration and review tools, and a portfolio website builder…all in one membership.”

Key features include

  • Easily Add & Manage Team Members
  • Manage All Your Stock Assets & Licenses In One Place
  • Collaborate & Review Projects Remotely
  • Save Time and Money

Here’s the link to learn more.


Please rate the helpfulness of this tip.

Click on a star to rate it!

… for Adobe Premiere Pro CC

Tip #1057: What Does this Blue Button Do?

Larry Jordan – LarryJordan.com

By default, sequences are edited as nests – but you can change that with a click.

This button determines how sequences are treated when they are edited into the timeline.

Topic $TipTopic

I’ve been using Premiere for years and have never paid attention to this blue timeline button. Here’s what it does.

When this button is blue, inserting or overwriting a sequence from the Files panel into a different sequence in the Timeline edits it as a nest.

When this button is white, inserting or overwriting a sequence from the Files panel into a different sequence in the Timeline edits it as a separate clips. (That is, it deconstructs the sequence into its component elements.)


Please rate the helpfulness of this tip.

Click on a star to rate it!

… for Apple Final Cut Pro X

Tip #1052: Two Key XML Conversion Utilities

Larry Jordan – LarryJordan.com

These two utilities are essential for moving files into or out of Final Cut

XToCC logo (top) and SendToX logo (bottom).

Topic $TipTopic

As long as you can create XML, you can move your data from one media application to another. However, the XML Final Cut Pro X uses is not compatible with many other applications. While some applications – KeyFlow Pro, Kyno and Axle.ai – support the current version of XML used in Final Cut Pro, most others, including Adobe’s Creative Cloud suite, do not.

Because XML is a core language for moving data between applications, there are two essential utilities that solve this compatibility issue:

  • SendToX. This converts older XML files into a form that FCP X can read.
  • XtoCC. This converts FCP X XML files into a form that older applications can read.

As with any migration, common elements – such as media and edits – transfer with no problems. However, proprietary functions – such as color grading or effects – may or may not transfer successfully.

As with all things in media, do a test using your own workflow to determine what works best for you.

EXTRA CREDIT

Here are links for both apps:


Please rate the helpfulness of this tip.

Click on a star to rate it!

… for Random Weirdness

Tip #1036: Rough Cut Interviews in 6 Steps

Larry Jordan – LarryJordan.com

These six steps keep the chaos at bay while editing interviews.

(Interview image courtesy of Pexels.com.)

Topic $TipTopic

This article, written by Joe Frederick, first appeared in PremiumBeat.com. This is a summary.

Editors on interview projects face an overwhelming task: reducing hours of footage into just minutes for the final cut. Eliminate that stress with these six steps.

1. Transcription. Getting your interviews transcribed is the best piece of advice I have for anyone cutting these types of videos. There are many, many advantages to getting your interviews transcribed. If the director suddenly wants to find a particular soundbite from a particular interview, you can easily search the transcription for particular key words or phrases. You can also skim through the interviews when away from the edit suite. The benefits are endless.

Before the transcription, it’s worth forming your multicam clips first, if you’ve filmed from multiple angles, so you can drag the multicam clip into your timeline and export the audio from there. That way, the timecode on your transcription will match the timecode of your interview timeline. This is vital if you want to keep your process efficient.

2. Highlighting. Read all the transcripts from beginning to end, highlighting anything and everything that might possibly be used in the edit. I usually open the PDFs in Preview, which allows you to use different colors when highlighting.

3. CreateGood Content.” Back in your NLE, go through all your interviews, cutting out any of your highlighted segments from each interview into a new project/sequence. Essentially you are building an unorganized selects reel. Put a text slide before each clip with the content of the sound bite. By now, you should have a sense of the organizational structure you are aiming for.

4. CreateGood Content Ordered.” Rearrange the selected sound bites into an order that makes sense.

5. CreateContent Cut.” Duplicate your project and rename it “Content Cut.” Because your footage is now in order, you’ll be able to see when you have repetition in what’s being said and can quickly delete it. Then, get busy deleting and whittling down your cut until it’s the length you want your final piece to be.

6. CreateRefined Content Cut.” Duplicate your project file once again and rename it Refined Content Cut. This is where the final finessing takes place.

By taking your project in stages, it helps you feel more in control which allows you to focus more on your story.


Please rate the helpfulness of this tip.

Click on a star to rate it!

… for Apple Motion

Tip #1045: Bug Fixes in Two Recent Updates

Larry Jordan – LarryJordan.com

The Motion update is free and available in the Mac App Store.

Topic $TipTopic

Two recent updates to Motion 5 fixed a lot of bugs. Here’s what’s fixed in these two updates.

10.4.10 UPDATE

  • Fixes an issue in which XAVC media from the Sony PXW-FX9 camera is not recognized.

10.4.9 UPDATE

In addition to adding 3D Objects and the new Stroke filter, this Motion update:

  • Adds square and vertical presets to the Display Aspect Ratio Snapshots in the Project Inspector.
  • Fixes an issue that prevented image masks from responding to opacity changes made to a source object.
  • Improves performance when working with particle emitters.
  • Fixes an issue with the Align To behavior and scrolling text.
  • Fixes a stability issue after switching to Cinema Layout.
  • Fixes a stability issue during playback with Dynamics turned on in the Advanced Pane of the Shape Inspector.
  • Fixes an issue in which still images might be exported with the incorrect color space.
  • Fixes an issue in which the Spirals Generator rendered incorrectly.

Please rate the helpfulness of this tip.

Click on a star to rate it!

… for Apple Motion

Tip #1047: Create a Vertical Video Project

Larry Jordan – LarryJordan.com

Square and vertical video require custom settings in Project > Properties.

The Inspector > Properties settings you need to change for vertical video.

Topic $TipTopic

Since the beginning of television, video used a horizontal aspect ratio. Since the beginning of cell phone photography and video, mobile users shot vertical video.

Sigh…. Drives all us old-school video people nuts!

Still, you gotta change with the times. Here’s how to create a vertical video project in Motion.

  • Create a new project using the Motion Project Browser. Since Motion always creates images at the highest possible quality, it doesn’t matter which setting you pick.
  • Once the project opens, select Project in the Layers panel (It’s named “Project.”)
  • Enter the Width and Height values, in pixels, of the new project. (These will generally be 720 x 1280 or 1080 x 1920.
  • Make sure Pixel Aspect Ratio is set to Square.
  • Set the Duration to whatever length you need.

EXTRA CREDIT

We can’t save project presets, so you’ll need to do this for each project. However, you can save the entire project as a template: File > Publish Template.


Please rate the helpfulness of this tip.

Click on a star to rate it!

… for Apple Motion

Tip #1048: What Does Publishing a Template Do?

Larry Jordan – LarryJordan.com

Publishing a template is a fast way to reuse settings and media between projects.

A custom template displayed in Project Browser > Categories.

Topic $TipTopic

If you find yourself creating similar projects time after time, creating a custom template can save you time. The trick is to know what to save. Templates can include:

  • Project settings
  • Media
  • Behaviors and filters
  • Anything else you save in a “normal” Motion project

When you choose File > Publish Template, you can assign it a name, pick a category in which to store it, and, if you want to use it in Final Cut, you can publish it as a Final Cut Generator.

But, if all you want to do is create a file with basic settings and, say, logos or other common graphics:

  • Choose File > Publish Template
  • Give it a name and create a category to store your templates. My custom category is named “Larry” – because it is easy for me to remember.
  • Leave all checkboxes unchecked.

Now, as you can see in the screen shot, the template shows up in Project Browser > Compositions, but does NOT show up in Final Cut.

Creating reusable templates is a great way to save time when you are creating similar projects.


Please rate the helpfulness of this tip.

Click on a star to rate it!