A new subscription bundle – 1,500 presets in 177 effects.
(Image courtesy of Pexels.com.)
Last week, NewBlueFX announced TotalFX – a collection of over 1,500 presets in 177 effects in 30 different products. This is a comprehensive suite of titling tools, transitions, filters and video editing plugins.
This includes Titler Pro 7 Ultimate, the “industry-standard in tiling software for video editors. Deliver exceptional production value with stunning 3D animated titles and motion graphics without sacrificing productivity. Titler Pro 7 integrates with all of today’s leading NLEs.”
Available via monthly, quarterly or annual subscription; or perpetual license. The annual subscription is $239 (US).
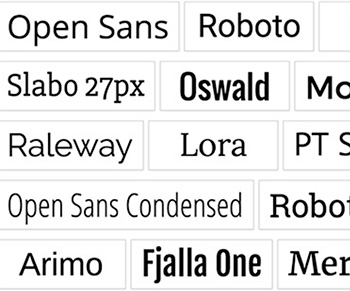
A small sample of the fonts available from Google.
This article first appeared in MotionArray.com. This is a summary.
Over the years, Google has launched many projects and products completely sans payment for the internet world to use. They are famous for things like search, Gmail, and the Chrome browser, but did you know about their free Google Fonts? You can download fonts from Google Fonts and use them in all of your personal and commercial projects for print, video, and whatever else you can think up.
The Google Fonts library can be found at fonts.google.com. Once you load the library you’ll have access to over 700 font families. The entire library can easily be sorted by popularity, alphabetical, date added, or the number of styles. The number of styles function comes in quite handy if you need a font with a lot of versatility.
When you see a font you like, simply click the Add to Collection button. This can be found to the right of the preview text or by hovering over the font in the poster layout.
Once your .zip is downloaded, you pop it open, install the fonts the way you normally would, and get to work.
EXTRA CREDIT
The link at the top has more details, font illustrations and links.
Please rate the helpfulness of this tip.
Click on a star to rate it!
https://www.theinsidetips.com/wp-content/uploads/2019/09/Tips-Logo-700x150.jpg00Larry Jordanhttps://www.theinsidetips.com/wp-content/uploads/2019/09/Tips-Logo-700x150.jpgLarry Jordan2020-09-23 01:30:002020-09-23 01:30:00Tip #1032: Free Google Fonts for Motion Design
VES: Honoring visual effects – one artist at a time.
VES logo.
The Visual Effects Society (VES) is a global professional honorary society and the entertainment industry’s only organization representing the full breadth of visual effects practitioners. VES’ over 4,000 members in more than 40 countries worldwide contribute to all areas of entertainment – film, television, commercials, animation, special venue, games and new media.
OBJECTIVES
To advance and promote the art and science of visual effects and to foster and strive for excellence and knowledge in all matters pertaining to visual effects, and for the purpose of bringing together those leaders and innovators in the field who have demonstrated a high standard of artistic and technical ability and whose singular achievements entitle them to Membership … (and) …to actively cultivate talented individuals in this discipline; to educate and develop public awareness and understanding; to support and encourage technological advancements in the field of visual effects; to establish a collective organization that recognizes, advances and honors visual effects as an art form, promoting the interests of its Membership so that Membership … based on merit, shall become a mark of honor and distinction.
The type of cabling determines maximum network speed and distance.
(Image courtesy of Pexels.com.)
I want to upgrade my office network to 10 gigabit Ethernet. But that requires replacing my Category 5e cables with either Cat6 or 6e. That got me wondering: What’s the difference?
According to Black Box: “Cat5e, also known as Category 5e or Category 5 Enhanced, is a network cable standard ratified in 1999. Cat5e cables are typically 24-gauge twisted pair wires, which can support Gigabit networks at segment distances up to 100 meters.
Cat6 came out only a few years after Cat5e. Cat6 is a standardised twisted pair cable for Ethernet that is backward compatible with Cat5/5e and CAT 3 cable standards.
Like Cat5e, Cat6 cables support Gigabit Ethernet segments up to 100 m, but they also allow for use in 10-Gigabit networks over a limited distance. At the beginning of this century, Cat5e typically ran to the workstations, whereas Cat6 was used as the backbone infrastructure from router to switches.
The main difference between Cat5e and Cat6 cable lies within the bandwidth, the cable can support for data transfer. Cat6 cables are designed for operating frequencies up to 250 MHz, compared to 100 Mhz for CAT5e. This means that a Cat6 cable can process more data at the same time. Think of it as the difference between a 2- and a 4-lane highway. On both you can drive the same speed, but a 4-lane highway can handle much more traffic at the same time.
Because Cat6 cables perform up to 250 MHz which is more than twice that of CAT5e cables (100 Mhz), they offer speeds up to 10GBASE-T or 10-Gigabit Ethernet, whereas CAT5e cables can support up to 1GBASE-T or 1-Gigabit Ethernet.
1 Gigabit Ethernet supports cables up to 100 meters. 10 Gigabit Ethernet on Cat6 cable limits distance to 55 meters.
EXTRA CREDIT
A newer version of Cat6 is Cat6e (also called “CAT6A”). According to TrueCABLE:
Cat6A cable is made and terminated to tighter tolerances than Cat6. This means the copper conductors are twisted tighter. This requires higher specification patch panels, wall jacks, and RJ45 connectors.
Cat6A speed is at least 500 MHz. This allows 10 Gbp/s (Gigabits per second) up to 328 feet (100 meters). Cat6 speed is 250 MHz. Therefore, it only supports 10 Gbp/s to 165 feet (55 meters) under ideal conditions; less in heavy cross talk environments.
Cat6A cable often uses thicker copper conductors and jackets. This make installation more difficult and drives up the price.
Please rate the helpfulness of this tip.
Click on a star to rate it!
https://www.theinsidetips.com/wp-content/uploads/2019/09/Tips-Logo-700x150.jpg00Larry Jordanhttps://www.theinsidetips.com/wp-content/uploads/2019/09/Tips-Logo-700x150.jpgLarry Jordan2020-09-22 01:30:002020-09-19 09:39:30Tip #1030: What’s the Difference: Cat5e, 6 or 6e?
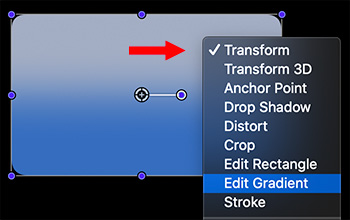
The Inspector controls colors, the onscreen tool controls direction.
Control-click an element in the Viewer to edit a gradient.
I was asked recently how to change the direction of a gradient in Motion. It is easy to do, but not easy to find. Here’s how.
Select an element with a gradient in the Layers panel.
Control-click the element in the Viewer and choose Edit Gradient. (See screen shot.)
Use the on-screen controls to change gradient direction, the distance between the colors and the colors themselves.
It’s easy, once you know how.
EXTRA CREDIT
Use the Gradient color controls in Inspector > Image > Fill to change the colors in the gradient itself.
Please rate the helpfulness of this tip.
Click on a star to rate it!
https://www.theinsidetips.com/wp-content/uploads/2019/09/Tips-Logo-700x150.jpg00Larry Jordanhttps://www.theinsidetips.com/wp-content/uploads/2019/09/Tips-Logo-700x150.jpgLarry Jordan2020-09-17 01:30:002020-09-17 01:30:00Tip #999: Change the Direction of a Gradient
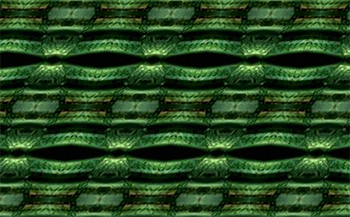
The Parallelogram Tile filter creates unique backgrounds from stills or video.
The Parallelogram Tile effect applied to a shot of a city street at night.
Motion has a filter that can create a unique, visually-interesting background out of any still or video clip. Here’s how to use it.
Import a still image or video clip, then select it in the Layers panel.
Apply Filters > Tiling > Parallelogram Tile.
In Inspector > Filters adjust Center > Y and Acute Angle to create an image that doesn’t look overly rectangular.
If this filter is applied to a video, the image will change as the video changes.
If this filter is applied to a still image, you can animate it by selecting the Parallelogram Tile filter in the Layers panel, then keyframing Center > Y. Slower moves look better. Adding a Gaussian Blur will also help.
EXTRA CREDIT
If you want to be especially daring, apply an Oscillate parameter behavior to Center > Y.
As with all filters, apply this, then tweak it. Pick what looks good to you.
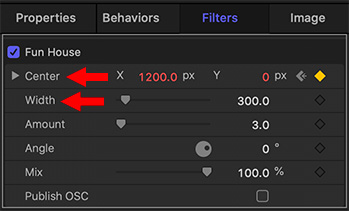
Keyframe settings for Filters > Distortion > Fun House.
Here’s another Motion filter that’s fun to play with – especially if you are creating a science fiction story where things are moving through time.
Import a clip into Motion, then select it in the Layers panel.
Apply Filters > Distortion > Fun House.
Position the playhead in the mini-timeline where you want the effect to start, then set a keyframe for Inspector > Filters > Fun House > Center so that X = -1200 and Y = 0.
Position the playhead where you want the effect to end; this looks best if the duration of the effect is short.
Then, change the X value to 1200, Y = 0.
You may need to tweak the values for Center depending upon the size of your project. In general, though, you want this effect to go quickly – 1-2 seconds – as well as start and end well offscreen.
EXTRA CREDIT
I also liked changing the Width for this filter to 300… just because.
Please rate the helpfulness of this tip.
Click on a star to rate it!
https://www.theinsidetips.com/wp-content/uploads/2019/09/Tips-Logo-700x150.jpg00Larry Jordanhttps://www.theinsidetips.com/wp-content/uploads/2019/09/Tips-Logo-700x150.jpgLarry Jordan2020-09-17 01:30:002020-09-12 14:29:06Tip #1012: Create a “Ripple in Time”
Maxon One: Cinema 4D, Red Giant, RedShift all on one subscription.
(Image courtesy of Maxon.com.)
Last week, Maxon announced the availability of Cinema 4D Release 23 (R23). The next generation of Maxon’s professional 3D software delivers powerful enhancements to its animation and UV workflows, character animation toolset, and the inclusion of Magic BulletLooks technology.
R23 Feature Highlights
New Character Animation Tools: Includes new Character Solver and Delta Mush workflows as well as a new Pose Manager and Toon/Face Rigs.
Animation Workflow: Better Keyframing, Filters for the Timeline and Attributes Manager, and more.
UV Workflows: All the powerful UV editing capabilities introduced in Cinema 4D S22 (the subscription-only upgrade) plus new tools geared toward UV workflows for hard-surface models.
Magic Bullet Looks Integration: Easily apply one of over 200 preset film looks, import LUTs, or work with individual tools for color correction, film grain, chromatic aberration and much more.
Scene Nodes: Scene Nodes allows users to explore massive Distributions and Procedural Modeling in advance of the further Cinema 4D core engine development for optimal creativity and experimentation.
R23 will be available on September 9th for subscription holders and will be available as an upgrade for perpetual license holders.
BUT WAIT, THERE’S MORE!
The big news is that Maxon also announced Maxon One, their new subscription offering that provides Cinema 4D, Redshift for C4D and Red Giant Complete all for one low price.
An interview with Zac Dixon, Creative Director of Identity Studio.
The Identity Studios logo.
This first appeared in MotionArray.com. In this article, MotionArray highlights a smaller studio that is working hard to create amazing work as they build a client base and a sustainable business.
Identity Visuals is just that kind of studio. In the words of Zac Dixon, creative director: “Identity Visuals started up when my co-founder Samuel Cowden and I moved to Nashville in the summer of 2012. In the beginning, it was just the two of us working on whatever work we could get on the first floor of Samuel’s apartment. A few months in we hired our first two team members and eventually moved out of Sam’s place into our first tiny studio on Music Row.”
He goes on to describe projects created by Identity Studios, as well as provide example images and videos.
The link above takes you to the interview.
Please rate the helpfulness of this tip.
Click on a star to rate it!
https://www.theinsidetips.com/wp-content/uploads/2019/09/Tips-Logo-700x150.jpg00Larry Jordanhttps://www.theinsidetips.com/wp-content/uploads/2019/09/Tips-Logo-700x150.jpgLarry Jordan2020-09-16 01:30:002020-09-12 14:21:33Tip #1008: Industry Spotlight: Identity Visuals
Vertical text is hard to read, but, used sparingly, can be eye-catching.
Here’s the vertical text tool and what it can do.
Adobe Premiere Pro provides the opportunity to create both horizontal and vertical text. Learn more.
Click and hold the Text tool to reveal the Vertical Text Tool.
Click anywhere in the Program Monitor to create text, the same as you would with the “normal” Text tool.
Format the text by switching to the Graphics workspace.
Select the text clip in the timeline, then click Edit, which is at the top of the Essential Graphics panel.
EXTRA CREDIT
As you can see in the screen shot, vertical spacing between characters is even more obvious than horizontal kerning. You tighten spacing using the Kerning control in the Text panel.
When entering text, type words in reverse order. (Smile… you’ll understand why the first time you add a second word.)
Please remember that vertical text is very hard to read quickly. Use this effect very sparingly!
Please rate the helpfulness of this tip.
Click on a star to rate it!
https://www.theinsidetips.com/wp-content/uploads/2019/09/Tips-Logo-700x150.jpg00Larry Jordanhttps://www.theinsidetips.com/wp-content/uploads/2019/09/Tips-Logo-700x150.jpgLarry Jordan2020-09-15 01:30:002020-09-12 14:06:44Tip #1005: The Vertical Text Tool
We may request cookies to be set on your device. We use cookies to let us know when you visit our websites, how you interact with us, to enrich your user experience, and to customize your relationship with our website.
Click on the different category headings to find out more. You can also change some of your preferences. Note that blocking some types of cookies may impact your experience on our websites and the services we are able to offer.
Essential Website Cookies
These cookies are strictly necessary to provide you with services available through our website and to use some of its features.
Because these cookies are strictly necessary to deliver the website, refuseing them will have impact how our site functions. You always can block or delete cookies by changing your browser settings and force blocking all cookies on this website. But this will always prompt you to accept/refuse cookies when revisiting our site.
We fully respect if you want to refuse cookies but to avoid asking you again and again kindly allow us to store a cookie for that. You are free to opt out any time or opt in for other cookies to get a better experience. If you refuse cookies we will remove all set cookies in our domain.
We provide you with a list of stored cookies on your computer in our domain so you can check what we stored. Due to security reasons we are not able to show or modify cookies from other domains. You can check these in your browser security settings.
Google Analytics Cookies
These cookies collect information that is used either in aggregate form to help us understand how our website is being used or how effective our marketing campaigns are, or to help us customize our website and application for you in order to enhance your experience.
If you do not want that we track your visit to our site you can disable tracking in your browser here:
Other external services
We also use different external services like Google Webfonts, Google Maps, and external Video providers. Since these providers may collect personal data like your IP address we allow you to block them here. Please be aware that this might heavily reduce the functionality and appearance of our site. Changes will take effect once you reload the page.
Google Webfont Settings:
Google Map Settings:
Google reCaptcha Settings:
Vimeo and Youtube video embeds:
Other cookies
The following cookies are also needed - You can choose if you want to allow them:
Privacy Policy
You can read about our cookies and privacy settings in detail on our Privacy Policy Page.