… for Adobe Premiere Pro CC

Tip #463: Nests Help Organize Timelines

Larry Jordan – LarryJordan.com

Nests treat a group of clips as if they were a single clip.

Topic $TipTopic

Nesting combines multiple elements, like clips, into one “thing,” called a nest. It’s easier to perform a task on a single nest than repeat the same task on multiple clips. Nests are not only more organized, they are also more efficient. This is the basic theory of nesting in Premiere Pro.

Nesting creates a new sequence that’s stored in the original sequence. Nested sequences can live inside other sequences, and can also contain other nested sequences inside them (a nest within a nest within a nest, etc.).

When a nested sequence is created, it will have the same specifications (resolution, frame rate, etc.) as the current sequence. It will begin at the first frame of the first selected clip in the timeline and end on the last one. It won’t be linked to the parent sequence, and the timecode won’t correlate like a sub-sequence.

NOTE: Nesting high-resolution media (larger than your sequence resolution) will rasterize your footage. Scaling up the nested sequence will pixelate the image. Consider this before nesting your clips.

To create a nest:

  • Select the clips in the timeline you want to nest
  • Right-click any selected clip and choose Nest
  • Name the new sequence and click OK

The new nest appears in the timeline at the position of the selected clips.

To open a nest, double-click it. It opens as an additional sequence in the timeline.

Trim, reposition and apply effects to a nest the same as a clip. All the clips inside the nest will act as though the effect was applied to each of them.

Here’s a link to learn more.


Please rate the helpfulness of this tip.

Click on a star to rate it!

… for Apple Final Cut Pro X

Tip #519: Use XML to Archive FCP X Projects

Larry Jordan – LarryJordan.com

Data stored in libraries, projects, events and clips can all be exported using XML.

Data stored in Libraries, projects, events and clips can all be exported using XML.

Topic $TipTopic

Most of the time, the easiest way to move media, projects and data in Final Cut Pro X from Point A to Point B is to copy the library. However, there are four main reasons to use an XML file instead:

  • To archive a project. The only way to future-proof your projects is to export and save an XML file.
  • To move a project from FCP X to another NLE, for example, Premiere Pro CC.
  • To send project data to or from a media asset management system.
  • To transfer a project online between editors. Provided both editors have the same media, XML files are tiny compared to a library file and transfer very quickly.

Why use XML? First, XML is an open standard – like HTML for the web – that allows us to describe the specifications of a media file, metadata, event, project or library. It is ideal for moving media files between different software or systems. Second, Apple has always considered its Final Cut Pro file formats proprietary; without FCP X you can’t open them. XML provides the best way to archive and/or share your projects for the future.

The process is simple, here’s how it works.

EXPORT AN ENTIRE LIBRARY

To export the entire contents of a library – generally for archiving purposes – select the library, then choose File > Export XML.

In the Export dialog, notice that the Source indicates it’s the entire Library. Give this XML file a name and location, then select the highest version of XML this dialog supports and click Save.

This creates a portable XML file that can be read by a number of different software in case you ever need to access this library in the future.

NOTE: XML files do not include media. That needs to be archived separately.

EXTRA CREDIT

  • Here’s a link to my website that details different ways to export libraries and projects for archiving.
  • Here’s a link to my website that details different ways to export Browser clips and events for media asset management, note taking and archiving.

Please rate the helpfulness of this tip.

Click on a star to rate it!

… for Apple Final Cut Pro X

Tip #518: Super-Secret, Super-Fast Export Trick

Larry Jordan – LarryJordan.com

The key to speed is to use the Browser.

Image courtesy of StandardFilms.com.
Set an In and Out first, then Command-drag to define multiple segments.

Topic $TipTopic

Imagine you need to get multiple highlights of breaking news/sports/weather/life up to the web like, ah, yesterday. Final Cut has a very fast way to make that happen. Watch…!

In order for us to export a segment from the timeline, we need to use the Range tool (or keyboard shortcuts) to set an In and Out. No problem – except that we can only have one In and one Out in the timeline at any time.

This doesn’t help us when we need to export a bunch of highlights as fast as possible.

But… there’s a hidden trick in FCP X that makes exporting segments even faster. Remember that I wrote: “You can only have one In and Out in the timeline?” That’s true for the timeline, but NOT true for the Browser.

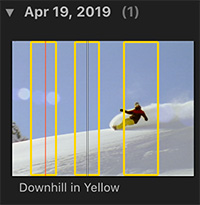
Clips in the Browser support as many segments as you want. For example, in this screen shot, I have three separate areas in the same clip selected – all at the same time!

NOTE: This multiple selection technique applies to clips in the Browser, but not Projects.

To select more than one section in a clip, drag to set the In and Out for the first section, then press the Command key and drag to set as many additional sections as you want!

With the areas you want to export selected, choose File > Share and note that this menu now shows the number of clips you’ll export.

Exporting from FCP X has always been fast. But, when you need to break a movie into sections, it will be even faster – and at the highest possible quality – to export directly from the Browser.


Please rate the helpfulness of this tip.

Click on a star to rate it!

… for Apple Final Cut Pro X

Tip #491: What is Broadcast Safe?

Larry Jordan – LarryJordan.com

The Broadcast Safe effect clamps levels to keep them legal.

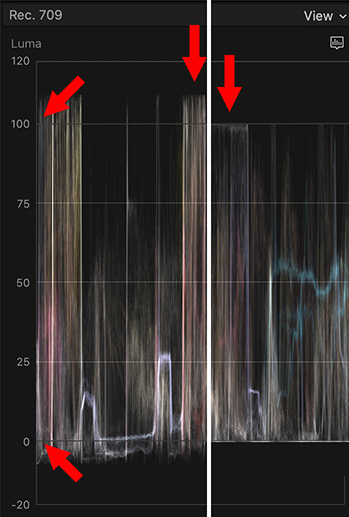
The left side shows the source image. The right side shows the results of applying Broadcast Safe.

Topic $TipTopic

“Broadcast Safe” refers to luma and chroma levels that are within long-established bounds required for broadcast, cable and digital cinema. The problem is that most digital cameras – both still and video – record levels in excess of these amounts.

Many of us create and post video for the web, which can easily handle any images recorded by a digital camera today. Web video does not require Broadcast Safe.

However, older distribution formats are limited in what they can transmit or distribute. For example, in this screen shot, the white levels in the left image exceed 100%, which is an illegal value for broadcast. As well, the black levels are below 0%, which is also an illegal level.

We have two options to correct this:

  • Color Board/Color Wheel settings
  • Broadcast Safe effect

Adjusting levels using the Color Inspector allows us to retain highlight and shadow detail. But, these filters also require us to adjust every clip to be sure it is safe for broadcast.

A faster way to work is to apply the Color > Broadcast Safe effect. This “clamps” white levels exactly at 100% and black levels exactly at 0%. The Broadcast Safe effect is very fast, but the limitation is that we lose all highlight/shadow detail in the clamped areas.

For some shots, such as at night with a distance street light, this is not a problem. For other shots, say the bride’s dress in the sunlight, clamping will lose all details in the highlights, which will turn the bride’s dress into mush.

There’s no perfect answer. When you care about texture in the clamped areas, use the Color Inspector. When you don’t care about the texture, use Broadcast Safe.

EXTRA CREDIT

For Rec. 709 footage, the default settings should be fine.


Please rate the helpfulness of this tip.

Click on a star to rate it!

… for Random Weirdness

Tip #494: Pick the Right Microphone

Larry Jordan – LarryJordan.com

The right microphone, more than any other audio component, determines the quality of your audio.

The ElectroVoice RE-20 dynamic microphone.

Topic $TipTopic

This article, written by Chuck Crosswhite, first appeared in PremiumBeat.com. This is an excerpt.

There are three basic microphone types:

  • Ribbon
  • Dynamic
  • Condenser

Ribbons were the original microphone and, because they are seriously fragile, are only used in highly-controlled studio environments.

Dynamic microphones are durable, moisture resistant, resilient mics that are great for capturing loud sounds. These mics are a mainstay at live music venues. These microphones don’t require any external power, so plug it in and get to rocking some sweet vocal tracks. This is a great option for anyone podcasting on the road in unpredictable settings and weather.

Condenser microphones, on the other hand, thrive in controlled environments such as studios. They tend to be much more sensitive than dynamic microphones and have a louder output. These microphones do require an external power source, so you’ll want to check out an interface or mixer with phantom power to supply these mics with electricity. Condenser microphones are also normally much more fragile and expensive, so be sure to treat them well. This should definitely be your microphone choice if you want to achieve a higher-end production value on your podcast.

The article goes on to recommend mics for beginning, semi-pro and professional podcasters. While I prefer Shure SM-58s as a dynamic all-purpose mic and ElectroVoice RE-20s for studio work, I don’t significantly disagree with his suggestions.


Please rate the helpfulness of this tip.

Click on a star to rate it!

… for Random Weirdness

Tip #478: Break Out of a Creative Rut

Larry Jordan – LarryJordan.com

Creativity can’t be forced – but it can be encouraged.

Creativity is seeing the same things in a different way.

Topic $TipTopic

This article, written by photographer Jamie Windsor, first appeared in PetaPlxel.com. This is a summary of what he wrote. (This link also includes an interesting 8-minute video discussing this problem.)

“I worked out that creative block happens for me when my conscious mind falls out of sync with my intuition. What I mean by this is that when I’m creating something, my intuition (or my subconscious mind) is coming up with ideas and my conscious mind is forming it into something coherent.

“But when I get into a creative rut, it’s like my subconscious mind’s engine has stalled and my conscious mind is left trying to run things. The problem with this is [that] my conscious mind can only see what it can immediately access and that can impact my creativity and my motivation.””

Here are five tips Jamie Windsor uses to restart his creative engine:

  1. Stop Trying
  2. Change Location
  3. See Other People
  4. Stop Worrying
  5. Give Up on Bad Ideas

Please rate the helpfulness of this tip.

Click on a star to rate it!

… for Random Weirdness

Tip #476: Better Content Aware Fills in Photoshop

Larry Jordan – LarryJordan.com

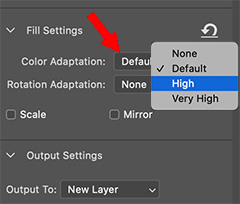
Color Adaptation modifies how replacement background colors and textures are handled.

The Color Adaptation menu, part of Content-Aware Fill, in Photoshop.

Topic $TipTopic

This trick was first reported in a YouTube video by PiXimperfect. This is an excerpt.

One of the new, and exceedingly powerful, image cleanup features in Photoshop is Content-Aware Fill. This removes a selected object and replaces it with the background behind it, as if the object never existed.

Most of the time, the default settings are fine. But, sometimes, the background colors are not quite perfect, or colors bleed in from the surrounding area. Either way, the replacement image isn’t ideal.

That’s where Color Adaptation comes into play. You’ll find it part of the menus that control Content-Aware Fill.

For solid-color backgrounds, you may get better results switching this to High. For edge bleed, you’ll get better results setting this to None.


Please rate the helpfulness of this tip.

Click on a star to rate it!

… for Apple Motion

Tip #498: Create a Spinning Globe

Larry Jordan – LarryJordan.com

Create a spinning glove from elements in the Motion Library.

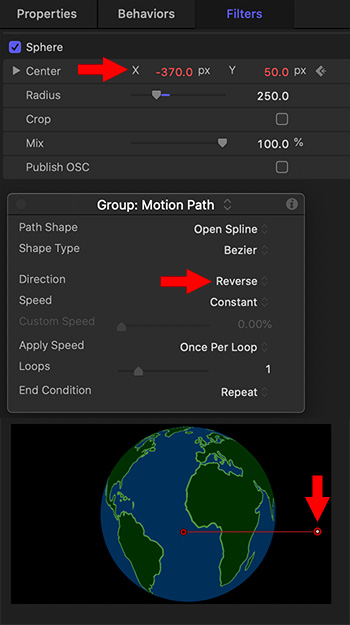
Here are the settings I used to create a spinning globe from elements in the Motion Library.

Topic $TipTopic

Tip #497 showed how to create a glowing map. This tip explains how to take those elements and turn them into a globe that spins. (Review Tip #497 for instructions on where these maps are located and how to create the initial effect.)

Starting with the map effect we created in Tip #497, select the group that contains the maps. Then:

  • Select the group containing the maps and change Inspector > Properties > Scale to 140% on all axes.
  • Apply Filters > Distort > Sphere. This converts the flat maps into a globe.
  • Set a starting keyframe for Sphere > Center X = 0.
  • Set an ending keyframe for Sphere > Center X = -370. This spins the globe, however, it slowly wanders off-screen.
  • Apply Behaviors > Basic Motion > Motion Track. Change Direction from Forward to Reverse.
  • Then, adjust the starting and ending point of the Motion Track so that it moves the globe in the opposite direction to Sphere. With a bit of tweaking, the movements of the two effects will cancel and cause the globe to spin motionlessly. (It took me about five minutes to get these to balance.)

At this point, you have a spinning globe you can scale and place anywhere in the frame.

COMMENT

There may be an easier way to do this, but I haven’t discovered it yet.


Please rate the helpfulness of this tip.

Click on a star to rate it!

… for Apple Motion

Tip #497: A Hidden Map in Motion

Larry Jordan – LarryJordan.com

These three maps can provide a variety of elements for effects.

Hidden deeply in Motion are three world maps you can use for effects.

Topic $TipTopic

Hidden deep inside Motion are three world maps that can be used for effects. Here’s where they are and an idea on how to use them.

In Motion, go to Library > Content > Images > Extras. Inside, you’ll find three maps:

  • Earth Color
  • Earth Transparent Outlines
  • Earth Transparent

These three maps perfectly align and can be used for different effects, including a spinning globe.

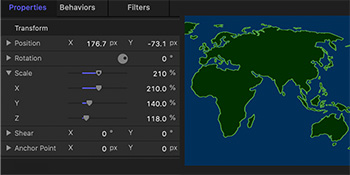
For example, in the effect in the screen shot:

  • Stack Earth Transparent Outlines on top of Earth Color.
  • Set the Opacity of Earth Color to 15%
  • Change the Scaling in the group that contains these two images to:
    • X = 210%
    • Y = 140%
    • Z = 118%

At this point, you’ll have a nice outline on your map, the countries will all look reasonably correct and you can use this in a variety of ways.

Cool.

EXTRA CREDIT

See Tip #498 to learn how to turn these maps into a spinning globe.


Please rate the helpfulness of this tip.

Click on a star to rate it!

… for Apple Motion

Tip #496: A Very Cool Time-Warp Effect

Larry Jordan – LarryJordan.com

From humble roots come eye-catching effects.

The Cellular generator with a Slit Scan effect applied.

Topic $TipTopic

Here’s a very cool way to create a time-warp effect. I’ve never used this in real-life, but I teach it in all of my Motion classes, because it is fun to play with and teaches an important lesson. Here are the steps.

  • In Motion, add Generators > Cellular into a project.
  • Change the color gradient from black to white, to medium-dark blue to black.
  • Select Cellular in the Layers panel and apply Filters > Stylize > Slit Scan.
  • In Inspector > Properties, rotate the group so the blue flares radiate up-left.
  • In Inspector > Filters:
    • Change Center so the white line is in a lower corner
    • Change Speed to 15.
    • Change the Glow color to a radioactive green.

Then, change anything else you want.

The lesson this teaches is that we can take something very “blah” and make it eye-catching simply by using a few filters.

EXTRA CREDIT

What what happens when you replace Slit Scan with Slit Tunnel.


Please rate the helpfulness of this tip.

Click on a star to rate it!