… for Apple Motion

Tip #507: Create 360° Projects in Motion

Larry Jordan – LarryJordan.com

2D assets don’t suddenly become 360° but this does make it easy to experiment.

To convert an existing Motion project to 360°, change Projection to 360° Monoscopic.

Topic $TipTopic

This article first appeared in an Apple KnowledgeBase article. This is a summary.

If you are looking to experiment with 360° video, Motion can convert a normal Motion project into 360° video without shooting new video. There are limitations, but here’s how it works.

To convert an existing Motion project to 360°:

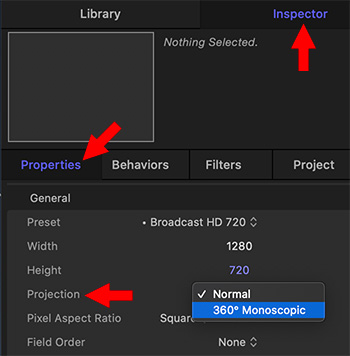
  • In the Layers list in Motion, click the Project object.
  • In the Properties Inspector, click the Projection pop-up menu, then choose 360° Monoscopic.
  • Any existing root-level 2D groups in your project are converted to 3D groups. (If the project includes 2D groups nested within 3D groups, the 2D groups remain unchanged.)
  • Click Add Object in the toolbar, then choose 360° Environment.
  • A new 360° environment is added to the Layers list.
  • In the Layers list, move the 360° environment to the bottom of the list. (Although not required, this step sets up the project to add and composite elements above the 360° environment.)
  • Next, do one of the following:
    • If your project does not contain a camera, click Add Object, then choose Camera. A new Viewpoint camera is added to your project.
    • If your project contains a camera, select the camera in the Layers list, then in the Camera Inspector, click the Camera Type pop-up menu and choose Viewpoint.
  • In the canvas, click the gray box in the top-right corner of the canvas, then choose the second arrangement in the list (two-up, split view).
  • The canvas is split into two viewports.
  • In the left viewport, click the Camera pop-up menu and choose 360° Look Around. Your project now correctly projects the equirectangular footage. The 360° Look Around view uses the field of view of the active camera.
  • In the right viewport, click the Camera pop-up menu and choose 360° Overview. The canvas displays the entire 360° scene as a flat, equirectangular image alongside the spherical viewer. This image represents the final output of your project.

NOTE: When you convert a normal project to a 360° project, normal footage already in the project is not projected in 360°. Other objects in the project also need to be adjusted. For example, if the project contains a generator that you want projected onto the 360° sphere, you must move the generator inside the 360° environment.

EXTRA CREDIT

The link at the top of this tip takes you to a detailed Apple KnowledgeBase article showing how to work with 360° video in Motion. This tip is only one part of the options that Motion provides.


Please rate the helpfulness of this tip.

Click on a star to rate it!

… for Apple Motion

Tip #495: Use Gradient Blur to Imply Depth-of-Field

Larry Jordan – LarryJordan.com

Gradient Blur simulates depth-of-field by varying the amount of blur in the frame.

Gradient blur applied to an image supplied by Blackmagic Design.

Topic $TipTopic

One of the challenges in using cell phone cameras is that too much of the image is in-focus. The amount of the image that’s in-focus is called “depth-of-field.”
We use depth-of-field to control where the eye looks first in the frame.

When lots of the image is in-focus, we say depth-of-field is deep. When only a small portion of the frame is in-focus, we say depth-of-field is shallow. (And, um, when none of the image is in-focus, we say the image is blurry.)

We can simulate a shallow depth-of-field in Motion using the Gradient Blur. (See screen shot.)

  • Apply Filters > Blur > Gradient Blur to a clip.
  • Drag the white dot to the area you want to stay in-focus.
  • Drag the black dot to the area you want to blur.
  • Adjust the settings in the Inspector to create the look you want.

Please rate the helpfulness of this tip.

Click on a star to rate it!

… for Visual Effects

Tip #512: Animate With a Multi-Plane Camera

Larry Jordan – LarryJordan.com

Multiple planes allows changes in depth, focus and perspective.

Image courtesy of Wikipedia.
Sketch of a 4-plane multiplane camera showing the glass plates and different motions.

Topic $TipTopic

When photographing traditional cell animation, all elements are painted onto a single cell. The problem is that you can’t create a sense of depth through movement. The multiplane camera fixes this.

First used by Lotte Reiniger for her animated feature The Adventures of Prince Achmed in 1926, the concept was further developed by Ub Iwerks for the Walt Disney Studios in 1933.

The multiplane camera is a motion-picture camera used in the traditional animation process that moves a number of pieces of artwork past the camera at various speeds and at various distances from one another. This creates a sense of parallax or depth.

Various parts of the artwork layers are left transparent to allow other layers to be seen behind them. The movements are calculated and photographed frame by frame, with the result being an illusion of depth by having several layers of artwork moving at different speeds: the further away from the camera, the slower the speed. The multiplane effect is sometimes referred to as a parallax process.

An interesting variation is to have the background and foreground move in opposite directions. This creates an effect of rotation. An early example is the scene in Walt Disney’s Snow White and the Seven Dwarfs where the Evil Queen drinks her potion, and the surroundings appear to spin around her.

The most famous multiplane camera was invented by William Garity for the Walt Disney Studios for the production of Snow White and the Seven Dwarfs. The camera was completed in early 1937. Disney’s multiplane camera, which used up to seven layers of artwork (painted in oils on glass) shot under a vertical and moveable camera, allowed for more sophisticated uses than the Iwerks version and was used prominently in Disney films such as Pinocchio, Fantasia, Bambi, The Adventures of Ichabod and Mr. Toad, Cinderella, Alice in Wonderland, Peter Pan, Sleeping Beauty and The Jungle Book.

EXTRA CREDIT

Here’s a link to Wikipedia to learn more.

Here’s a link to a video of Walt Disney in 1967 illustrating how a multiplane camera works.


Please rate the helpfulness of this tip.

Click on a star to rate it!

… for Visual Effects

Tip #510: 10 Tips for Shooting Visual Effects

Larry Jordan – LarryJordan.com

The underlying point of these is to be sure you can work with your shots later in post.

Topic $TipTopic

The CGGeek posted a YouTube video presenting “10 Tips for Filming Visual Effects.” While I don’t agree with all of them, especially because his entire video was shot out of focus, I do agree with most of them.

They are:

  1. Take your camera off the tripod and shoot with camera motion. (This, I think, needs to be taken with a grain of salt, depending upon how much tracking and rotoscoping will be needed.)
  2. Shoot at a high shutter speed for fast moving VFX shots, above 1/500th of a second.
  3. Write down the camera settings: focal length, shutter and frame rate.
  4. Use lots of high-contrast camera markers to simplify motion tracking later.
  5. Lock your camera on a tripod, then add motion later in post.
  6. Avoid pans, zooms and fast camera motion when doing camera tracking.
  7. Always shoot a flat, background plate in case you need to garbage mask your actors.
  8. Take a 360° environmental photo to show the overall scene.
  9. Use the sky as a blue-screen background.
  10. Track both foreground and background, the extra depth improves the results of a camera track.

Please rate the helpfulness of this tip.

Click on a star to rate it!

… for Visual Effects

Tip #504: Comparing a Framing vs. Tripod Camera

Larry Jordan – LarryJordan.com

The difference is in what rotates – the camera or the subject.

(Image created in Apple Motion.)
Panning with a framing camera; the subject is the white line.

Topic $TipTopic

There are two ways to pivot a camera: around the tripod or around the subject. Here’s a quick tip to explain the difference.

We are all familiar with pivoting a camera on a tripod. The camera stays in the same place, while the field of view rapidly shifts. This is ideal for subjects who are moving from one place to another.

In other words, the camera position holds still while the subject moves.

But, what if you are shooting an object on a table? If you pivot the camera on a tripod, you lose the view of the table and need to reposition the table.

A “framing camera” fixes this problem. First invented for shooting animation stills, a framing camera pivots the camera around the subject.

In other words, the subject position holds still while the camera moves around it.


Please rate the helpfulness of this tip.

Click on a star to rate it!

… for Codecs & Media

Tip #514: The Brave New World of 8K Media

Larry Jordan – LarryJordan.com

8K files require vast storage with super-fast bandwidth.

File storage requirements as frame size increases for ProRes 422 and 4444.

Topic $TipTopic

Technology continues its relentless advance and we are hearing the drumbeats for 8K media. Editing 4K takes a lot of computer horsepower. Editing 8K requires 4 TIMES more than 4K! Which is why Apple is promoting the new Mac Pro for use with 8K workflows.

I don’t minimize the need for a powerful CPU or the potential of the new Mac Pro when editing frame sizes this huge. However, important as the computer is in editing media, the speed and size of your storage are even MORE critical.

Let’s start by looking at storage requirements for different frame sizes of media.

NOTE: For this example, I’m using ProRes 422 and 4444 because Apple has done a great job documenting the technical requirements of these codecs. Other codecs will have different numbers, but the size and bandwidth relationships will be similar.

More specifically, the three frame sizes in my chart are:

  • 1080/30 HD. 30 fps, 1920 x 1080 pixels
  • UHD/30. 30 fps, 3940 x 2160 pixels
  • 8K/30. 30 fps, 8192 x 4320 pixels

As the screen shot illustrates, an hour of 8K media takes 1.2 TB for ProRes 422 and 2.5 TB for ProRes 4444! These amounts require totally rethinking the capacity of our storage – and remember, this does not include typical work or cache files, many of which will also be 8K.

EXTRA CREDIT

Here’s a link to my website to learn more, including the bandwidth needs of these super-huge frame sizes.


Please rate the helpfulness of this tip.

Click on a star to rate it!

… for Codecs & Media

Tip #513: How Changing Frame Rate Affects File Size

Larry Jordan – LarryJordan.com

Faster frame rates more than double file size.

As frame rates increase, file storage needs also increase – dramatically.

Topic $TipTopic

I want to look at the effect increasing video frame rates has on storage capacity and bandwidth.

NOTE: In this example, I’m using Apple ProRes as a measurement codec. Other codecs will generate different numbers, but the overall results are the same. Here’s a white paper from Apple with all the source numbers.

Regardless of frame size, as frame rates increase, storage needs and bandwidth also increase. If we set the storage needs of 24 fps video (regardless of frame size) to 100%, then:

  • 25 fps video = 104% capacity and bandwidth increase
  • 30 fps video = 125% capacity and bandwidth increase
  • 50 fps video = 208% capacity and bandwidth increase
  • 60 fps video = 250% capacity and bandwidth increase

Just as capacity increases by these amounts, so, also, does bandwidth. Higher frame rates require bigger and faster storage.

EXTRA CREDIT

Here’s a link to my website to learn more.


Please rate the helpfulness of this tip.

Click on a star to rate it!

… for Adobe Premiere Pro CC

Tip #511: Relink Missing Media in Premiere

Larry Jordan – LarryJordan.com

Relinking reconnects media that Premiere can’t find; as long as you didn’t erase it.

A portion of the Link Media dialog in Premiere Pro CC.

Topic $TipTopic

This article first appeared in MotionArray.com. This is an excerpt.

Media can go offline for a variety of reasons. However, once you show Premiere where the media went, relinking is straight-forward. So, what do you do if you can’t link media in Premiere Pro? In this tip, you’ll learn a couple of ways to relink missing footage or other assets in your projects.

RELINK MEDIA

When the dreaded “Missing Media” dialog appears, it is generally because a hard drive or folder was renamed or turned off. (If a media folder was deleted, this procedure won’t help.)

  1. Click Locate on the pop-up window that points out media is missing.
  2. On the left-hand side, navigate to the folder or directory that holds the missing media (this location may vary with each project).
  3. At the bottom right-hand corner of the dialogue box, click Search. Searching will review your media folders to locate the clip you’re looking for.
  4. Once you have found that, highlight the clip, and click OK.
  5. This will relink all of the footage in that folder or directory.
  6. As Adobe Premiere Pro is doing this, it may also be able to find various other assets that might be missing from the same folder. If it finds all of them, all is well and good.
  7. However, if it doesn’t, click Locate again and search all the folders again. Repeat this step until all of your missing media is located. Now, you should be able to proceed again with your edits, error-free.

FIND OFFLINE MEDIA

When the Offline Media error message appears:

  1. Go to the Project Panel.
  2. Search for the word Offline in the Project panel.
  3. Highlight all of the offline media from the search results.
  4. Right-click and select Link Media.
  5. You’ll see the Link Media box come up again.
  6. Click on Locate and Search the main folder following the steps above.
  7. Once the file is found, click OK.

This will relink all the media, and you’ll be good to go!


Please rate the helpfulness of this tip.

Click on a star to rate it!

… for Codecs & Media

Tip #508: Pick the Best Audio Format for Editing

Larry Jordan – LarryJordan.com

Choose AIF or WAV audio files. File sizes are larger, but the quality is worth it.

A typical monoaural audio waveform of human speech.

Topic $TipTopic

This article, written by Charles Yeager, first appeared in PremiumBeat.com. This is a summary.

When using various audio files in your video edits, such as music tracks and sound effects, does the audio file type really make a difference? (Spoiler: yes, it does.) But the real question is why are there so many different audio file formats? And what is the purpose for each one? So let’s break that down, and in so doing, determine the best audio file formats to use when editing videos.

There are three principle audio groups:

  • Uncompressed file formats: .WAV, .AIFF
  • Compressed Lossless file formats: .FLAC, .ALAC (Apple Lossless)
  • Compressed Lossy file formats: .MP3, .AAC, .WMA, .OGG

UNCOMPRESSED

Uncompressed audio formats are the equivalent of RAW video formats.This allows for a wide range of audio bit depth and sample rates. This results in better audio quality and covers the full frequency that the human ear can hear.

Uncompressed audio files are typically easier to work with in audio and video editors because they require less processing to play back. And since uncompressed files contain more data, you’ll get better results when you’re manipulating the audio in post with various effects.

COMPRESSED LOSSLESS

The name “compressed lossless” may sound like a contradiction. However, the compression isn’t occurring in a way that degrades the audio itself. Think of it almost like ZIP-compressing a music file, then unzipping it during playback.

Compressed lossless audio files can be anywhere from 1/2 to 1/3 the size of uncompressed audio files — or even smaller, while the audio quality is still lossless, enabling full frequency playback.

The drawbacks for compressed lossless files are that they are the least supported (compared to uncompressed and compressed lossy.) They also require a little more computing power to play back, because they need decoding.

COMPRESSED LOSSY

Compressed lossy audio formats are likely the most common audio files you use when listening to music. This is because compressed lossy audio files have the most support among portable devices, and they have the smallest file sizes; up to 1/10 WAV or AIF.

Compressed lossy audio files are ideal for streaming online.

However, all that compression comes at a cost. The drawback is that the audio has a limited frequency range and noticeable audio artifacts when compared to a lossless format. Another drawback is that you have less range in post when it comes to editing and audio manipulation.

WHICH TO USE FOR AUDIO EDITING?

WAV or AIF.


Please rate the helpfulness of this tip.

Click on a star to rate it!

… for Adobe Premiere Pro CC

Tip #470: How to Improve Chroma-keys in Premiere

Larry Jordan – LarryJordan.com

Adjust until the background is solid black, the foreground solid white.

These are the key tweaks to get a clean chroma-key using Ultra Key.

Topic $TipTopic

Premiere has an excellent chroma-keyer in Ultra Key. But, once you’ve applied the effect, how do you clean the key to get the best results? Here’s the tweaks you need to know.

  • Click the eyedropper tool and click near the face of your talent. However, not so close that you run the risk of catching some hair.

NOTE: If the lighting is uneven, a clean key around the face is most important.

  • Switch the Ultra Key effect Output setting fromm Composite to Alpha Channel. The foreground needs to be solid white, no shades of gray. The background needs to be solid black, no “white dust.”
  • If adjustments need to be made, adjust the background first. For example, if the background isn’t solid black, adjust Pedestal until it is.

NOTE: You may need to add a mask to get rid of garbage in the frame. Most keys require masks.

  • If the foreground has shades of gray, adjust Transparency first. If that doesn’t fully solve the problem, gently tweak Tolerance.

EXTRA CREDIT

The best way to get a clean key is to light the background evenly, at around 50% gray scale on the Waveform Monitor and keep talent at least ten feet in front of the screen.


Please rate the helpfulness of this tip.

Click on a star to rate it!