… for Visual Effects

Tip #614: What is the Alpha Channel

Larry Jordan – LarryJordan.com

Alpha channels allow us to combine multiple images into a new single image.

Topic $TipTopic

An alpha channel is essentially any channel other than the channels that define color values for pixels in an image. In graphics, the alpha channel is the part of the data for each pixel that is reserved for transparency information. 32-bit graphics systems contain four channels — three 8-bit channels for red, green, and blue (RGB) and one 8-bit alpha channel.

NOTE: 8-bit color channels means that each channel can display up to 256 shades of that color.

The alpha channel is really a mask. It specifies how the pixel’s colors should be merged with another pixel when the two are overlaid, one on top of the other. In a 2D pixel which stores a color for each pixel, additional data is stored in the alpha channel with a value ranging from 0 to 1. A value of 0 means that the pixel is transparent while a value of 1 means the pixel is fully opaque.

Typically, alpha channels are defined per object. Different parts of the object would have different levels of transparency depending on how much you wanted the background to show through. This allows you to create rectangular objects that appear as if they are irregular in shape — you define the rectangular edges as transparent so that the background shows through. This is especially important for animation, where the background changes from one frame to the next.

Rendering overlapping objects that include an alpha value is called alpha blending. Blend modes provide a variety of ways to do this alpha blending.

EXTRA CREDIT

The concept of an alpha channel was introduced by Alvy Ray Smith in the late 1970s and fully developed in a 1984 paper by Thomas Porter and Tom Duff.


Please rate the helpfulness of this tip.

Click on a star to rate it!

… for Visual Effects

Tip #607: Autodesk Flame & Smoke Shortcuts

Larry Jordan – LarryJordan.com

A searchable list of Flame and Smoke Classic Shortcuts

The Flame logo.

Topic $TipTopic

Autodesk published a searchable list of keyboard shortcuts for both Flame and Smoke, organized by function.

You can find them here.


Please rate the helpfulness of this tip.

Click on a star to rate it!

… for Codecs & Media

Tip #613: Blu-ray Disc File Formats

Larry Jordan – LarryJordan.com

The most popular distribution format for Blu-ray Disc is H.264/AAC.

The Blu-ray Disc logo.

Topic $TipTopic

Continuing our look at Blu-ray Discs that we started in Tip #612, here’s a list of supported codecs for Blu-ray Discs.

NOTE: You can use any media format for mastering, but files for distribution must use one of these formats.


According to this Sony website, the following audio and video codecs are supported on Blu-ray Disc® media.

Video Codecs

  • MPEG-2: Enhanced for HD, also used for playback of DVDs and HDTV recordings.
  • MPEG-4 AVC: Part of the MPEG-4 standard also known as H.264 (High Profile and Main Profile).
  • SMPTE VC-1: A standard based on Microsoft® Windows Media® Video (WMV) technology.

Audio Codecs

  • Linear PCM (LPCM): Offers up to 8 channels of uncompressed audio.
  • Dolby Digital® (DD): Format used for DVDs also known as AC3, offers 5.1-channel surround sound.
  • Dolby Digital® Plus (DD+): Extension of DD, offers increased bitrates and 7.1-channel surround sound.
  • Dolby® TrueHD: Extension of MLP Lossless, offers lossless encoding of up to 8 channels of audio.
  • DTS Digital Surround®: Format used for DVDs, offers 5.1-channel surround sound.
  • DTS-HD®: Extension of DTS, offers increased bitrates and up to 8 channels of audio.

Please rate the helpfulness of this tip.

Click on a star to rate it!

… for Codecs & Media

Tip #612: The Background of Blu-ray Disc

Larry Jordan – LarryJordan.com

A quick look at the history of Blu-ray Disc.

The Blu-ray Disc logo.

Topic $TipTopic

I’ve gotten a fair amount of email recently asking about Blu-ray Discs.

The specs for Blu-ray Disc were developed by Sony and unveiled in October, 2000 specifically for HD media. The first Blu-ray prototype was released in April, 2003. The format is now controlled by the Blu-ray Disk Association.

Blu-ray Disc was named for the blue laser it uses to read and write media. Blue lasers support higher density storage than the red lasers used by DVDs.

A single layer Blu-ray Disc holds 25 GB, a dual-layer holds 50 GB. While vast at the time of its release, these small file limits today mean that we need to use significant media compression to get our files to fit. Currently, Blu-ray Discs support HD, HDR and 3D media formats, all within the same storage capacity.

NOTES

  • The original DVD was designed for SD media and holds about 4.7 GB single layer or 8.5 GB dual-layer.
  • CD-ROMs hold between 650 – 700 MB.

EXTRA CREDIT

Tip #613 has a list of all supported Blu-ray Disc distribution formats.


Please rate the helpfulness of this tip.

Click on a star to rate it!

… for Adobe Premiere Pro CC

Tip #611: Tracking Adjusts Letter-spacing

Larry Jordan – LarryJordan.com

In general, widen body text, narrow title text.

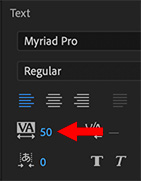
Increased tracking widens the spacing between letters, decreased tracking narrows it.

Topic $TipTopic

Tracking adjusts the spacing between letters. This is a helpful technique for titles in video because opening letter spacing often makes text more readable. Here’s how.

The tracking control is located under the font name in the Essential Graphics panel, or as part of the Text effect in Effect Controls.

Opening tracking (adding a positive number) expands the width between characters. Often, for video, widening the tracking makes smaller point size text easier to read.  While I don’t tighten tracking for body text, I do tighten tracking for title text.

How much you adjust tracking is up to you – there’s no magic number. However, in general, you don’t need to adjust tracking by much.

EXTRA CREDIT

In some cases, though, tracking doesn’t give us enough control. That’s where kerning comes in. Tip #610 discusses kerning in Premiere, which is a more precise way to adjust the horizontal spacing between specific pairs of letters; most often for title text.


Please rate the helpfulness of this tip.

Click on a star to rate it!

… for Adobe Premiere Pro CC

Tip #610: Kerning is Turned Off in Premiere

Larry Jordan – LarryJordan.com

I recommend assigning shortcuts to 5 & 50 unit movement.

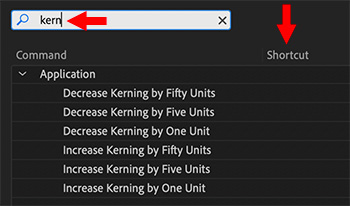
Search for “kern” in Keyboard Shortcuts, then assign the one’s you want.

Topic $TipTopic

Kerning is the ability to adjust the space between to letters to make it look more pleasing. Except… kerning is turned off by default in Premiere. Yes, you can select letters and adjust the tracking (Tip #611), but kerning allows us more precision over pairs of letters. While we generally don’t kern body text, we frequently need to kern titles.

To enable kerning shortcut controls:

  • Open Premiere’s Keyboard Shortcuts panel.
  • Search for “kern”
  • Assign shortcuts to the options you prefer.

EXTRA CREDIT

After experimenting with these, I recommend enabling movement by five and fifty units. I assigned these to the comma and period keys, using different modifier keys.

To kern, enable the Text tool and place it between the two letters you want to adjust. Then, type the keyboard shortcuts you just assigned to move the letters closer or farther apart – the exact amount depends upon what looks good to you.


Please rate the helpfulness of this tip.

Click on a star to rate it!

… for Adobe Premiere Pro CC

Tip #602: Premiere: Color Wheel Secret Tip

Larry Jordan – LarryJordan.com

Lock the hue while varying the saturation.

Here’s a secret tip when working with the macOS Colors window to choose a color.

Topic $TipTopic

Here’s a secret tip when working with the macOS Colors window to choose a color.

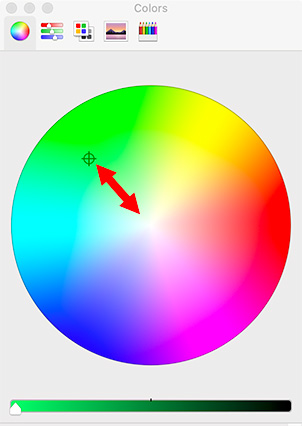
Drag the small puck in the color wheel to choose a color, then press the Shift key.

This constrains the movement of the puck so that it moves in a straight line between its current position and the center.

This allows you to lock the hue while changing the saturation.


Please rate the helpfulness of this tip.

Click on a star to rate it!

… for Codecs & Media

Tip #591: In-Depth Overview of USB

Larry Jordan – LarryJordan.com

USB is ubiquitous and growing in speed.

A USB logo and plug.

Topic $TipTopic

The folks at Juiced Systems created an excellent overview of USB called: “Know Your USB. A Practical Guide to the Universal Serial Bus.” (Juiced Systems, based in Orange County, CA, designs & creates unique high performance computer accessories for power users and enterprise professionals.)

Key Takeaways

  • USB cables, ports, and connectors (hardware) have varying USB versions, generations, and specifications (software) that dictate the speed and performance.
  • USB types are denoted by letters, such as Type-A and Type-B, while USB versions have numbers to them, like USB 3.2 or USB4.
  • A USB device may physically fit into a USB port, but its performance can be hampered by a generation or standard mismatch. For example, your USB 2.0 device can work with a USB 3.0 port, but the speed takes on USB 2.0’s. Similarly, a 3.0 device can work with a USB 2.0 port, and the speed is that of the port. USB devices often specify the highest standard they support and require in their product labels.
  • Speaking of speed, USB 1.0, 2.0, 3.0, and 4 each have maximum data transmission rates. These are theoretical numbers at best, and the actual speed still varies. If you are experiencing slow data transfer, it may have to do with the USB port (transfer speed), as noted above, as well as the read/write speed of the devices involved.

USB has been hailed as the king of connectors or the port that changed everything. But at the end of the day, it is that cable or port that makes your life easier as you charge your phone, save files, or access your peripherals on your laptop.

EXTRA CREDIT

The full report is well-written, in-depth and easy-to-understand. Here’s the link.


Please rate the helpfulness of this tip.

Click on a star to rate it!

… for Apple Final Cut Pro X

Tip #608: Enable On-screen Inspector Controls

Larry Jordan – LarryJordan.com

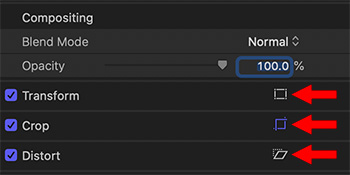
Blue means an on-screen control is enabled.

When an icon is blue, on-screen Controls in the Viewer are active.

Topic $TipTopic

In the Video Inspector are three icons that enable on-screen Viewer controls to create or modify a variety of Inspector effects.

Indicated by red arrows in the screen shot, when an icon is white, the controls are off. When an icon is blue, the controls are active and displayed in the Viewer.

You can activate these either by clicking them in the Inspector or selecting an effect from the small pop-up menu in the lower left corner of the Viewer.


Please rate the helpfulness of this tip.

Click on a star to rate it!

… for Apple Final Cut Pro X

Tip #601: FCP X: Color Wheel Secret

Larry Jordan – LarryJordan.com

Lock the hue while varying the saturation.

Press and hold the Shift key while dragging to constrain the hue.

Topic $TipTopic

Here’s a secret tip when working with the macOS Colors window to choose a color.

Drag the small puck in the color wheel to choose a color, then press the Shift key.

This constrains the movement of the puck so that it moves in a straight line between its current position and the center.

This allows you to lock the hue while changing the saturation.


Please rate the helpfulness of this tip.

Click on a star to rate it!