… for Apple Final Cut Pro X

Tip #600: Store the Same Clip in More Than One Event

Larry Jordan – LarryJordan.com

Option-dragging creates independent references to the same clip.

This is the same clip, stored in two different events, with two different file names.

Topic $TipTopic

Normally, we can only store one clip in one event. Here’s a new technique that allows us to create independent copies of media without increasing storage needs.

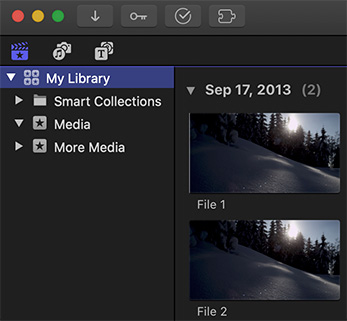
If you import media into Final Cut Pro X using Leave Files in Place:

  • When you drag a media clip from one event to another, it moves the media file.
  • When you Option-drag a media clip from one event to another, it creates an independent copy of that clip, without copying the clip or increasing storage requirements.

Each clip can be independently renamed, edited into the timeline with different In/Out points, or have different effects applied to either clip without changing the other clip.

The big benefit to this is that you can create as many iterations of a clip as you need, without unnecessarily filling storage.


Please rate the helpfulness of this tip.

Click on a star to rate it!

… for Random Weirdness

Tip #599: Some Inspired Exterior Photographs

Larry Jordan – LarryJordan.com

As cameras get faster lights can get smaller. Take a look at the results!

Image courtesy LumaCube & ShipWreck Photography

Topic $TipTopic

I’ve always been fascinated by beautiful lighting – from portraits to wide shots. Most of the time, the stuff I like takes a generator, a crew of 50 and three semi’s worth of gear. Which, these days, is out of the question. Sigh…

Recently, though, I’ve been amazed with the light output and creativity coming from small LumaCubes. These seem perfect for lighting small indoor home studios – especially for live streaming and close cameras.

However, that doesn’t mean they can’t be used outside. If you are looking for stunning photography created using microscopically small lights, take a look at the Gallery page of the LumaCube website.

Here’s the link to their image gallery.


Please rate the helpfulness of this tip.

Click on a star to rate it!

… for Random Weirdness

Tip #598: How to Set Up a Live Streaming Studio

Larry Jordan – LarryJordan.com

The best first step is to get a good microphone.

A screen shot from Curtis Judd’s streaming webinar.

Topic $TipTopic

As we look to move our studios to our homes and start live streaming, it is useful to get a guide on what gear to use and how to use it.

Curtis Judd has an interesting and informative YouTube video where he walks through all the equipment he uses to create live streams for YouTube.

Here’s the link.

EXTRA CREDIT

This is an article I wrote on the gear the Digital Production Buzz used to create our live streaming audio podcasts. Here’s the link.


Please rate the helpfulness of this tip.

Click on a star to rate it!

… for Random Weirdness

Tip #584: 5 Tips When Picking an HDR Monitor

Larry Jordan – LarryJordan.com

Tips to keep in mind when picking a monitor.

Apple Pro Display XDR, courtesy of Apple.

Topic $TipTopic

These tips, written by Scharon Harding, first appeared in Creative Planet Network. This is a summary.

When picking an HDR monitor, these should be your top considerations:

  • Brighter is better. HDR monitors can get much brighter than SDR ones. If you’re a general user, opt for a monitor that’s VESA-certified for at least DisplayHDR 500 (a minimum max brightness of 500 nits with HDR media), while gamers will probably want DisplayHDR 600 or greater. Creative professionals like video editors should get at least DisplayHDR 1000.
  • Backlight dimming type is crucial. If you go for DisplayHDR 500 or higher, you’ll know you have at least edge-lit dimming. And when it comes to FALD (full array local dimming) or edge-lit dimming, more zones are better
  • The more DCI-P3 coverage, the better, but be careful to check color accuracy.
  • As usual, higher contrast ratios are best. High contrast is an area where HDR displays shine over their SDR counterparts.
  • HDR10 is the only HDR format Windows users need (unless they plan to hook their display up to something like a Blu-ray player).

EXTRA CREDIT

Tom’s Hardware has developed a guide on how to choose the best HDR monitor. Here’s the link to learn more.


Please rate the helpfulness of this tip.

Click on a star to rate it!

… for Apple Motion

Tip #597: Create Striking Duo-Tone Images in Motion

Larry Jordan – LarryJordan.com

Threshold creates striking duo-tone images, which you can then colorize.

Threshold creates duo-tone images (top) from a full color image (middle) using the settings illustrated at the bottom.

Topic $TipTopic

If you want to create striking, duo-tone backgrounds, the Threshold filter in Apple Motion is exactly what you need.

The Threshold filter converts full-color images into stark, black-and-white images which you can then colorize using the same filter. The operation is simple:

  • Select an image. Then, apply Filters > Color > Threshold.
  • Instantly the image is a black-and-white duotone.
  • Next, select one of the two color boxes and adjust colors to suit. For me, the most effective color to adjust is the darker box.

The screen shot shows the results (top), source (middle), and the settings that got us there (bottom).


Please rate the helpfulness of this tip.

Click on a star to rate it!

… for Apple Motion

Tip #596: An Easy Way to Create a 3D Look

Larry Jordan – LarryJordan.com

By default, Motion elements are 2D.

Top red arrow: Switch from 2D to 3D. Middle arrow: Move an element back in space. Bottom arrow: Adjust rotation of element.

Topic $TipTopic

Motion provides a very easy way to create 3D effects, where one element passes through another. Best of all, it just takes one mouse click.

After creating the shapes you want:

  • Store them in the same folder. (This isn’t strictly necessary, but it makes things easier.)
  • On the right side of the group holding the shapes, click the 3 Shapes icon, indicated by the top red arrow. This switches the group from 2D to 3D.
  • Select an element, then go to Inspector > Properties and twirl down Rotation. Adjust the Y axis so the shape goes back from the front of the screen.
  • Twirl down Position and adjust Z position until one shape passes through the next.

Tweak Position and Rotation settings for all elements to get the look of the depth you want.


Please rate the helpfulness of this tip.

Click on a star to rate it!

… for Apple Motion

Tip #595: Create Unusual Borders in Motion

Larry Jordan – LarryJordan.com

Shape styles can be applied to any shape, and are control by Outline > Width.

A rectangle with a blue Traditional > Acrylic shape style applied.

Topic $TipTopic

You are probably familiar with using Fill and Outline for shapes. But there is a wealth of other edge options hiding in Shape Styles. After you draw a shape, or use the pen or paint brush tools to create a shape, select the shape using the Arrow tool.

NOTE: If you select a shape using the Shape tool, changes will affect the NEXT shape you draw, not the current one.

  • With the shape selected, check Outline, then enter a Width value of 10 or more.
  • Open the HUD (F7) and click Shape Style at the bottom. There you’ll find dozens of different styles from Traditional to Light, that can be applied to the edges of your shape.
  • Use Width to modify the width of the effect.

EXTRA CREDIT

Shape styles can only be applied to the edges of a shape drawn by the shape, pen or paint brush tools.


Please rate the helpfulness of this tip.

Click on a star to rate it!

… for Visual Effects

Tip #594: What Is Feathering?

Larry Jordan – LarryJordan.com

Feathering softens edges in images, shapes or masks.

The feathered edge of a mask. The top half shows feathering out, while the lower half illustrates feathering in.

Topic $TipTopic

Feathering softens edges. When you soften (feather) an edge, the softening has to go somewhere. This means that you can feather OUT from the edge (top of screen shot) or IN from the edge.

Think of feathering as “blurring the edges.” It affects the edge, but not the rest of the image. Feathering has three components:

  • The direction of the feather
  • The amount of the feather
  • The shape of the ramp from the edge to the surface

Each NLE has options which allow you to adjust each of these parameters.

However, feathering will not allow you to extend an image beyond its original borders.


Please rate the helpfulness of this tip.

Click on a star to rate it!

… for Visual Effects

Tip #593: Opacity vs. Levels to Darken

Larry Jordan – LarryJordan.com

Lower highlights to “dim” a background, rather than opacity.

Image courtesy of 2ReelGuys.com.
The problem with lowering opacity (left)to dim an image is that the background will show through. Instead adjust levels (right).

Topic $TipTopic

Backgrounds are wonderful, especially for info-graphics. But, all too often, they are too bright. (Especially backgrounds from Apple.) We can “dim” them using opacity – but that isn’t a good idea.

What opacity does is “darken” an image by making it translucent. Since the default background in most NLEs is black, lowering opacity gives the illusion of darkening. However, as you can see from the left side of the screen shot, if there is anything in the background, it will show through. Which kinda spoils the dimming effect.

Instead, use the color grading controls in your NLE and lower highlights about 50% (right image). This darkens a background without creating translucency, or altering colors.

EXTRA CREDIT

In Photoshop, use Image > Adjustments > Levels to achieve similar results.


Please rate the helpfulness of this tip.

Click on a star to rate it!

… for Visual Effects

Tip #592: Make Zooms More Interesting

Larry Jordan – LarryJordan.com

The Anchor Point affects both scale and rotation effects.

Image courtesy: Ed Greene and Greene HD Productions (www.greenehdtv.com/)
In Premiere, slide the circle (red arrow) to move the anchor point.

Topic $TipTopic

All of us a familiar with how scaling works: as you scale an image it gets larger or smaller. But, there’s a little known setting you can tweak that will make your zooms or rotations much more interesting.

The Anchor Point, which exists in both Premiere and Final Cut, is the point in an image which determines the center of rotation and/or scaling.

By default, both programs put the Anchor Point in the center of the frame. But, you can modify the point, which changes how an image rotates and/or scales.

  • To adjust this in Premiere (screen shot) select a clip, in Effects Control click the word “Motion” to enable on-screen controls, then slide the circle. (See screen shot.)
  • To adjust the anchor point in Final Cut, select a clip and go to Transform in the Video Inspector.

Please rate the helpfulness of this tip.

Click on a star to rate it!