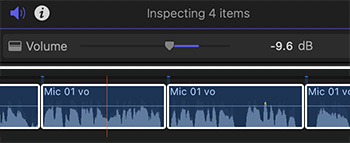
Use the Volume slider in Audio Inspector to adjust multiple clips at once.
A composite showing the Volume slider in the Inspector and selected clips in the timeline.
Normally, we adjust clip volumes by dragging the volume line in a timeline clip up or down. But there’s a faster way.
Select all the clips you want to adjust in the timeline. Then, in the Audio Inspector, drag the Volume slider. This makes an absolute audio adjustment, setting all selected clips to the same level.
NOTE: An “absolute” audio adjustment sets all clips to the same level, regardless of the level at which the clip was originally set.
This is much faster – and more accurate – than changing each clip individually.
Please rate the helpfulness of this tip.
Click on a star to rate it!
https://www.theinsidetips.com/wp-content/uploads/2019/09/Tips-Logo-700x150.jpg00Larry Jordanhttps://www.theinsidetips.com/wp-content/uploads/2019/09/Tips-Logo-700x150.jpgLarry Jordan2021-03-29 01:30:002021-03-26 16:16:34Tip #1515: A Faster Shortcut to Audio Levels
The Tilde key (~) has two very useful – but obscure – functions in Final Cut Pro. Let me illustrate.
NOTE: The Tilde key is located immediately below the ESC key at the top left corner of the keyboard.
First, press Cmd + ~ to hide or display the Library list (called the “Sidebar”) to the left of the Browser.
Second, when you have audio connected to a clip in the Primary Storyline – for example, narration or a music clip – when you drag the clip in the Primary Storyline, all the clips attached to it move as well.
But, when tilde is pressed, the Primary Storyline clip moves without moving any of the connected clips.
The tilde key “overrides” connections, which is a very useful shortcut to know.
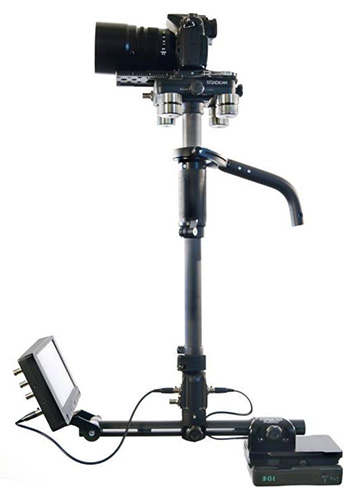
Steadicam is a handy way to get professional stabilized footage.
Steadicam Aero (image courtesy of Tiffen.)
This article, written by Lewis MacGregor, first appeared in PremiumBeat.com. This is a summary.
Once mastered, Steadicam is a handy way to get professional stabilized footage.
The world of Steadicams and stabilized footage has drastically changed over the last decade. At one point, the costly tool was reserved only for professional broadcasts, TV, and cinema. Yet, with new filmmakers born of the DSLR revolution yearning for something similar, we also saw the birth of inexpensive stabilization tools that followed the principle of Steadicams, but the results weren’t as successful. Further into the decade, we then saw the birth of the consumer-priced gimbal, and now everyone can obtain smooth footage.
Steadicams have seemingly reverted to professional productions only, whereas low-budget and new filmmakers opt towards a gimbal like the DJI Ronin-S.
A Steadicam is a camera rig that’s uniquely designed to stabilize camera shake. It mechanically isolates the camera from the operator’s movement, allowing for a smooth shot, even when moving over an asymmetrical surface. First created in the 1970s, the Steadicam quickly took Hollywood by storm as a better option for shooting smooth tracking shots.
A Steadicam, unlike a gimbal, primarily achieves smooth footage from a series of counterbalance weights and operator skill. Unlike a gimbal, which uses a motor to help achieve stable footage, the Steadicam’s primary tool is gravity. As such, the use of a Steadicam comes with a steep learning curve, and it’s also why a Steadicam operator is a designated position on a production. It requires skill and expertise to master.
This in-depth article continues with lots of Steadicam example videos and the following subjects:
Why Would I Need a Steadicam?
How Do I Set up a Steadicam?
How Much Do Steadicams Cost?
The Less Expensive Alternative
More Info on Steadicams (including a variety of links)
Please rate the helpfulness of this tip.
Click on a star to rate it!
https://www.theinsidetips.com/wp-content/uploads/2019/09/Tips-Logo-700x150.jpg00Larry Jordanhttps://www.theinsidetips.com/wp-content/uploads/2019/09/Tips-Logo-700x150.jpgLarry Jordan2021-03-26 01:30:002021-03-26 01:30:00Tip #1510: A Quick Guide to Steadicams
There are two reports I get every day that are very helpful in tracking what’s going on at the high-end of the media industry: broadcast and film.
First, is TV Technology. They are a part of Future US Inc., an international media group and leading digital publisher of dozens of special-interest publications.
The other is a daily newsletter from the NAB called “NAB Smart Brief.”
NAB’s Smartbrief is a daily snapshot of broadcast industry news pulled from numerous leading media sources. Smartbrief contains summaries of the news that matters to you, written by expert editors to save you time and keep you informed and prepared.
Tradition media is down, streaming media is way up.
Image credit: Ranker via TV Technology.
According to TV Technology (link) global streaming subscriptions jumped well past 1 billion. Reporting on the Motion Picture Association’s annual THEME report, TV Technology wrote that the total number of online video subscriptions jumped to 1.1. billion at the end of 2020.
TV Technology writes:
MPA’s categorization of online video subscriptions specifically refers to streaming services, like Netflix and Disney+. In 2020, 232.1 million new subscriptions were added across the world, a 26% increase from 2019. Meanwhile, cable subscriptions decreased by 2% in 2020, dropping to 530.7 million globally.
In terms of revenue, the pay-TV subscription market, which excludes online video in the MPA report, was $233.1 billion. Despite a decrease in subscriptions, cable actually grew its revenue by $871.4 million to $111.6 billion, keeping it as the largest subscription video market. Online video is the third largest subscription market and increased $14.3 billion (34%) in 2020.
When looking specifically at the U.S., online video subscriptions shot up to 308.6 million, an increase of 32%. Virtual pay-TV subscriptions also saw an increase, adding 12.1 million subscriptions in 2020, up 29%. Cable and satellite subscriptions both declined.
However, like the global market, cable remains the largest subscription market in terms of revenue in the U.S.
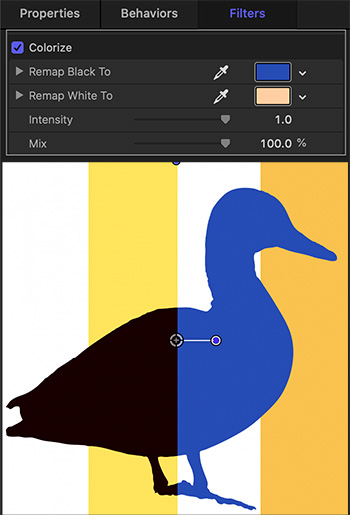
Colorize filter settings (top). (Bottom from left to right) Original image, replace white, replace black, replace both.
One of the more helpful tools in Apple Motion is the Colorize filter. This turns black-and-white graphics and into something MUCH more interesting.
Here’s how it works.
SETUP
Select the black-and-white graphic you what to change. (This will work with video, but it is designed for graphics.)
Apply Filters > Color > Colorize(screen shot top).
To change white to any color: Click the white color chip and change this to the color you prefer.
To change black to any color: Click the black color chip and change this to the color you prefer.
And, for those truly daring, change BOTH color chips to change both white and black.
EXTRA CREDIT
The screen shot illustrates all the different options. Also, you can use keyframes to animate the color selection over time.
Please rate the helpfulness of this tip.
Click on a star to rate it!
https://www.theinsidetips.com/wp-content/uploads/2019/09/Tips-Logo-700x150.jpg00Larry Jordanhttps://www.theinsidetips.com/wp-content/uploads/2019/09/Tips-Logo-700x150.jpgLarry Jordan2021-03-25 01:30:002021-03-25 01:30:00Tip #1503: The Colorize Filter is an Essential Friend
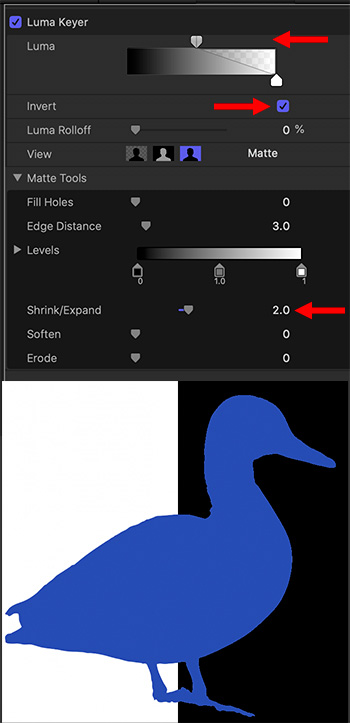
Removing a white background is easy, just hard to find.
Luma keyer settings (top), original image (lower left) and final.
Removing a white background in Motion is easy, but the settings are hard to find. This is one of those tips that, if you know it, seems easy. And, if you don’t, drives you nuts.
Import an element that has a white background into Motion and select it.
Apply Filters > Keying > Luma Keyer
Check the Invert checkbox to key on white (second red arrow).
Slide the top Luma slider to the right until the foreground is as solid as possible (top red arrow). Click the View > Matte icon to make sure the foreground is solid white.
To get rid of white edges, slide Matte Tools > Shrink/Expand to the right a pixel or two; I used 2.0(bottom red arrow).
Done.
Please rate the helpfulness of this tip.
Click on a star to rate it!
https://www.theinsidetips.com/wp-content/uploads/2019/09/Tips-Logo-700x150.jpg00Larry Jordanhttps://www.theinsidetips.com/wp-content/uploads/2019/09/Tips-Logo-700x150.jpgLarry Jordan2021-03-25 01:30:002021-03-25 01:30:00Tip #1501: Get Rid of a White Background
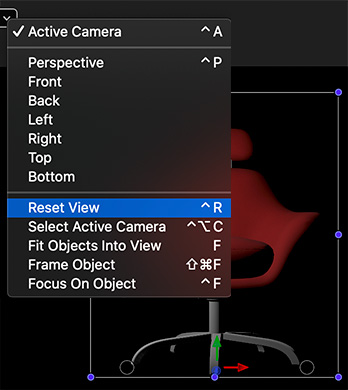
Active Camera menu options, with Reset View used to restore the original view.
Once you add lights. cameras or sets to a Motion project, you move into 3D space. And that is a place where it is easy to get lost. Really, really lost.
Why? Because the background is black, the space is vast, we are moving in three dimensions, and there’s no floor.
NOTE: All three of these options change your view, but they don’t alter your Motion project.
To help you quickly get reoriented and find home, go to the Active Camera menu in the top left corner of the Canvas (Viewer).
Reset View (Shortcut: Control + R). This instantly brings you back to the 0,0,0 point. So, no matter how far you wander, you can always get home.
Fit Object into View (Shortcut: F). Select an element in the Layers pane. This option instantly fills the frame with the selected object. This is great way to quickly see small text or background elements.
Frame Object (Shortcut: Shift + Cmd + F). This rotates the selected element to the active camera’s point of view, centers it, then zooms until it fills the frame.
These options are even more useful when you are using other perspectives than Active Camera.
EXTRA CREDIT
Using Frame Object often means that you are seeing an element from a different perspective than the one displayed in the Active Camera menu.
Choose Reset View to get everything reset back to normal.
Please rate the helpfulness of this tip.
Click on a star to rate it!
https://www.theinsidetips.com/wp-content/uploads/2019/09/Tips-Logo-700x150.jpg00Larry Jordanhttps://www.theinsidetips.com/wp-content/uploads/2019/09/Tips-Logo-700x150.jpgLarry Jordan2021-03-25 01:30:002021-03-25 01:30:00Tip #1482: Don’t Get Lost in 3D Space
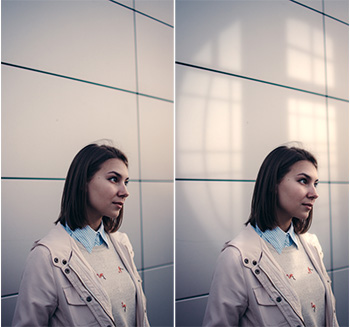
Optics is designed to correct, enhance, and stylize images with an easy-to-use interface.
A before and after composite showing Boris FX Optics in action.
BorisFX is recognized as a leader in visual effects software. Last year, they released a new program called Boris FX Optics.
Available as a plugin for Adobe Photoshop, Adobe Lightroom, and as a standalone application for macOS and Windows, the Optics toolkit features over 150 filters and thousands of presets designed by VFX industry veterans to correct, enhance, and stylize images with an easy-to-use interface.
The plugin can be purchased for only $9/month or $99/year.
Features include:
160 total filters that simulate optical glass cameras, specialized lenses, film stocks, lens flares, optical lab processes, grain, exacting color correction, natural light, and photographic effects
75 Boris FX Sapphire filters included: Create stunning organic looks with superior image quality and creative control. Filters include lens flares, light leaks, glow, night sky, clouds, luna (moon), zap (lightning), free lens, rack defocus, digital damage, and more.
Thousands of customizable presets
294 color and black & white still photography film stocks, motion picture film stocks, and historical photography processes
89 color grading presets from Academy Award-nominated movies including 2001: A Space Odyssey, Apocalypse Now, Blade Runner, Back to the Future, Frankenstein, Gone with the Wind, King Kong, Saving Private Ryan, and Titanic
Gobo library includes 751 gobo lighting effects categorized into abstract, doors, elements, foliage, snowflakes, textures, and windows groups
Paint using black & white, blur, clone, color, eraser, mosaic, red-eye, repair, and scatter brushes
Layering system to apply multiple filters and sophisticated masking tools to isolate effects
Non-destructive crop, rotate, and scale (standalone only)
Maxon is presenting its 3D and Motion Design Show starting April 13; with a warm-up show that just finished and is now available online. Maxon’s 3D and Motion Design Show features the world’s top motion graphics and VFX artists showcasing 3D techniques and real-world production workflows using Cinema 4D, Redshift and the Red Giant suite of products.
Every event is free, streaming live and available online shortly after airing on 3DMotionShow.com as well as the Maxon YouTube channel. Viewers will be able to interact and send in questions via chat for the live Q&A segments with artists.
Past and upcoming shows can be found here. The first episode is already online, while the next episodes start April 13.
Please rate the helpfulness of this tip.
Click on a star to rate it!
https://www.theinsidetips.com/wp-content/uploads/2019/09/Tips-Logo-700x150.jpg00Larry Jordanhttps://www.theinsidetips.com/wp-content/uploads/2019/09/Tips-Logo-700x150.jpgLarry Jordan2021-03-24 01:30:002021-03-24 01:30:00Tip #1512: Rediscover the State-of-the-Art
We may request cookies to be set on your device. We use cookies to let us know when you visit our websites, how you interact with us, to enrich your user experience, and to customize your relationship with our website.
Click on the different category headings to find out more. You can also change some of your preferences. Note that blocking some types of cookies may impact your experience on our websites and the services we are able to offer.
Essential Website Cookies
These cookies are strictly necessary to provide you with services available through our website and to use some of its features.
Because these cookies are strictly necessary to deliver the website, refuseing them will have impact how our site functions. You always can block or delete cookies by changing your browser settings and force blocking all cookies on this website. But this will always prompt you to accept/refuse cookies when revisiting our site.
We fully respect if you want to refuse cookies but to avoid asking you again and again kindly allow us to store a cookie for that. You are free to opt out any time or opt in for other cookies to get a better experience. If you refuse cookies we will remove all set cookies in our domain.
We provide you with a list of stored cookies on your computer in our domain so you can check what we stored. Due to security reasons we are not able to show or modify cookies from other domains. You can check these in your browser security settings.
Google Analytics Cookies
These cookies collect information that is used either in aggregate form to help us understand how our website is being used or how effective our marketing campaigns are, or to help us customize our website and application for you in order to enhance your experience.
If you do not want that we track your visit to our site you can disable tracking in your browser here:
Other external services
We also use different external services like Google Webfonts, Google Maps, and external Video providers. Since these providers may collect personal data like your IP address we allow you to block them here. Please be aware that this might heavily reduce the functionality and appearance of our site. Changes will take effect once you reload the page.
Google Webfont Settings:
Google Map Settings:
Google reCaptcha Settings:
Vimeo and Youtube video embeds:
Other cookies
The following cookies are also needed - You can choose if you want to allow them:
Privacy Policy
You can read about our cookies and privacy settings in detail on our Privacy Policy Page.