… for Random Weirdness

Tip #1689: Frame.io Announces v3.7.1 – Boosts Premiere Pro

Larry Jordan – LarryJordan.com

Frame.io beefs up its support for Adobe Premiere Pro and After Effects.
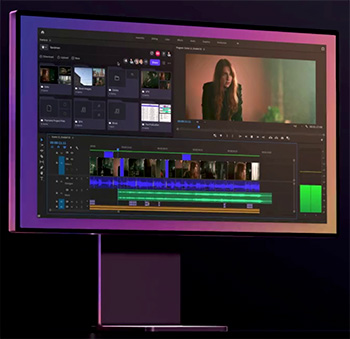
Adobe Premiere Pro running the new Frame.io extension (courtesy of Frame.io).

Topic $TipTopic

Last week, Frame.io announced version 3.7.1. This update features new Adobe integration extensions along with dozens of other performance improvements and enhancements that customers have asked for.

Frame.io 3.7.1 includes redesigned Adobe Premiere Pro and After Effects extensions with intuitive new user interfaces. Editors and motion graphics artists will find the most commonly used controls and commands at their fingertips. Navigation controls have been moved from the bottom of the screen to the top, giving customers a larger and clearer view of assets. Switching between projects and teams has been streamlined, file path breadcrumbs have been added, and the download button now lets you import media directly into Premiere Pro or download it for later review. It’s also easier to upload active sequences into Frame.io, so sharing the latest version of a cut is faster than ever.

The new Adobe extensions are free for all Frame.io users and are available for download in the Adobe Creative Cloud Marketplace.

Frame.io 3.7.1 also adds a resizable navigation panel to the web app. Simply click and drag to show additional folders and text, or shrink it to leave more room for assets. New shortcut menus let customers quickly move assets up one folder, making it even faster to reorganize clips. Files can now be uploaded directly from Google Drive on iOS devices. This makes it easier for customers to add assets, no matter where they are.

Here’s a link to learn more.


Please rate the helpfulness of this tip.

Click on a star to rate it!

… for Random Weirdness

Tip #1686: Why “IP is the New Prime Time”

Larry Jordan – LarryJordan.com

“Ultimately, it’s about brand and content.” (Peter Csathy)

Proposed logo for WarnerMedia/Discovery.

Topic $TipTopic

Angela Watercutter, of Wired, writes: “Controlling Hollywood stopped being just about who had the biggest opening weekend at the box office or a massive hit during prime time. A turf war over intellectual property became a land-grab effort to see who could bulk up their streaming service with the best library of content.”

This article, written by Adrian Pennington, first appeared in NABAmplify.com. This is a summary.

Hands up, who saw WarnerMedia’s blockbuster merger with Discovery coming? Not WarnerMedia chief Jason Kilar who was kept in the dark while three-month long negotiations carried on above his head between AT&T boss John Stankey and Discovery’s president, David Zaslav.

The deal has shaken the industry — because it’s widely considered a shrewd one in which Zaslav in particular has played especially well.

It has also put the streaming wars on a new footing. One in which scale and tentpole franchises are deemed essential if a media conglomerate is going to be one of the handful to succeed.

As WarnerMedia’s head of ad sales JP Colaco said, “We believe that IP [intellectual property] is the new prime time.”

This article starts by looking at what this merger means for AT&T and Discovery, but it goes further and looks at it’s impact on the media landscape as a whole; with stops including Amazon, MGM, Netflix and, um, everyone else.

Here’s the link.


Please rate the helpfulness of this tip.

Click on a star to rate it!

… for Apple Motion

Tip #1684: A Fast Way to Change the Background

Larry Jordan – LarryJordan.com

By default, backgrounds are transparent; but you can change that.

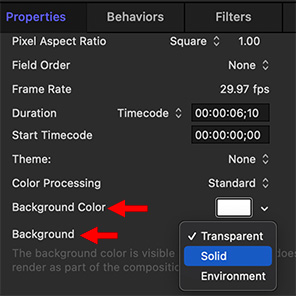
These two options (red arrows) determine the state and color of a Motion project background.

Topic $TipTopic

By default, Apple Motion places all elements over a transparent background. This means that, when you export the finished movie, it can be easily superimposed over video regardless of whether you use Avid, or Adobe or Apple software.

But, what if you don’t want the background to be transparent? Motion has a very easy way to change it to something solid.

  • Select the Project name in the Layers panel.
  • Go to Inspector > Properties.
  • Scroll down to the bottom.
  • Set the Background (bottom red arrow) to Solid.
  • Set the Background Color to whatever color you want for your project.

Now, when you export, your file will include a solid background.

EXTRA CREDIT

The difference between Solid and Environment is that, while both are solid, Environment “interacts with [a] 3D project, including blend modes and reflections.” (Apple Help)


Please rate the helpfulness of this tip.

Click on a star to rate it!

… for Apple Motion

Tip #1683: Change a Motion Project Duration

Larry Jordan – LarryJordan.com

Changing durations is possible, but it requires a lot of manual clean-up.

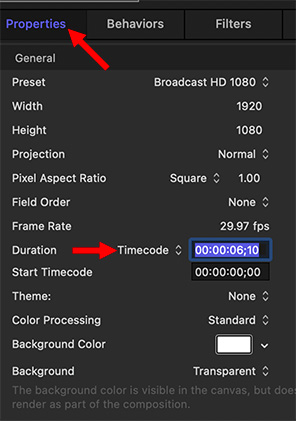
Project duration is changed in Inspector > Properties.

Topic $TipTopic

It’s possible to change the duration of a Motion project – but it isn’t always wise. Learn more.

The absolutely best place to change the duration of a Motion project is in the Project Browser before you add any elements into the project. At that point, you can create whatever duration you want.

You can still change it after you’ve started editing, but you probably won’t like the results.

To change the duration:

  • Select the Project name in the Layers panel.
  • Open Inspector > Properties.
  • Half-way down the Duration of the currently selected project is displayed (see screen shot).

However – if media is edited into the project:

  • You can’t make it shorter than the existing media placed into the Layers panel (though there’s a work-around I’ll discuss in a minute).
  • You can make it longer, but none of your media or effects are adjusted for the new length.

WORK-AROUND. If you first make a project longer than its current duration, you can then make it shorter than its current duration, except that, again, none of your media or effects are adjusted.

This means that changing duration after media is added into a project requires you to change all media and effects locations and durations manually to conform them to the new timing.


Please rate the helpfulness of this tip.

Click on a star to rate it!

… for Apple Motion

Tip #1682: Explore Hidden Artwork

Larry Jordan – LarryJordan.com

Compositions contain animation and graphics not found in the Motion Library.

These composition graphics do not appear in the Motion Library.

Topic $TipTopic

Most of the time, I encourage you to skip the templates and compositions in the Apple Motion Project Browser and dive right into Motion itself. But, I discovered something today that modified my opinion.

Open Motion and look in the sidebar on the left side of the Project Browser. There you’ll find a variety of compositions. These are Motion projects saved as templates that you can use in your own work.

What I realized is that the artwork in these does not appear in the Motion Library. For example, the screen shot illustrates car, heart and text graphics that aren’t in the Motion Library. (I didn’t verify all the compositions, but it seems that most of their art work does not appear in the Library.)

Each is animated and, though the animation tools exist in Motion, they are applied in ways that are may be useful to learn.

So, the next time you open Motion, take a look at these compositions. You may find some artwork – or animation – that you can use in your own projects.

EXTRA CREDIT

To open a Composition, simply double-click it in the Project Browser.


Please rate the helpfulness of this tip.

Click on a star to rate it!

… for Visual Effects

Tip #1693: Top 15 After Effects Alternatives

Larry Jordan – LarryJordan.com

After Effects is great, but not perfect. Here are some alternatives.

Image courtesy of Pexels.com.

Topic $TipTopic

This article first appeared in MotionArray.com. This is a summary.

After Effects is an amazingly powerful piece of software, but there are many reasons why you might want to look for an alternative; perhaps AE doesn’t suit your budget, or you can’t achieve what you want to within the program. There are many tools and plugins that can help increase After Effect’s capabilities, but there are also a lot of other programs you could use instead. In this guide, we’re going to talk you through 15 alternatives for Adobe After Effects and what might just make them better.

Here’s the list – and the article includes a video, pricing, supported platforms and best use examples for each of these software tools.

  1. Natron
  2. Blackmagic Fusion Studio 17
  3. Wondershare FilmoraPro
  4. Moovly
  5. Nuke
  6. HitFilm Express
  7. Apple Motion
  8. HitFilm Pro
  9. Sony Vegas Post Suite
  10. Blender
  11. Pixel Conduit
  12. Corel VideoStudio Pro X6
  13. PowerDirector
  14. Autodesk Smoke
  15. Wax

The second part of this article, linked above, provides recommendations on how to select the best alternative for the work you need to get done.


Please rate the helpfulness of this tip.

Click on a star to rate it!

… for Visual Effects

Tip #1692: 61 Seconds of Beautiful Nonsense

Larry Jordan – LarryJordan.com

Let’s be humorous and dance with the fruits!!

Composite image from “Fruitless,” from Yeti Pictures.

Topic $TipTopic

Fruitless, a 2020 Motion Awards Winner, is a 61-second short form project “exploring novel aesthetics, production methodologies and/or technologies.” In other words, it’s a bit weird.

DESCRIPTION

As the summer is getting closer, we felt the heat and changed our diet into a massive fruit daily attack. We are not used to pop colors and playful tastes, so it was a great challenge to stay disciplined on our new daily routine. This is the moment where we decide to have fun with our situation and try to see the bright side of it. Let’s be humorous and dance with the fruits!!

YETI Pictures handled the direction, design, animation and simulation duties, using Cinema 4D, Octane Render, XParticles, Realflow and TFD.

Watch it here.

EXTRA CREDIT

Motionographer.com is celebrating all the winners by displaying their work. Here’s the link.


Please rate the helpfulness of this tip.

Click on a star to rate it!

… for Visual Effects

Tip #1691: Monogram Now Integrates with Final Cut Pro

Larry Jordan – LarryJordan.com

Monogram’s control surface supports Final Cut Pro and Premiere Pro.

Monogram controls surfaces for color grading. (Image courtesy of Monogram)

Topic $TipTopic

As first reported by ProVideo Coalition, Monogram announced this month that the company worked directly with CommandPost to add incredible functionality between Monograms modular control surface and Final Cut Pro (FCP). The FCP integration with Monogram via CommandPost makes color grading significantly more precise and productive than with a mouse and keyboard.

Here are some of Monograms’ key features as presented by the company:

  • The Orbiter module is one of a kind. The pressure sensitive disc in the middle paired with the outside infinite encoder ring makes for incredibly precise adjustments in tasks    like color grading or tonal adjustments a breeze
  • It can easily shave hours off of editing time, plus with the physical controls it helps you stay focused on your work instead of looking at software UI like adjustment panels.
  • We’ve worked with the Adobe team, Capture One team and Final Cut Pro team to create fantastic integrations with the most popular creative applications used by professionals.

Monogram worked with Commandpost.io to beta test their newly developed integration between Monogram Creative Console and Final Cut Pro. The new integration supports:

  • Grading controls: Color wheels and color boards
  • Inspector and compositing controls: Position, anchor, crop, scale, opacity, and rotation
  • Timeline controls: Jog, nudge, select items, and blade
  • Additionally: any menu item or key command assignable in Final Cut Pro
  • Because this was built upon CommandPost’s incredible macOS automation tools, says the company, it’s a more capable integration than anything previously offered for Palette or Monogram + Final Cut.

EXTRA CREDIT

Read the ProVideo Coalition article here.

Learn more about Monogram here.


Please rate the helpfulness of this tip.

Click on a star to rate it!

… for Codecs & Media

Tip #1688: intoPIX Offers JPEG XS Codecs for NVIDIA

Larry Jordan – LarryJordan.com

JPEG XS is designed for production and post in the Cloud, not distribution.

intoPIX logo, courtesy of intoPIX.

Topic $TipTopic

intoPIX, a provider of video compression tools, has integrated solutions for JPEG XS & SMPTE 2110-22 for NVIDIA Rivermax-enabled Ethernet NICs. The combination of intoPIX FastTICO-XS GPU SDK with Rivermax provides developers a turnkey solution supporting the new JPEG XS standard. Moreover, the new integration of Rivermax into the NVIDIA DeepStream SDK  gives developers all the right tools to create the most exciting video streaming products for any application.

Just as we need codecs for distribution, we also need codecs for moving media assets to the cloud for post-production.

Using JPEG XS safeguards all advantages of an uncompressed stream such as ultra-low latency, high quality – and offers a significant bandwidth reduction with real-time GPU encoding /decoding in HD, 4K or 8K. It can be used in any LAN, WAN or cloud-based application which is sensitive to low latency and high quality

This integration unlocks innovation for a wide range of applications in media and entertainment, broadcast, healthcare, and more. It was presented by intoPIX during GTC21 with 4K 60fps JPEG XS streaming using the NVIDIA Jetson AGX Xavier System On Module (SOM) and NVIDIA ConnectX-5 NICs.

EXTRA CREDIT

Read the press release here.


Please rate the helpfulness of this tip.

Click on a star to rate it!

… for Codecs & Media

Tip #1687: A Compressed Guide to Codec Costs

Larry Jordan – LarryJordan.com

In today’s world, a multi-codec approach is best.

Report logo courtesy of Bitmovin.com.

Topic $TipTopic

This article, written by Adrian Pennington, first appeared in NABAmplify.com. This is a summary.

Transmitting data has a cost — in terms of bitrate and budget which CTOs of streaming media services need to carefully weigh.

Bitmovin has crunched the numbers and concludes that a multi-codec approach is best. That’s important given the codec race that has developed over the past few years. It’s a race that has no clear winner.

“At this point in time, if any OTT or streaming provider is seeking to reach the maximum number of devices at the highest possible quality, adopting a multi-codec approach is your best bet to success,” states The Definitive Guide to Video Codecs.

“Adopting just two (VP9 and HEVC) will enable an organization to reach roughly 98% of browsers and devices in the US alone.”

Codecs have the potential to significantly reduce the cost of video streaming workflows and operations. This cost is often measured based on file size, storage usage, and bandwidth consumption. Applying codecs is how content distributors can reduce their bitrate expenditure while maintaining a sliding scale of quality.

Bitmovin analyzed the numbers and shares their data on H.264, HEVC, VP9, AV1, VVC (H.266), and LCEVC.

EXTRA CREDIT

Here’s a link to get the Bitmovin report. The report is free, but requires your email address.


Please rate the helpfulness of this tip.

Click on a star to rate it!