… for Codecs & Media

Tip #1685: The Future of Production

Larry Jordan – LarryJordan.com

Software-defined workflows support creative task through connected automation.
Graphic courtesy of Tedial, Inc.

Topic $TipTopic

In August 2019, Movielabs and Hollywood Studios published a white paper envisioning “The Evolution of Media Creation”, which provided a ten-year vision for the future of media production, post and creative technologies. Since then, the world has changed considerably however, many of the aspects within the white paper are still extremely important for global media production.

Key to this are Software-Defined Workflows, which abandon the notion that interoperability is limited to applications that are designed specifically to work together. Instead, it adopts the model that applications can interoperate with any other as long as they follow a set of interoperability rules and security policies, either natively or with adapters.

Tedial CTO, Julian Fernandez Campon, explores this idea of software-defined workflows and how they support creatives.

There are a number of important elements that together lead to success including: workflows that are automated (as much as possible); workflows that are simple and easy to design, maintain and evolve; practicality – software-defined workflows make it practical to develop reusable components and to automate aspects of the workflow that are currently manual.

Here’s the link to their free white paper.

EXTRA CREDIT

The text above was taken from a promotional email written by Tedial.


Please rate the helpfulness of this tip.

Click on a star to rate it!

… for Adobe Premiere Pro CC

Tip #1681: A Cool – But Useless – Feature

Larry Jordan – LarryJordan.com

This used to work great. Now, ah, not so much.

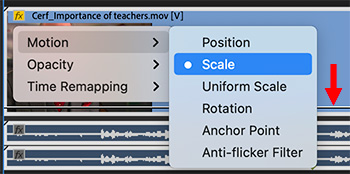
Adding keyframes in the timeline, using this menu, no longer works reliably.

Topic $TipTopic

There’s a long-time feature in Premiere that used to be really useful. Well, at the least, it was useful. But, now, it’s essentially useless.

Most of the time, when we want to create effects, we select the clip in the timeline, then go to Effect Controls and make our adjustments.

But, there’s a hidden feature in Premiere that, theoretically, saves a step.

Control-click a clip in the Timeline (see screen shot) and a hidden menu appears. Here, you can select a setting, say “Scale,” and a white keyframe line appears in the clip (see the red arrow).

Again, in theory, we can drag this line up or down, or double-click it to add keyframes, to adjust and animate the scale of the clip.

The problem is that line, there, at the bottom, is positioned for 100% scale. We can drag it to 0, or to a minimum setting of 119%; but nothing in-between. It’s positioned too low to be useful because we can’t drag it marginally lower; except to 0. Useless.

We rarely, if ever, scale clips larger than 100%. But we CONSTANTLY need to scale clips smaller than 100%. At least for scaling, this hidden menu option totally fails.

So, experiment on your own to see which of these features work. But, for now, you are better off ignoring this menu and continue to use Effect Controls.


Please rate the helpfulness of this tip.

Click on a star to rate it!

… for Adobe Premiere Pro CC

Tip #1680: The Option Makes the Difference

Larry Jordan – LarryJordan.com

The simplest shortcuts often make the biggest difference.

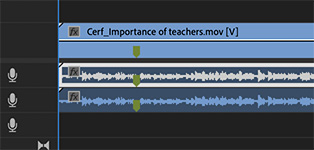
Press Option to click and select just one track in a linked clip.

Topic $TipTopic

Sometimes, the simplest shortcuts make the biggest difference. Here’s one option I can’t live without.

Normally, when you click a synced clip in the Timeline, the entire clip is selected. And, most of the time, that’s exactly what you want.

Sometimes, though, you want to select just the audio or just the video portion of a synced clip. Perhaps you want to delete it, or move it into sync, or apply an audio filter to one channel and not another.

You could click the Link Selection button at the top left of the Timeline, but, frankly, it’s just easier to press Option, then click the portion of the clip you want to select.

When Option is not pressed, clicking selects the entire clip. When Option is pressed, clicking selects only the track you click on.

I’ve used this trick for years – it has saved me countless hours because it’s so simple… and effective.


Please rate the helpfulness of this tip.

Click on a star to rate it!

… for Adobe Premiere Pro CC

Tip #1679: What is Adaptive Audio?

Larry Jordan – LarryJordan.com

Premiere provides flexibility in assigning audio formats and channels.

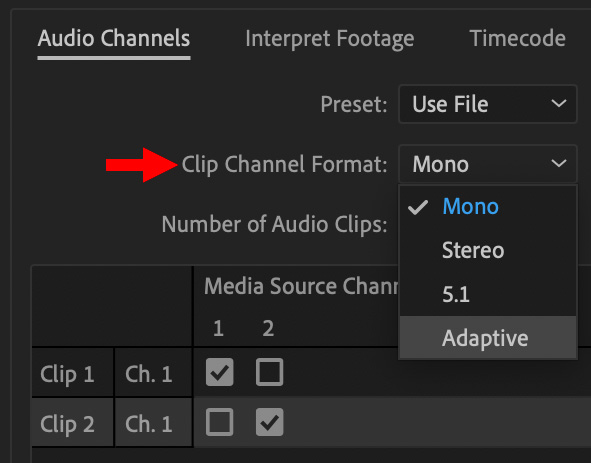
Audio channel format options inside Adobe Premiere.

Topic $TipTopic

Most of the time, Adobe Premiere Pro guesses the audio format and channel assignments correctly when you import a clip. But, sometimes, you need to make changes.

To do so:

  • Control-click the audio clip you want to adjust in the Project or Bin panel.
  • Select Modify > Audio Channels.
  • In the popup window, set Clip Channel Format to Mono, Stereo, 5.1 or Adaptive.
  • Finally, using the checkboxes at the bottom, you can remap which channel in the audio clip plays on which channel in Premiere.

One of the Format options is “Adaptive.” Adobe describes Adaptive as: “The adaptive track can contain mono, stereo, and adaptive clips. With adaptive tracks, you can map source audio to output audio channels in the way that works best for your workflow. This track type is useful for working with audio from cameras that record multiple audio tracks. Adaptive tracks can also be used when working with merged clips, or multicam sequences.”


Please rate the helpfulness of this tip.

Click on a star to rate it!

… for Apple Final Cut Pro X

Tip #1678: Create an Animated Background – Quick

Larry Jordan – LarryJordan.com

Be sure to apply a blur to keep the background from decreasing readability.

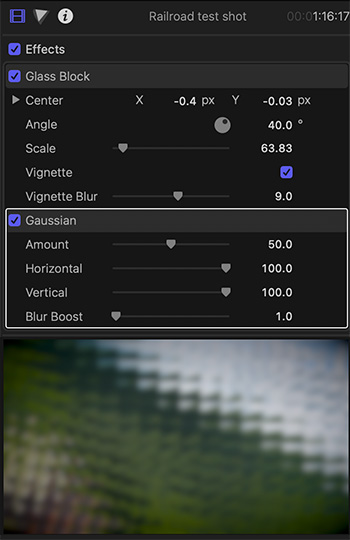
(top to bottom) Glass Block & Gaussian Blur effects, with the effects applied to a video clip.

Topic $TipTopic

Here’s a fast and fun way to create an animated background for text, graphics or other uses where you need the background animated, but not distracting.

  • Apply Effects Browser > Distortion > Glass Block to a clip.
  • Then, apply Effects Browser > Blur > Gaussian Blur to the same clip.

NOTE: The effects order is important, apply Glass Block first, then the blur. This softens the block edges so they don’t distract from foreground text.

  • Adjust the Angle in the Glass Block effect to make it a little less geometrically static.

Play the clip and watch what happens. The animation will be based on the amount of movement in the video clip. Some movement is good, too much movement will be distracting.

Cool.


Please rate the helpfulness of this tip.

Click on a star to rate it!

… for Apple Final Cut Pro X

Tip #1677: Working with Dual-Channel Audio

Larry Jordan – LarryJordan.com

Final Cut Pro makes handling multi-channel audio easy and very flexible.

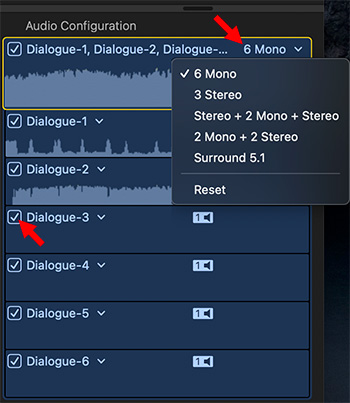
Converting stereo to mono audio is easy using Audio Configuration.

Topic $TipTopic

Normally, when you import a two-channel audio clip, Final Cut Pro treats it as stereo. But Final Cut makes working with multi-channel audio easy. Here’s how:

  • Select the clip in either the Browser or the Timeline.
  • Open the Audio Inspector.
  • Scroll down to Audio Configuration.
  • Click the menu – which, for two-channel clips, should say Stereo – and change it to 2 Mono.

NOTE: In this screen shot, I’m working with a six-channel audio clip, where only the first two channels have audio. Here, I selected “6 Mono.”

Once you see the different channels you can:

  • Skim a channel to review it at high-speed
  • Click inside a channel, then press spacebar to play just that channel.
  • Uncheck a channel to mute it.

EXTRA CREDIT

Converting a 2-channel Mono clip to Stereo is just as easy: Change the menu from 2 Mono to Stereo.


Please rate the helpfulness of this tip.

Click on a star to rate it!

… for Apple Final Cut Pro X

Tip #1676: Create A New Library from an Event

Larry Jordan – LarryJordan.com

Transferring files does not affect the current project.

Every Event has a secret menu simplifying media handling.

Topic $TipTopic

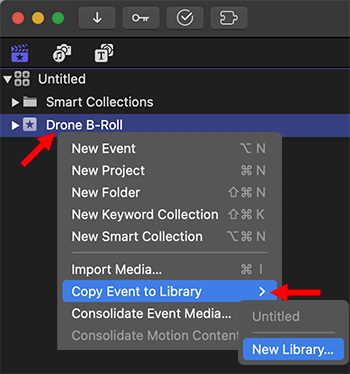
Final Cut has a very useful utility that allows you to create new libraries from existing events. A good example of this might be an event in your documentary that contains all the drone footage (or other B-roll) from your current project that you want to offer for sale on stock footage websites.

Clearly, you don’t want to keep opening your documentary just to access B-roll footage. On the other hand, manually transferring all those clips is a pain.

Instead, let FCP transfer the footage, along with all keywords and other metadata, for you.

  • Control-click the name of the Event in the Library List.
  • Choose Copy Event to Library > New Libary.

Done.

NOTE: You can also use this technique to move media or projects from one library to another.

All the contents of that event, including media, projects and metadata, are copied to the new location. Because this is a copy, your current project is not altered.


Please rate the helpfulness of this tip.

Click on a star to rate it!

… for Random Weirdness

Tip #1672: Top Sources for Affordable, Royalty-Free Music

Larry Jordan – LarryJordan.com

There are lots of good sites with great music.

RocketStock blog logo.

Topic $TipTopic

This article first appeared in RocketStock.com. This is a summary.

Looking for affordable, royalty free music for your video project in 2021? These resources offer the quality tracks video editors need.

One of the realities of video editing is that you need music, and you can’t just take it from anywhere. You need legally licensed music to avoid lawsuits or other legal issues.

The problem for many video editors is cost. Most working filmmakers don’t have the money it takes to license well-known radio hits. If you fall into this category (like the overwhelming majority of us do), you might understand the challenges of finding licensing agreements for quality music you can afford. Let’s take a look at some of the best stock music resources for your next project.

Here’s their list:

Readers also suggested:


Please rate the helpfulness of this tip.

Click on a star to rate it!

… for Random Weirdness

Tip #1671: 10 Tips to High Production Value – at Low Cost

Larry Jordan – LarryJordan.com

Production value is what draws viewers in.

Image courtesy: “The Battle at Home” from John DeStefano Jr.

Topic $TipTopic

This article, written by John DeStefano Jr., first appeared in NoFilmSchool.com. This is a summary.

While trying to become successful in the film industry, people will always compare your film, feature-length or short, to the best movies ever made.

So how do you create something that’s similar in quality, when those movies have multimillion-dollar budgets, A-list actors, and what seems like an army of a crew? The answer is simple—high production value.

High production value is what is going to draw viewers in and keep them there. In order to duplicate the look and feel of blockbuster hits, all you need is a little ingenuity and movie magic.

  1. The Poster, Title, and Logline
  2. Locations
  3. Story
  4. Actors
  5. Color
  6. Extras
  7. Crew
  8. Establishing and Wide Shots
  9. Time Management
  10. Post Sound Design and Music

With limited resources, you can be well on your way to a long and successful career with the help of high production value. All you need to do is create films that look great, sound great, and flow well. Oh, and create an entertaining and enticing story that audiences will love and won’t forget.

EXTRA CREDIT

The article provides personal details and images on how the author used these tips in his latest feature “The Battle at Home” – which got him a contract to a MUCH bigger feature.


Please rate the helpfulness of this tip.

Click on a star to rate it!

… for Random Weirdness

Tip #1670: 10 Things to Know about Backlight

Larry Jordan – LarryJordan.com

When in doubt, backlight!

Image courtesy of PremiumBeat.com.

Topic $TipTopic

This article, written by Tanner Shinnick, first appeared in PremiumBeat.com. This is a summary.

The backlight may be the most important light on any set. A well-placed and utilized backlight can quickly elevate any production, giving it that coveted “cinematic look.”

Here are Tanner’s 10 Tips:

  1. A Backlight Is an Essential Component in 3-Point Lighting
  2. Backlighting Creates a 3D Effect in a 2D Medium
  3. Essential to Create Separation
  4. “When in Doubt, Backlight!”
  5. Quality of Light Matters
  6. Expose Properly
  7. A Backlight Has Many Names
  8. A Backlight Can Create Drama
  9. The Sun Is the Ultimate Backlight
  10. Experiment

Overall, the backlight is an essential piece of your lighting setup. It can create separation, depth, and help you achieve that cinematic look.

EXTRA CREDIT

The article provides photos that illustrate each of these ten ideas, along with provide examples and details on how to use each.


Please rate the helpfulness of this tip.

Click on a star to rate it!