… for Adobe Premiere Pro CC

Tip #1479: Adobe Updates Premiere Pro

Larry Jordan – LarryJordan.com

This first major upgrade for 2021 sets the scene for the future.

Logos for Adobe Premiere Pro and After Effects.

Topic $TipTopic

This week, Adobe released new versions of its video and audio applications: Premiere Pro, After Effects, Audition, Media Encoder, Character Animator and Premiere Rush. There is a LOT in these new releases. Here are the details.

PREMIERE PRO

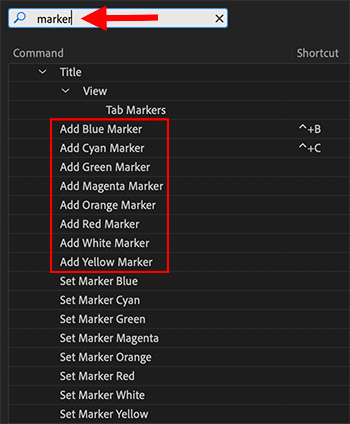
  • New Caption workflow
  • Media Replacement
  • Faster Warp Stabilizer
  • Team Project performance improvements
  • Copy and Paste Audio Effects in the Audio Track Mixer
  • Legacy Audio Effects Removed
  • Equitable Language

AFTER EFFECTS

  • Media Replacement in Motion Graphics templates and Essential Properties
  • Real-Time 3D Draft Preview
  • 3D Ground Plane
  • Improved Composition Toolbar
  • Team Project performance improvements
  • Equitable Language

AUDITION

  • Insert Mode in Waveform Editor
  • Keyframe Dragging
  • Equitable Language

MEDIA ENCODER

  • Support import of ARRIRAW footage

CHARACTER ANIMATOR

  • New Example Puppet
  • New project file format
  • Snap to Frames & Snap to Objects
  • Pin Fee When Standing

PREMIERE RUSH

  • New color presets
  • Apply color edits to all the clips in your video
  • Easily flip/mirror videos clips, images, stickers, and overlays
  • New sound effect
  • Performance Improvements

EXTRA CREDIT

Here’s a link to more information and demos of major features.


Please rate the helpfulness of this tip.

Click on a star to rate it!

… for Adobe Premiere Pro CC

Tip #1480: Premiere Speech-to-Text Goes Beta

Larry Jordan – LarryJordan.com

The link in this tip also includes a link to sign up for the beta program.

Premiere will soon support automatic transcripts natively within the app.

Topic $TipTopic

Adobe announced that Speech-to-Text is coming to Adobe Premiere Pro. Automatically generate a transcript and add captions to your videos to improve accessibility and boost engagement with Speech to Text.

Currently in beta, it is expected to be released in the next few months. It will require updating to Premiere 15.x. It includes support for: English, Spanish, Japanese, Korean, French, German, Chinese, Hindi, and more.

This web page has more information, along with the opportunity to sign up for Adobe’s beta program.


Please rate the helpfulness of this tip.

Click on a star to rate it!

… for Apple Motion

Tip #1432: Secrets of the Spinning Gear

Larry Jordan – LarryJordan.com

Use the Background Tasks window to monitor exports.

Click the spinning gear to reveal the Background Tasks List.

Topic $TipTopic

Have you ever noticed a small gear spinning in the lower right corner of the Viewer? Well, here’s what it means.

When you export a project from Apple Motion, a small spinning gear appears in the lower right corner of the Viewer. (Red arrow in the screen shot.)

This spinning gear disappears when the export is complete.

Click the spinning gear to display the Background Tasks List dialog. This window, which can’t be displayed any other way, shows the progress of an export.

Click the “X in a circle” to cancel the export.


Please rate the helpfulness of this tip.

Click on a star to rate it!

… for Apple Motion

Tip #1454: Expose Shows What’s In a Motion Project

Larry Jordan – LarryJordan.com

An easy way to remember “Expose” is “X”

An exposed project consisting of seven discreet elements.

Topic $TipTopic

Often, Motion projects get so complex, it can be hard to find and modify the element you need to adjust. The Expose feature helps solve that problem.

Motion’s expose commands provide a way of viewing multiple layers at once, “exploding” and re-scaling them. The expose commands allow you to access all layers in a project in the canvas without having to drill down into the Layers list. Expose commands also let you select inactive layers at the playhead’s current position or jump to a selected layer’s In point.

  • To expose layers that are active at the playhead position, type X.
  • To expose all layers in your project, type Shift + X.

In both cases, layers will temporarily scale down and spread over the canvas. Each layer is represented by a white frame in the canvas. Move the pointer over a frame to show the layer’s name.

Click anywhere in the Canvas to reset the display.


Please rate the helpfulness of this tip.

Click on a star to rate it!

… for Adobe Premiere Pro CC

Tip #1465: Add Different Marker Colors in Real-Time

Larry Jordan – LarryJordan.com

All eight marker colors can have keyboard shortcuts.

The red box indicates which menu options add markers of different colors.

Topic $TipTopic

A reader asks: “Is it possible to create different color markers during playback in Premiere? I could then highlight answers during an interview in real-time.” The answer is: Yes. Here’s how.

There are eight different marker colors in Premiere, but only the green version has a default keyboard shortcut.

Open Premiere Pro > Keyboard Shortcuts (Windows: Edit > Keyboard Shortcuts).

Search for “marker” (top red arrow in screen shot).

In the Title section, you’ll see eight uanassigned options to add a marker for each color (red box in screen shot).

In this example, I assigned shortcuts to add Blue and Cyan markers.

During playback, typing these shortcuts adds markers in real time. As always, if the clip is selected, the marker is added to the clip. If nothing is selected, the marker is added to the timeline.


Please rate the helpfulness of this tip.

Click on a star to rate it!

… for Apple Final Cut Pro X

Tip #1451: Drop Zone Secrets

Larry Jordan – LarryJordan.com

Where you click a drop zone clip with the skimmer determines the In.

A drop zone, with a reflection, created in Motion, filled with an image in Final Cut.

Topic $TipTopic

A drop zone is an image placeholder, created in Motion, for use in Final Cut Pro. Drop zones can be added to titles, effects, transitions or generators.

To fill a drop zone in Final Cut:

  • Select the clip containing the drop zone.
  • In the Video Inspector, click the blue box around the drop zone you want to fill. (Some templates contain multiple drop zones.)
  • In the Browser, click the clip you want to put into the drop zone.
  • Click the blue Apply Clip button in the Viewer.

EXTRA CREDIT

Here’s the secret. If you use the skimmer to select the clip, where you click the skimmer in the Browser clip determines the In of the clip in the drop zone.


Please rate the helpfulness of this tip.

Click on a star to rate it!

… for Apple Final Cut Pro X

Tip #1452: The Mysterious Red Box

Larry Jordan – LarryJordan.com

The red “slider” simplifies navigating a zoomed-in Viewer image.

The red slider appears whenever you are zoomed into an image.

Topic $TipTopic

You’ve seen it from time to time, the mysterious red box in Final Cut’s Viewer. What the heck is it?

The red slider appears whenever you are zoomed into an image more than the Viewer can display.

Drag the red box itself to navigate around the image.

EXTRA CREDIT

To display the red box, type Cmd + [plus] to zoom into the Viewer.

To make the red box disappear, type Shift + Z (or choose Fit from the View menu).


Please rate the helpfulness of this tip.

Click on a star to rate it!

… for Apple Final Cut Pro X

Tip #1453: An Editing Keyboard Shortcut

Larry Jordan – LarryJordan.com

These keystrokes determine what is edited into the timeline.

The small arrow hides this menu.

Topic $TipTopic

Anything that speeds the editing process is a good thing. Here are three keyboard shortcuts that simplify editing clips into the timeline.

Normally, when you edit a clip from the Browser into the Timeline, you edit both its audio and video. However, you can also edit just the video or just the audio.

  • Shift + 1: Edits audio and video into the timeline.
  • Shift + 2: Edits just the video into the timeline.
  • Shift + 3: Edits just the audio into the timeline.

These settings stay in effect until you change them.

NOTE: You can also find these in the small down-arrow to the right of the four editing icons at the top left of the timeline.


Please rate the helpfulness of this tip.

Click on a star to rate it!

… for Apple Motion

Tip #1377: Create a Reflection

Larry Jordan – LarryJordan.com

Reflections require a reflecting surface and a group that’s switched to 3D.

Reflecting surfaces can be any color or shape.

Topic $TipTopic

Philip asked: “How do I create a reflection in Motion?”

By default, all objects in Motion radiate light, meaning they can create a reflection. However, in order to see a reflection, you need a second object that catches the light from the first object and reflects it. THAT setting, to enable reflections, is turned off by default.

To enable reflections:

  • Create the object you want to reflect (the heart, in this screen shot)
  • Create a surface upon which you want the reflection to appear (the gold rectangle)
  • Be sure both objects are in the same group.
  • Switch the group from 2D to 3D by clicking the small icon of rectangles on the right of the group name in the Layers panel.
  • Select the rectangle.
  • Go to Inspector > Properties and enable (check) Reflection.
  • Adjust the angle of the rectangle to get the reflection you want.
  • Adjust the Inspector settings to get the look you want.

NOTE: 3D Objects do not create reflections.


Please rate the helpfulness of this tip.

Click on a star to rate it!

… for Apple Motion

Tip #1381: Precisely Control the Position of Anything

Larry Jordan – LarryJordan.com

Control Points provide precise position control for selected elements.

The Control Points settings for the Motion Path behavior.

Topic $TipTopic

Most of the time, when we drag objects into position in Motion they look fine. But, sometimes, you need more precise control. The Inspector makes that possible.

For example, when applying the Motion Path behavior, you may need it to be perfectly vertical, or go to very precise pixel positions. This is easy to do.

  • Select the object or behavior in the Layers panel that you need to adjust.
  • Depending upon what you have selected, go to Inspector > Behaviors or Inspector > Shape.
  • In that panel, at the bottom, you’ll find an option titled Control Points.
  • Twirl it down to see a list of all controls points needed to define or configure that object or behavior.
  • The left number sets the X position, the middle number sets the Y and the right number sets the Z. (If there are only two numbers, they represent the X and Y, with the X value on the left.)

NOTE: For horizontal objects or moves, the Y position should match. For vertical elements, the X positions should match.

Remember, the 0,0 position is the center of the frame, for movement, or the center of an element, for objects.


Please rate the helpfulness of this tip.

Click on a star to rate it!