… for Apple Final Cut Pro X

Tip #1591: The Hidden Metadata of Final Cut Pro

Larry Jordan – LarryJordan.com

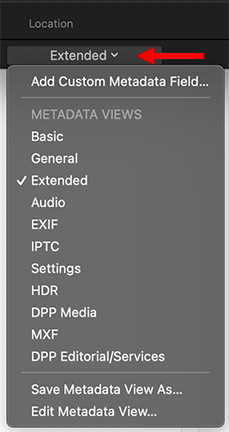
The default Basic setting displays the least metadata.

Click the Basic menu to reveal extensive metadata tracking for each clip in FCP.

Topic $TipTopic

There is a ton of metadata that Final Cut Pro tracks for each audio or video clip — all deeply hidden in the Info Inspector. Here’s how to unlock it.

  • Open the Info Inspector and scroll down to the bottom.
  • There, on the left, you’ll find a menu labeled Basic.
  • Click it and eleven different metadata displays are already configured. The one with the most data is Extended.
  • Select different options to see what they contain.
  • To configure your own metadata menu, select Edit Metadata View.

Please rate the helpfulness of this tip.

Click on a star to rate it!

… for Apple Motion

Tip #1575: A Simple Layers Slider

Larry Jordan – LarryJordan.com

Click the icon, then drag the dot to change Layer panel scaling.

The Scale icon, bottom, and the Scale slider (dot at top).

Topic $TipTopic

Tucked into the bottom edge of the Layers pane is an icon of two rectangles. This “Scale slider” hides a useful function. Let me illustrate.

Click the Scale icon (red arrow) to reveal a pop-up set of three icons. Only the middle one moves.

Drag the middle dot left or right to change the scale of the elements displayed in the Layers panel.

As projects get more complex this is a fast way to cram more elements into less space. Or, conversely, expand elements to better see what you are working with.


Please rate the helpfulness of this tip.

Click on a star to rate it!

… for Adobe Premiere Pro CC

Tip #1568: Adjust Title Gradient Edge Softness

Larry Jordan – LarryJordan.com

Double-click a color chip for a wealth of customization options.

Appearance color chip (top) the floating Color Picker window (bottom).

Topic $TipTopic

Philippa asks:

How do I adjust the edge softness of gradients in Premiere so they fade out, rather than use hard lines?

Many of the Motion Graphic templates have a “Shape” attached to them.

  • Add a template to the timeline and select it
  • Switch to the Graphics workspace
  • Select the Shape element at the top of the panel
  • Scroll down to the Appearance section where Fill is checked
  • Double-click the Fill color chip (top red arrow)

This opens the floating Color Picker window (see screen shot). The icons at the top of the color bar determine opacity, those at the bottom determine the colors in the gradient.

  • To add a new opacity setting, click above the line.
  • To remove an opacity setting, drag the opacity chip up.
  • To change an opacity setting, click it once, then change the Opacity values (lower red arrow)
  • To change where the opacity changes, select one of the opacity “chips,” then drag the small diamond (right red arrow).

Please rate the helpfulness of this tip.

Click on a star to rate it!

… for Adobe Premiere Pro CC

Tip #1569: A Wrench, or Two, in the Works

Larry Jordan – LarryJordan.com

These two wrenches provide custom text and graphic options.

Text engine wrench (top), graphics wrench (bottom).

Topic $TipTopic

In the Essential Graphics panel, part of the Graphics workspace, are two wrenches that you’ve probably overlooked.

The top wrench, about half-way down the panel, determines which text engine to use in aligning text.

Here is also where you can turn ligatures (blended glyphs like “fi” or “ff”) on or off. The default is on.

Lower in the panel is the graphics wrench. This determines how edges and corners meet.

Most of the time, the defaults are fine. But, when you need to change them, now you know now.


Please rate the helpfulness of this tip.

Click on a star to rate it!

… for Apple Final Cut Pro X

Tip #1574: The Video Scope View Menu

Larry Jordan – LarryJordan.com

Pick the display options that work best for you.

The Video Scope View menu.

Topic $TipTopic

Looking at the Video Scopes in Final Cut reminds me of the small View menu in the top right corner of the scopes pane. Here’s a quick look at what this does.

The geometric shapes at the top (see screen shot) illustrate all the different ways to arrange the video scopes. My preference is the side-by-side option in the top right corner. I like seeing both the Vectorscope and Waveform Monitor at the same time.

  • Vertical Layout puts the scopes under the Viewer. While this is really cramped for a single monitor, it is often the best choice when using two monitors and displaying the Viewer on the second monitor.
  • Show Guides displays a thin white line as you hover the mouse over a video scope, allowing you to read pixel values as you move the cursor.
  • Monochrome removes all color display from the scopes, though it does not alter your media or timeline.
  • The slider, at the bottom, determines the brightness of the trace, that is the data from your video, in the video scope display.

Final Cut will remember these settings from one project to the next, until you change them.


Please rate the helpfulness of this tip.

Click on a star to rate it!

… for Apple Final Cut Pro X

Tip #1541: Create Shapes Filled with Video

Larry Jordan – LarryJordan.com

This nested compound clip effect is also good for filling logos with moving video.

Photoshop shape (top), with video inserted (middle), a nested compound clip (bottom).

Topic $TipTopic

OK, this is tricky, but worth trying. Here’s how to create a shape in Photoshop, fill it with moving video in Final Cut, then place it over a background.

In Photoshop:

  • Select the custom shape tool, then, from the menubar at the top, pick a shape you like. (The top screen shot shows a flower image.)
  • Make the background layer transparent.
  • Save the image as a PNG or PSD.

In Final Cut:

  • Create a new project.
  • Put the video you want to insert into the shape into the Primary storyline.
  • Stack the shape above it.
  • Select the shape and apply Video Inspector > Blend Mode > Stencil Alpha. The shape fills with the video.
  • Select both shape and video and choose File > New > Compound clip. Give this any name you like.
  • Place the shape, again, on top of the compound clip in the timeline.
  • Select the top shape and apply Effects > Keying > Keyer. It should automatically knock out the black background, leaving the red lines on top of the image from the compound clip. (Illustrated in the middle screen shot.)
  • Select both the new shape and the compound clip and choose File > New > Compound clip. (Yup, a nested compound clip!) Give this any name you like.
  • Stack that nested compound clip on top of the video you want to appear in the background (The barn, in the bottom screen shot.)

Done.

EXTRA CREDIT

This trick works with logos, text, custom shapes – the possibilities are endless.


Please rate the helpfulness of this tip.

Click on a star to rate it!

… for Codecs & Media

Tip #1551: Create Still or Moving Watermarks

Larry Jordan – LarryJordan.com

Apple Compressor creates still or moving watermarks easily.

The Apple Compressor logo.

Topic $TipTopic

[ I discovered this tip while researching a recent PowerUP webinar illustrating Media Compression in Apple Compressor. ]

In this four-minute video tutorial, I illustrate how to use Apple Compressor to add either still or moving watermarks to a video during compression.

I use watermarks for all my posted videos. While I create watermarks using stills, the opportunity to embed an animated logo is equally easy.

NOTE: Here’s the link.


Please rate the helpfulness of this tip.

Click on a star to rate it!

… for Apple Final Cut Pro X

Tip #1534: Faster, Focused, Final Cut Pro Help

Larry Jordan – LarryJordan.com

Final Cut help can now be downloaded and/or searched.

The Apple Final Cut Pro logo.

Topic $TipTopic

Apple made two significant changes to the Help system in Final Cut Pro in the 10.5 release. Both will help you find the information you need faster.

HELP IS NOW SEARCHABLE

From within Final Cut, choose Help > Final Cut Pro Help. This opens the online Final Cut Pro User Guide.

In the search box in the top right corner you can now enter a search term.

Press Return to see the results.

HELP IS NOW DOWNLOADABLE

You can now download the entire Final Cut Pro User Guide as a PDF to our system.

Control-click Download the PDF at the bottom of the Final Cut Pro User Guide Welcome page.

NOTE: Here’s the link. The Guide is 43 MB in size.


Please rate the helpfulness of this tip.

Click on a star to rate it!

… for Adobe Premiere Pro CC

Tip #1519: Hidden Media Replacement Controls

Larry Jordan – LarryJordan.com

Adjusting where a clip starts is a huge benefit for media replacement.

Placement and timing settings for replaced media in Essential Graphics.

Topic $TipTopic

There’s a hidden feature in the new motion graphic templates that allow media replacement. I mentioned this in last week’s tip, but it deserves more attention.

When you add a template that allows media replacement – and not all of them do – you have a lot of control over which part of the inserted image is displayed in the timeline.

After you drag an image into the placeholder graphic (see Tip #1504) look immediately below the image in the Essential Graphics panel.

  • Scale to… This provides four options for scaling the image to fit within the placeholder.
  • H & W. These scale an image symmetrically, if the chain icon is linked, or asymmetrically, if the chain icon has a line through it.

The four icons across the bottom determine:

  • Horizontal position
  • Vertical position
  • Rotation
  • Timecode where the inserted image should start

This last setting is key. In the past, we would need to create subclips that start where we wanted them to start. Now, all we need to do is enter a timecode. This makes it very easy to experiment with the best place to start an inserted video – the only downside is that every time we change one of these settings, we need to re-render the effect.


Please rate the helpfulness of this tip.

Click on a star to rate it!

… for Adobe Premiere Pro CC

Tip #1505: New Feature: Faster Warp Stabilizer

Larry Jordan – LarryJordan.com

The actual stabilization is the same, what’s faster is the analysis.

Warp Stabilizer controls in the Effect Panel of Premiere Pro.

Topic $TipTopic

One of the new features in the 2021 update to Premiere Pro is a faster Warp Stabilizer. Here’s what you need to know.

According to Adobe’s release notes:

[We have] “dramatically improved the time it takes to analyze shaky footage while leaving the actual stabilization process unchanged.  The result is that the quality of the stabilization is as good as before – just way faster.”

My guess is that what Adobe has done is move the analysis off the CPU and onto the GPU, which is much faster at analyzing bitmapped media files.

EXTRA CREDIT

Adobe notes: “The Warp Stabilizer effect in Premiere Pro requires that the clip dimensions match the sequence settings. If the clip does not match the sequence settings, you can nest the clip, and then apply the Warp Stabilizer effect to the nest.”

Here’s a link to more details on using the Warp Stabilizer


Please rate the helpfulness of this tip.

Click on a star to rate it!