… for Adobe Premiere Pro CC

Tip #1620: How to Rename Timeline Tracks

Larry Jordan – LarryJordan.com

Scale tracks vertically, then control-click a track to rename.
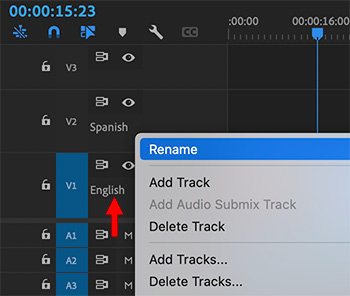
Control-click a track name in the Timeline to change its name.

Topic $TipTopic

Premiere allows renaming audio or video tracks – if you know where to click.

Here’s how:

  • Load the sequence you want to label into the Timeline.
  • Select the Timeline panel.
  • Type Cmd + [plus] to increase the vertical height of the video tracks until you see the names of the tracks.

NOTE: To increase the height of audio tracks, type Option + [plus].

  • Control-click the name of the track you want to change and select Rename (see screen shot).

These names will show up in the Timeline and Audio Track Mixer.

Once you save the project, these names will stay with that sequence until you change them.


Please rate the helpfulness of this tip.

Click on a star to rate it!

… for Adobe Premiere Pro CC

Tip #1621: Create Custom Workspaces

Larry Jordan – LarryJordan.com

Custom layouts are easy to create and keep using Workspaces.

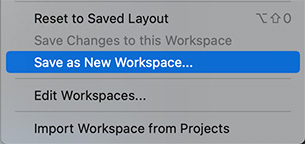
Window > Workspaces submenu.

Topic $TipTopic

You can create an unlimited number of custom interface workspaces in Premiere. Here’s how.

  • Drag the vertical or horizontal borders between panels to resize panels.
  • Add new panels from the Windows menu.
  • Rearrange things as much as you want.
  • Then, choose Window > Workspaces > Save as New Workspace to save your work.

EXTRA CREDIT

To reset a workspace to its default setting, select it so it is displayed in Premiere. Then, choose Window > Workspaces > Reset to Saved Layout.


Please rate the helpfulness of this tip.

Click on a star to rate it!

… for Adobe Premiere Pro CC

Tip #1622: Reduce Audio Noise in Premiere Pro

Larry Jordan – LarryJordan.com

Adobe licensed their noise reduction tool from Accusonus.

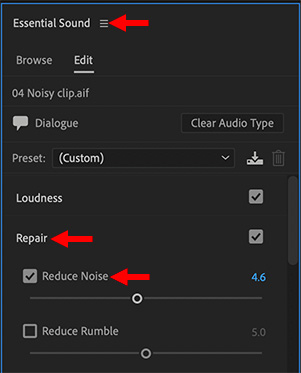
Noise reduction options in the Essential Sound panel.

Topic $TipTopic

One of the new features in Adobe Premiere Pro is a filter to reduce noise in an audio clip.

Generally, you want to use this effect to reduce, not eliminate, noise. Why? Because the more noise you reduce, the more likely you are to damage the quality of the remaining audio.

Still, this effect can salvage otherwise unusable clips. Here’s how it works:

  • Switch to the Audio workspace.
  • Select the audio clip you need to repair in the Timeline.
  • Assign the Dialogue tag by clicking the word Dialogue in the Essential Sound Panel.
  • Check the Repair option.
  • Check Reduce Noise.
  • Drag the slider while playing the clip and adjust to where the noise is reduced while the remaining audio sounds good.

NOTE: Because noise and voice frequencies overlap, there will probably be some degradation of the remaining audio. Try to find the best balance you can – but every clip will be different.


Please rate the helpfulness of this tip.

Click on a star to rate it!

… for Apple Final Cut Pro X

Tip #1606: Change Metadata Labels for Video Exports

Larry Jordan – LarryJordan.com

Metadata can be embedded into ProRes, MP4, MP3 and QuickTime files.

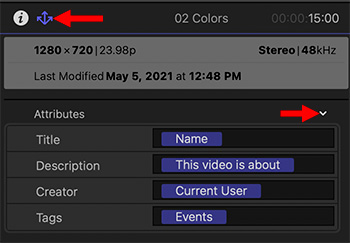
The Project Metadata Inspector (top red arrow). The white arrow displays more metadata fields (bottom red arrow).

Topic $TipTopic

Have you ever wondered where those labels come from when you share (export) a file? These labels are stored as project metadata.

Here’s how to change them:

  • Select the project in the Browser.
  • Click the “trident” arrow in the Inspector (top arrow in screen shot). This displays the project metadata.
  • Change the text in any field.
  • Or, click the white down arrow (bottom red arrow in screen shot) to display more than a dozen other metadata fields that can be added to your export.

These will be retained in the project until you change them.

EXTRA CREDIT

You can also add metadata to videos using Compressor.


Please rate the helpfulness of this tip.

Click on a star to rate it!

… for Apple Final Cut Pro X

Tip #1607: Add Metadata to Videos in Compressor

Larry Jordan – LarryJordan.com

Metadata can be read by many different applications, as well as asset managers.

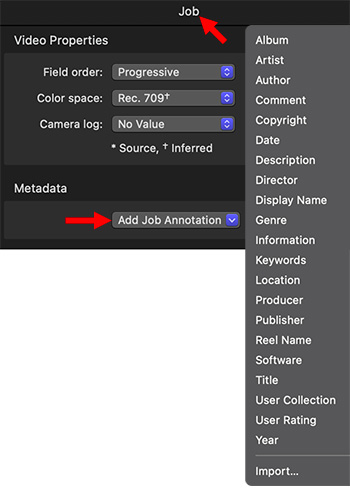
Custom metadata fields that can be added to any ProRes, MP4, MP3 or QuickTime movie.

Topic $TipTopic

You can use Apple Compressor to add metadata (labels) to your videos during compression using Compressor. Here’s how.

  • Import one or more files into Apple Compressor.
  • Select the file name in the Job list, not the compression setting.
  • In the Job Inspector (top red arrow in screen shot), scroll down to the Metadata menu (bottom red arrow).
  • Click it and select as many custom fields as you need.

NOTE: No, you can’t add fields that aren’t on this list. However, you can import an XML Property List, if you know how to create XML files.

Metadata can be added to ProRes, MP4, MP3 and QuickTime files.


Please rate the helpfulness of this tip.

Click on a star to rate it!

… for Apple Motion

Tip #1592: A “Better” Way to Adjust Audio in Motion

Larry Jordan – LarryJordan.com

Nothing about audio in Motion is easy. Here’s proof.

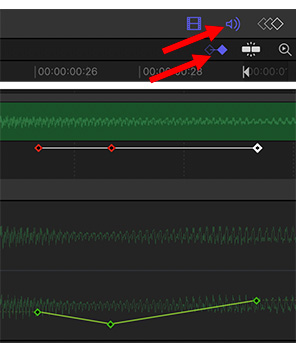
Enable keyframe display (top), Audio timeline (middle), Keyframe Editor (bottom).

Topic $TipTopic

Audio always seems like an afterthought in Motion. Audio clips are impossible to find and almost impossible to adjust. But, here’s a trick that makes setting levels a bit easier.

Import an audio clip into Motion, then:

  • Reveal the Timeline (Shortcut: F6).
  • Click the Audio icon in the top right corner (top red arrow). This reveals the audio clip in the middle of the pane (middle section of screen shot).
  • Click the Keyframe icon (lower red arrow).
  • Put the playhead where you want the first keyframe to appear and select the audio clip in the Timeline pane.
  • Go to Inspector > Audio Track and add a keyframe for Audio Level. A small red dot appears below the audio clip in the Timeline pane. (Middle portion of the screen shot.)

NOTE: You would think you could adjust the keyframe audio level by dragging it. You would be wrong.

  • Adjust the audio level for that keyframe in the Inspector.
  • Move the playhead to where you want the next keyframe to appear and repeat the keyframe setting process.

NOTE: You would think the keyframes in the Timeline would indicate the different levels. You would be wrong.

  • To see audio levels once they are set, Control-click the keyframe and choose Show in Keyframe Editor. (Lower section of screen shot.)

NOTE: You would think Motion would make adjusting audio easier. You would be wrong.


Please rate the helpfulness of this tip.

Click on a star to rate it!

… for Apple Motion

Tip #1593: How to View Motion Keyframes

Larry Jordan – LarryJordan.com

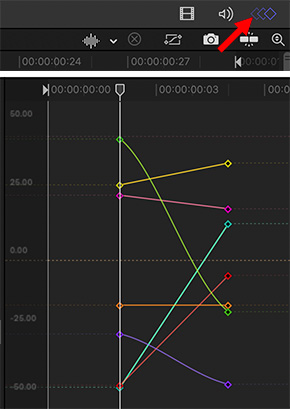
Each keyframe can be repositioned and modified from within the Timing Pane.

Keyframes displayed in the Timing Pane.

Topic $TipTopic

Most of the time, the mini-Timeline in Motion, combined with the Inspector, allows us to adjust keyframes without getting bogged down in too many details.

But, when you need to see all the keyframes associated with an elements, the Timing Pane is the answer.

To reveal it, choose Window > Show Timing Pane.

Then, to see keyframes, click the 3 Diamonds icon in the top right corner (red arrow in screen shot).

This opens the keyframe display where you can see and modify keyframes as necessary.

EXTRA CREDIT

Tip #1594 explains how to modify keyframes.


Please rate the helpfulness of this tip.

Click on a star to rate it!

… for Apple Motion

Tip #1594: What the Keyframe Controls Do

Larry Jordan – LarryJordan.com

The Timing Pane displays and edits keyframes for any selected element.

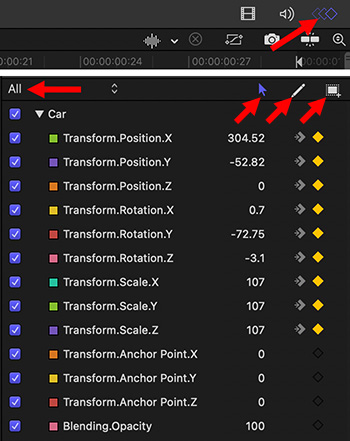
The Keyframes list in the Timing Pane. The three tools on the right add and modify keyframes.

Topic $TipTopic

Most of the time, we don’t need to access keyframes as a group. But, when we do, the Timing Pane has the tools you’ll need.

When you open the Timing pane, depending upon which display option you select, you can view all the keyframes that are associated with the selected element.

To view keyframes:

  • Select the element you want to review in the Layers pane.
  • Display the Timing Pane (Window > Show Timing Pane)
  • Click the “3 Diamonds” in the top right corner (top red arrow in screen shot).
  • Select All from the Untitled Set menu on the top left (left red arrow in screen shot). This reveals all keyframes associated with the selected element.
  • Arrow. Double-click a keyframe dot to edit its value or position.
  • Pencil. Sketch keyframes tool. Select a keyframe from the list on the left, then drag the Pencil to manually draw an animation curve for that setting.
  • Rectangle. Transform keyframes tool. Use the Transform Keyframes tool to drag a selection rectangle around multiple keyframes and then manipulate their positions by dragging the bounding box or adjusting its handles. Dragging the bounding box moves the selected keyframes in whatever direction you move.

Please rate the helpfulness of this tip.

Click on a star to rate it!

… for Adobe Premiere Pro CC

Tip #1587: When to Use Render at Maximum Depth

Larry Jordan – LarryJordan.com

Basically, turn this off.

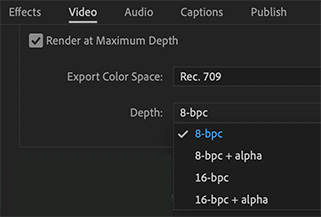
Most of the time, with modern computers, leave this unchecked.

Topic $TipTopic

There are new render settings for video export. These affect the Render at Maximum Depth option. Here’s what they mean and which to choose.

This setting is a hold-over from the days when all rendering was done by the CPU. Now that Premiere has shifted to GPU rendering, these settings are no longer necessary.

  • Leave Render at Maximum Depth unchecked unless you don’t have a dedicated GPU.
  • If you check this, and you are doing color grading, set the depth to 16-bpc for the most accurate color rendering.
  • 8-bpc will render faster, but subtle color shade may get lost.
  • Only check + alpha if you need transparency included with your export.

EXTRA CREDIT

To reassure yourself, render a test image with this turned on and then with it turned off. See if you can see a difference.


Please rate the helpfulness of this tip.

Click on a star to rate it!

… for Apple Final Cut Pro X

Tip #1590: An Easy Way to See Interlaced Video

Larry Jordan – LarryJordan.com

Interlacing is automatically converted to progressive when a clip is scaled.

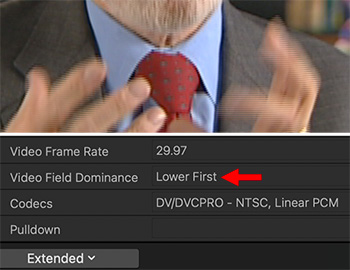
Interlacing artifact (top image), the Video Field Dominance setting in the Info Inspector.

Topic $TipTopic

We have lived with interlaced video since the beginning of television. On TV sets, interlacing looks lovely. But, oh my! On the web, it looks atrocious!

Fortunately, Final Cut has two ways to quickly determine if a video clip is interlaced:

From the View menu in the top right corner of the Viewer, enable Show Both Fields. When the Viewer is set to 100%, you’ll see the thin, black, horizontal lines emanating from moving objects (top screen shot).

NOTE: If an interlaced image is scaled, interlacing lines will be removed, but their general motion blur will remain.

Or, go to the Info Inspector. Set the Basic menu in the lower left corner to Extended, then scroll down to see the Video Field Dominance setting. Anything other than Progressive means the clip is interlaced (bottom screen shot).

Scaling a clip, or editing it into a progressive project, will automatically convert it from interlaced to progressive.


Please rate the helpfulness of this tip.

Click on a star to rate it!