… for Adobe Premiere Pro CC

Tip #1225: Create the Illusion of Speed

Larry Jordan – LarryJordan.com

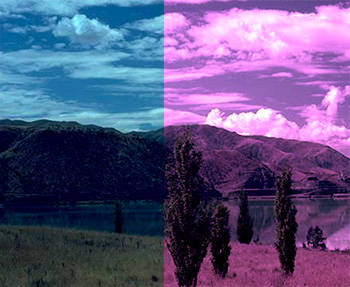
A Directional Blur creates a blur that reinforces the direction of movement.

Jet-powered fish with a Directional Blur applied.

Topic $TipTopic

You are editing an action scene, but elements in it don’t seem to be moving fast enough. Here’s filter that can help.

  • Apply Effects > Blurs > Directional Blur.
  • Then, set the Angle to match the direction of movement, and the Amount to emphasize the speed of movement.

This is similar to creating motion blur in the camera to show the audience just how fast something is moving.

There are no “magic settings” to this effect. Simply apply the filter, then tweak until things look good to you.


Please rate the helpfulness of this tip.

Click on a star to rate it!

… for Adobe Premiere Pro CC

Tip #1226: Make Video Look Like a 3D Button

Larry Jordan – LarryJordan.com

This is a fast way to add dimensionality to a 2D video.

Effect Controls settings (top) and the finished effect.

Topic $TipTopic

There’s a little known effect in Premiere that can turn any video into a 3D button. While you wouldn’t use this in a background video, it can create interesting foreground effects. Here’s how it works.

  • Select a clip – ideally, scale it to less than full screen.
  • Apply Effects > Perspective > Bevel Alpha.

The default settings aren’t bad, but you can tweak them in Effect Controls. In this example, I increased the Edge Thickness a lot.


Please rate the helpfulness of this tip.

Click on a star to rate it!

… for Adobe Premiere Pro CC

Tip #1164: How to Retime a Clip in AME

Larry Jordan – LarryJordan.com

Retiming ALWAYS changes the playback speed of a clip.

The ‘Interpret Footage” option linked to the media file in Adobe Media Encoder.

Topic $TipTopic

(This tip is from a recent webinar on Media Compression in Adobe Media Encoder.)

Retiming a clip means to change the frame rate at which a clip plays back. For example, from 24 fps to 25 fps. This can easily be done in Adobe Media Encoder. Here’s how.

  • Open Adobe Media Encoder. (Any version will do, this isn’t a new feature.)
  • Using the Media Browser, import the clip who’s speed you want to change into the Queue.
  • Control-click the name of the movie file in the Queue (see screen shot) and select Interpret Footage.
  • In the resulting dialog, change “Assume this frame rate:” to the new frame rate you want to use for playback.
  • Click OK and you are done.

NOTE: When retiming clips, while you can convert these into any codec, it is a good practice to convert them into a high-quality intermediate codec like ProRes 422, or a high-data rate GoPro Cineform or DNx file. This retains the maximum image quality during the conversion.

EXTRA CREDIT

Unlike changing the frame rate, which drops or adds frames, interpreting footage plays every frame in the clip, but at a different speed.

So, going from a faster frame rate to a slower one creates slow motion, while going from a slower frame rate to a faster one creates a timelapse.


Please rate the helpfulness of this tip.

Click on a star to rate it!

… for Adobe Premiere Pro CC

Tip #1205: Display the Compression Log in AME

Larry Jordan – LarryJordan.com

AME’s log summarizes everything that was done to compress a file.

The Status column in Adobe Media Encoder.

Topic $TipTopic

(This tip is from a recent webinar on Media Compression in Adobe Media Encoder.)

Every compression job in Adobe Media Encoder is logged in a hidden log file. This log shows how long it took to compress a file, where the file is stored and what settings were applied to it.

To display the log, after a file has been compressed, click Done in the Status column.

The compression log appears almost instantly. The latest files will be located at the bottom.

EXTRA CREDIT

This is a text file. The contents can be copied and pasted into the word processor of your choice if you need to make this report prettier.


Please rate the helpfulness of this tip.

Click on a star to rate it!

… for Adobe Premiere Pro CC

Tip #1206: Reset a Compression Job in AME

Larry Jordan – LarryJordan.com

To reset the status, Control-click the status and reset it.

The Reset Status menu, which is accessed by Control-clicking the status for a job.

Topic $TipTopic

(This tip is from a recent webinar on Media Compression in Adobe Media Encoder.)

When Adobe Media Encoder (AME) completes a compression task, it flags the job as Done (Tip #1205).

However, what if you discover a problem with the file? Once that Done flag is set, AME won’t recompress it.

Unless…. you know this simple tip to resetting the status of a clip.

Simply Control-click the Status (the word “Done”) for the file you need to recompress and reset it. (See screen shot.)

EXTRA CREDIT

This reset is typically needed when you compress a file, only to discover that one of the settings was wrong, or an overlay was misspelled, or the data rate was too low.

Resetting the status is much faster than recreating the entire compression setting.


Please rate the helpfulness of this tip.

Click on a star to rate it!

… for Adobe Premiere Pro CC

Tip #1181: How Color Match Works

Larry Jordan – LarryJordan.com

I find that Color Match gets me close, then I can tweak using the color wheels.

The Color Match section of the Lumetri Color panel.

Topic $TipTopic

Color Match allows fast color matching between timeline clips in Premiere. It’s been in the Lumetri Color panel for a while, but you may have overlooked it. Here’s how it works.

  • Put the playhead on a clip in the timeline who’s color needs adjustment.
  • Switch to the Color workspace, then reveal the Color Wheels & Match section (see screen shot).
  • Click Comparison view. This displays a second window in the Program Monitor to the left of the timeline image.
  • Drag the slider under the Comparison View until you find a frame who’s color you like.
  • In the Lumetri panel, click Apply Match (see screen shot).

Instantly, the color of the timeline clip shifts to match the overall tone of the frame in the Comparison View.

EXTRA CREDIT

No automated color tool works perfectly all the time. I find this technique to be a fast way to get a clip close to the colors I want. From there, it is easy to tweak it to its final look using the Color Wheels.


Please rate the helpfulness of this tip.

Click on a star to rate it!

… for Adobe Premiere Pro CC

Tip #1189: New Features in Premiere Pro (Nov. 2020)

Larry Jordan – LarryJordan.com

New features are nice, but Adobe also needs to prioritize performance and bug fixes.

The Quick Export icon in Premiere.

Topic $TipTopic

Adobe has quietly moved to monthly updates for all its media software. Here’s what’s new in the November, 2020, update.

  • Quick Export. This provides direct access to popular and frequently used export settings, right from the header bar in Premiere Pro.
  • AME APU Optimization. This affects Windows users running Ryzen CPUs, using Radeon GPUs, with up to 4 times faster rendering and smoother playback for 4K sequences thanks to improved memory usage.
  • Moving into beta is media replacement in motion graphics templates which will provide new options for graphics workflows.

The Quick Export icon is located in the top right corner of the Premiere interface (see screen shot).

EXTRA CREDIT

Here’s Adobe’s blog with the details.


Please rate the helpfulness of this tip.

Click on a star to rate it!

… for Adobe Premiere Pro CC

Tip #1187: Using Quick Export

Larry Jordan – LarryJordan.com

Quick Export is a fast way to create H.264 versions of your timeline.

Quick Export icon (top), video format settings (middle) and seven compression options.

Topic $TipTopic Quick Export, new with the Nov. 2020 release of Adobe Premiere Pro, is a single-button way to create H.264 versions of the currently open project in your timeline.

  • Click the Quick Export icon in the top right corner of the Premiere interface (screen shot, top red arrow).
  • This displays the Quick Export screen allowing you to change the file name, storage location and compression setting.
  • Click Preset to pick from eight different compression settings: bit rate (top four) and image size (bottom four) for the exported file. (Middle image) The display at the bottom (bottom red arrow) shows the current export configuration.
  • When the settings are the way you like – and most of the time, you probably won’t change them, click Export.

NOTE: All these options create H.264 files.

This quickly configures project exports. The export process remains the same.

EXTRA CREDIT

For more export options, simply export your project as always and configure it using the Export Settings window.


Please rate the helpfulness of this tip.

Click on a star to rate it!

… for Adobe Premiere Pro CC

Tip #1179: Double-click & Mouse Tricks

Larry Jordan – LarryJordan.com

Double-clicking is a cool way to change the interface.

Drag the small vertical line next to the chevron to resize the Workspace bar.

Topic $TipTopic

Hidden in Adobe Premiere are some interesting double-click mouse tricks. Here’s what I’ve discovered so far.

NOTE: I’m using the Premiere Nov. 2020 update. I have no idea how long these have been in the software.

Double-click mouse tricks:

  • Double-click the header – where “Learning” and “Assembly” are located – to hide it. Single-click the small space that remains to get them to reappear.
  • Drag the small vertical line between the workspace names at the top and the right chevron arrow to expand or collapse the space for workspace names.
  • Click the small House icon in the top left corner to return to the Home screen (duh… took me forever to try this).
  • Double-click the top of the Program Monitor to bring it full-screen. Double-click in the same place to put it back.
  • Actually, double-click the top of ANY panel to expand it to full-screen.

NOTE: This last double-click is the same as pressing the tilde key – except you don’t need to worry about where your cursor is located.

These are some very cool time-savers. Share ones you’ve discovered in the comments, below.


Please rate the helpfulness of this tip.

Click on a star to rate it!

… for Adobe Premiere Pro CC

Tip #1180: Color Tricks for Surreal Effects

Larry Jordan – LarryJordan.com

The Channel Mixer provides opportunities to play with color in surreal ways.

The source image (left) and after processing by the Channel Mixer.

Topic $TipTopic

Most of the time, I want my images to look “real” or “normal.” However, sometimes, reality is the LAST thing you want. How can you make your images look surreal – or down-right other-worldly?

Time to meet the Channel Mixer effect.

The Channel Mixer maps the three color channels – red, green and blue – to the other two channels. Every pixel contains values from all three channels to varying degrees.

This effect says: Take the red values in each pixel and instead of increasing or decreasing their red content, increase or decrease the blue (or green) content instead. This very quickly takes a normal looking image and makes it surreal.

This effect needs to be played with to appreciate what it can do.

Apply Effects > Color Correction > Channel Mixer to a clip, then drag the sliders around and watch what happens.

The screen shot is a perfect example. In it, I’m mapping blue elements in each pixel to boost the red.


Please rate the helpfulness of this tip.

Click on a star to rate it!