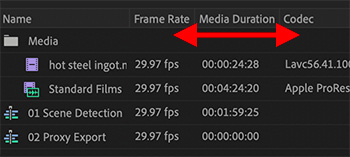
List view is similar to a spreadsheet – with the addition of dozens of hidden columns.
Drag and resize columns in List View just like a spreadsheet.
When you switch to List view in the Program panel, clips and sequences are sorted into rows and columns. This gives you lots of different ways to look at the elements of your project.
List View is similar to a spreadsheet:
Drag the name of a column header to move it to a new location.
Drag the vertical line between column headers to resize the column.
Click the column header to sort by that column.
Click twice to sort in descending order
Shift-click a second column header to sort on a second column (for example, click first on Scene to sort by Scene number, then, shift-click on Log Note to sort by circled takes.)
NOTE: The Name column can not be moved.
To hide or display more columns, Control-click any column EXCEPT the Name column and choose Metadata Display.
While you can display any metadata fields listed there, the one that will be most helpful are the fields inside Premiere Pro Project Metadata.
It is fascinating to see what readers find interesting!
During this last year, The Inside Tips published 975 tips and techniques covering six subject categories:
Adobe Premiere
Apple Final Cut Pro
Apple Motion
Codecs & Media
Random Media Weirdness
Visual Effects
Here are three “Top Ten Tips Lists:” The first shows the most popular tips covering Adobe Premiere Pro. The second list shows the Top Ten most read tips across all categories. The third list shows the highest rated tips across all categories sorted by votes.
TOP 10 INSIDE TIPS FOR 2020
FOR ADOBE PREMIERE PRO
NOTE: Each tip was rated 5 out of 5. They are sorted by the number of votes each tip received, with most votes listed first.
Please rate the helpfulness of this tip.
Click on a star to rate it!
https://www.theinsidetips.com/wp-content/uploads/2019/09/Tips-Logo-700x150.jpg00Larry Jordanhttps://www.theinsidetips.com/wp-content/uploads/2019/09/Tips-Logo-700x150.jpgLarry Jordan2020-12-29 01:30:002020-12-27 10:38:28Tip #1290: Top Ten Tips of 2020 for Adobe Premiere Pro
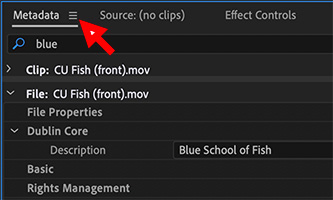
Metadata is great – but search is limited only to clips currently open in Premiere.
The Metadata panel in Adobe Premiere Pro.
You spend all this time entering labels and other metadata for the clips in your project. Where does Premiere store this data and can you use it again?
A great strength of Premiere is the extensive metadata (labeling) support inside every project. For example, select a clip, or group of clips. Switch to the Metadata panel and add labels for the selected clips. Finally, go to the Project panel and search for any of the terms you entered.
NOTE: A good option for adding metadata is to use the Dublin core fields. Learn more here.
This search is extremely fast and covers all manually-entered metatdata. So, whenever you need a clip, you can quickly search for it using the relevant metadata.
The bad news is that you can’t access this data outside of Premiere because this metadata is only stored inside each Premiere project. If a project isn’t open or if you try to use the Finder to find a clip, all this metadata is hidden.
One ray of hope is that if you drag a clip from one project to another inside Premiere, all its metadata travels with it.
EXTRA CREDIT
This inability to find clips based on metadata stored in Premiere is one of the key reasons asset management software exists. With a MAM, you enter the metadata into the MAM and can then search for files and transfer them with their metadata into different Premiere projects quickly and easily.
Please rate the helpfulness of this tip.
Click on a star to rate it!
https://www.theinsidetips.com/wp-content/uploads/2019/09/Tips-Logo-700x150.jpg00Larry Jordanhttps://www.theinsidetips.com/wp-content/uploads/2019/09/Tips-Logo-700x150.jpgLarry Jordan2020-12-22 01:30:002020-12-18 17:50:57Tip #1264: Where Premiere Stores Metadata
Dublin Core provides a standardized way to identify and find resources, including media.
The DCMI logo – note the use of 15 dots.
I was wondering about what Dublin Core metadata actually is. So, I looked it up.
The original Dublin Core of thirteen (later fifteen) elements was designed to standardize key labels about resources. It was first published in a report from a workshop in 1995. It was formalized into ISO, ANSI/NISO and IETF standards a few years later.
NOTE: “Dublin” refers to Dublin, Ohio, USA where the schema originated during the 1995 invitational OCLC/NCSA Metadata Workshop. “Core” refers to the metadata terms as “broad and generic being usable for describing a wide range of resources”.
The resources described using the Dublin Core may be digital resources (video, images, web pages, etc), as well as physical resources such as books or CDs, and objects like artworks.
From this initial paper, the Dublin Core Metadata Initiative (DCMI) evolved into the role of “de facto” standards agency by maintaining its own, updated documentation for DCMI Metadata Terms. The DCMI Usage Board currently serves as the maintenance agency for the ISO spec.
For more than twenty years, the DCMI community has developed and curated Dublin Core Specifications. More recently, DCMI has become recognised as a trusted steward of metadata vocabularies, concept schemes and other metadata artefacts, and has taken responsibility for other community-created specifications. DCMI remains committed to this important work, and is actively developing more efficient and sustainable approaches to the stewardship of these standards.
Alpha channels are the magic that make compositing and most effects possible.
Viewing the alpha channel: White is opaque, black is transparent & gray is translucent.
The process of adding an alpha channel to an image – at the developer level – is highly complex. Fortunately, we don’t need to understand how the channel is added to take advantage of it.
Just as the red, blue and green channels describe the amount of red, blue or green in each pixel, the alpha channel describes the amount of transparency in each pixel. An alpha channel provides a way to store images and their transparency information in a single file without disturbing the color channels.
Many file formats can include an alpha channel, including Adobe Photoshop, ElectricImage, TGA, TIFF, EPS, PDF, and Adobe Illustrator. ProRes, AVI and QuickTime (saved at a bit depth of Millions Of Colors+), also can contain alpha channels, depending upon the codecs used to generate these file types.
Alpha channels store transparency information in files in one of two ways: straight or premultiplied. Although the alpha channels are the same, the color channels differ.
With straight (or unmatted) channels, transparency information is stored only in the alpha channel, not in any of the visible color channels. With straight channels, the effects of transparency aren’t visible until the image is displayed in an application that supports straight channels.
With premultiplied (or matted) channels, transparency information is stored in the alpha channel and also in the visible RGB channels, which are multiplied with a background color. The colors of semitransparent areas, such as feathered edges, are shifted toward the background color in proportion to their degree of transparency.
Some software lets you specify the background color with which the channels are premultiplied; otherwise, the background color is usually black or white.
Straight channels retain more accurate color information than premultiplied channels. While premultiplied channels are compatible with a wider range of programs, such as Apple QuickTime Player.
Often, the choice of whether to use images with straight or premultiplied channels has been made before you receive the assets to edit and composite. Premiere Pro and After Effects recognize both straight and premultiplied channels, but only the first alpha channel they encounter in a file containing multiple alpha channels.
ProRes 4444 is a good choice when you need to create or transfer clips with alpha channels.
Alpha channels are supported in all NLEs, and there are dozens of articles on the web detailing how to work with them to create a variety of different effects.
Please rate the helpfulness of this tip.
Click on a star to rate it!
https://www.theinsidetips.com/wp-content/uploads/2019/09/Tips-Logo-700x150.jpg00Larry Jordanhttps://www.theinsidetips.com/wp-content/uploads/2019/09/Tips-Logo-700x150.jpgLarry Jordan2020-12-22 01:30:002020-12-22 01:30:00Tip #1266: Interpreting an Alpha Channel
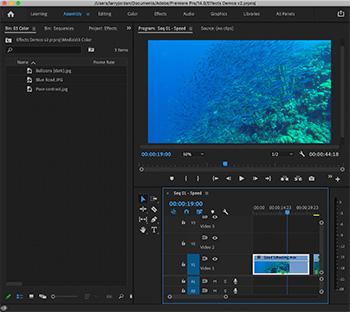
The Assembly workspace focuses on clips and story-telling.
The Assembly workspace is designed for fast review and rough-cut editing.
You’ve seen the text button in the Workspaces list at the top of Premiere Pro: Assembly. But what is this workspace and how do you use it?
PremiumBeat.com describes it as: “A workspace layout that has a large Project area with the Program & Source Monitors sharing [the same] space. This is a handy workspace if you like to use Premiere Pro’s Hover Scrub, then set In & Out and use shortcuts to quickly Insert or Overwrite edit. As the name suggests, this workspace is designed for quickly creating a rough cut in Premiere Pro.”
Here’s a detailed article from PremiereBro.com on workspaces in Premiere.
Please rate the helpfulness of this tip.
Click on a star to rate it!
https://www.theinsidetips.com/wp-content/uploads/2019/09/Tips-Logo-700x150.jpg00Larry Jordanhttps://www.theinsidetips.com/wp-content/uploads/2019/09/Tips-Logo-700x150.jpgLarry Jordan2020-12-15 01:30:002020-12-15 01:30:00Tip #1245: What is the Assembly Workspace?
These hand-drawn letters can be used in ANY NLE – not just Premiere.
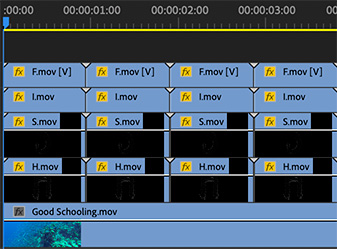
Each animated letter is its own movie. Duplicate to increase duration.
Recently, I wrote an Inside Tip on some hand-painted fonts for Premiere. (Tip #1119). Then, Richard sent me a note asking how to install them. Here’s the answer.
You don’t install these. Instead, each letter is a stand-alone movie file.
Drag the letters you need into Premiere.
Stack them above each other – since they all need to appear on screen at the same time – in the timeline.
Using the Position settings in Effect Controls, position the letters so they are readable.
Each letter has a one-second duration. To make the letters hold on-screen longer, you can either change the speed of the clip (which kinda kills the animation) or add multiple versions of the same letter to the timeline (see screen shot).
EXTRA CREDIT
Change the color of each letter using the Change to Color effect. (See Tip #1247)
To make this more manageable, consider combining all the letters for each word into a nest. This simplifies scaling, adding color or transitions or animating movement using keyframes.
Please rate the helpfulness of this tip.
Click on a star to rate it!
https://www.theinsidetips.com/wp-content/uploads/2019/09/Tips-Logo-700x150.jpg00Larry Jordanhttps://www.theinsidetips.com/wp-content/uploads/2019/09/Tips-Logo-700x150.jpgLarry Jordan2020-12-15 01:30:002020-12-12 10:09:04Tip #1246: Hand-painted Fonts for Premiere
This effect makes it easy to change any color to any other color.
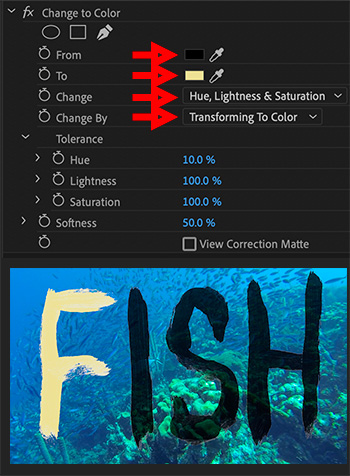
Change to Color settings (top) and a single letter in the new color.
In Tip #1246, I illustrated how to use hand-painted fonts in Premiere. The problem is that these fonts are all black. How do you change their color?
The answer is the Change to Color effect. Here’s how it works.
Drag Effects > Video Effects > Color Correction > Change to Color onto the clip(s) who’s color you want to change.
NOTE: This is not the same effect as Change Color. Change to Color is easier to use.
In Effect Controls, click the From color and set it to pure black. (See screen shot)
NOTE: Don’t use the eyedropper to select the letter color in the Program Monitor. The letters are translucent and this picks a blend of colors, which won’t work.
In Effect Controls, set the To color to the color you want to display.
Next, set Change to Hue, Lightness & Saturation.
Finally, set Change by to Transforming to Color. This retains the translucency built into each letter.
EXTRA CREDIT
Nesting the letters will make this process easier because you can apply this effect to the nest and change all the letters at the same time.
Please rate the helpfulness of this tip.
Click on a star to rate it!
https://www.theinsidetips.com/wp-content/uploads/2019/09/Tips-Logo-700x150.jpg00Larry Jordanhttps://www.theinsidetips.com/wp-content/uploads/2019/09/Tips-Logo-700x150.jpgLarry Jordan2020-12-15 01:30:002020-12-12 10:10:31Tip #1247: The Change to Color effect
We may request cookies to be set on your device. We use cookies to let us know when you visit our websites, how you interact with us, to enrich your user experience, and to customize your relationship with our website.
Click on the different category headings to find out more. You can also change some of your preferences. Note that blocking some types of cookies may impact your experience on our websites and the services we are able to offer.
Essential Website Cookies
These cookies are strictly necessary to provide you with services available through our website and to use some of its features.
Because these cookies are strictly necessary to deliver the website, refuseing them will have impact how our site functions. You always can block or delete cookies by changing your browser settings and force blocking all cookies on this website. But this will always prompt you to accept/refuse cookies when revisiting our site.
We fully respect if you want to refuse cookies but to avoid asking you again and again kindly allow us to store a cookie for that. You are free to opt out any time or opt in for other cookies to get a better experience. If you refuse cookies we will remove all set cookies in our domain.
We provide you with a list of stored cookies on your computer in our domain so you can check what we stored. Due to security reasons we are not able to show or modify cookies from other domains. You can check these in your browser security settings.
Google Analytics Cookies
These cookies collect information that is used either in aggregate form to help us understand how our website is being used or how effective our marketing campaigns are, or to help us customize our website and application for you in order to enhance your experience.
If you do not want that we track your visit to our site you can disable tracking in your browser here:
Other external services
We also use different external services like Google Webfonts, Google Maps, and external Video providers. Since these providers may collect personal data like your IP address we allow you to block them here. Please be aware that this might heavily reduce the functionality and appearance of our site. Changes will take effect once you reload the page.
Google Webfont Settings:
Google Map Settings:
Google reCaptcha Settings:
Vimeo and Youtube video embeds:
Other cookies
The following cookies are also needed - You can choose if you want to allow them:
Privacy Policy
You can read about our cookies and privacy settings in detail on our Privacy Policy Page.