… for Adobe Premiere Pro CC

Tip #1182: What Does Clamp Signal Do?

Larry Jordan – LarryJordan.com

Clamping the signal affects the video scopes, but does NOT affect the video.

Unclamped video (top) vs. clamped video. The red arrow shows the checkbox.

Topic $TipTopic

The Lumetri Scopes have a “Clamp Signal” checkbox. It is checked on by default. What does this do and how does it affect your video?

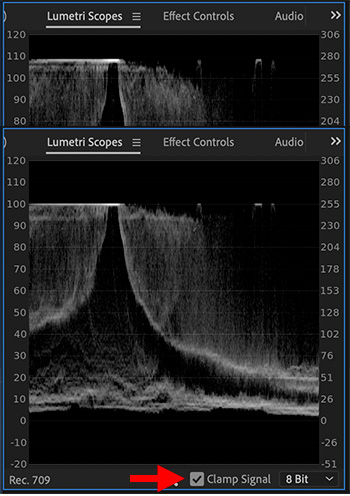
First introduced in 2017, the Clamp Signal checkbox in the Lumetri Scopes panel limits the scope’s display to the visible spectrum for Rec. 709 media. Selected by default, this setting lets the scopes show values only from 0 through 100. If you want to see how much of the signal is being clipped, deselect the Clamp Signal check box.

The screen shot illustrates a signal which is unclamped, top, and clamped, bottom. Notice how the source clip has white levels that approach 110%. The red arrow indicates the checkbox itself.

The KEY thing you need to know is that checking this has NO effect on the video in the timeline. It only adjusts the scope display.

For web video, levels over 100% for Rec. 709 footage are no big deal – the web can play anything. But for projects destined for broadcast, cable, digital cinema or DVD, white levels must never exceed 100% for Rec. 709 media. (A bit lower is actually preferable.)

While the checkbox is nice, it is a better idea, most of the time, to see accurate video levels, so leave this box unchecked. This is not the default setting.


Please rate the helpfulness of this tip.

Click on a star to rate it!

… for Adobe Premiere Pro CC

Tip #1150: Audio Effect Order is Important

Larry Jordan – LarryJordan.com

Audio effects process in a specific order. Make sure the Limiter/Compressor is last.

A typical stack with noise reduction (top), EQ (center), and Compression/Limiting at the bottom.

Topic $TipTopic

When adding effects to audio clips in Premiere (or Audition), the order in which those effects are applied makes a difference. Here’s what you need to know.

Audio effects are processed from the top of the Effect Controls panel to the bottom. (See screen shot.)

The first effect to apply – if you need it – is noise reduction. Get rid of what you don’t want before you start shaping the sounds you do. Remember, your goal is to reduce noise, not eliminate it. If you want it gone, re-record in a studio.

NOTE: Noise reduction can often degrade the spoken voice. By processing this early, you can then use effects farther down the “stack” to try to replace what noise reduction took away. This is why we reduce, not remove, noise.

Next, add any EQ or special effects you need to shape the sounds the way you want. Add any reasonable number of filters here.

Finally, at the bottom and ALWAYS last, apply either a compression or limiter filter. This makes sure that audio levels don’t exceed the level you specifiy.

I should mention that you don’t apply both a compression filter AND a limiter filter to the same track. Pick one or the other.

NOTE: For my mixes, I apply the Multiband Compressor to all dialog tracks, with the Limiter filter applied to the master track and set to -3 dB to catch any errant levels before they distort the final mix. I don’t generally use compression on either effects or music.


Please rate the helpfulness of this tip.

Click on a star to rate it!

… for Adobe Premiere Pro CC

Tip #1154: Options for Converting Frame Rate

Larry Jordan – LarryJordan.com

Try letting Premiere convert frame rates first. If playback is smooth, you’re all set.

The Timebase menu in Premiere’s Sequence Settings.

Topic $TipTopic

During a recent webinar, Ian asked:

I shoot/edit in the UK at 25/50 fps with images up to 4k. At times I have B-roll either from an iPhone or GoPro 8 shot at 30 fps 4K. Should I retime these to 25/50 fps before importing or let Premiere do the job?

My answer is that, in general, go with the simplest solution first: let Premiere handle the frame rate conversion.

Because all video is just a string of still images, changing the frame rate while still maintaining the same apparent speed during playback requires dropping or duplicating frames.

Whenever you drop or duplicate a frame, there’s the potential for stutter in the video playback. The more drastic the frame rate conversion, the more potential for obvious stuttering.

However, you’ll find that Premiere does a good job dropping frames to convert the frame rate for most movement. (You won’t notice the impact of changing frames on stationary images with a locked down camera.)

If Premiere doesn’t do a good job, try converting your footage using Adobe Media Encoder. This uses a different process for frame rate conversion that may look better to you.

Every movie is different. Experiment with different tools until you get the results you want.


Please rate the helpfulness of this tip.

Click on a star to rate it!

… for Adobe Premiere Pro CC

Tip #1157: Verify Your Audio Meets Spec

Larry Jordan – LarryJordan.com

Running Amplitude Statistics means that I can guarantee that my audio meets spec.

The Amplitude Statistics window, showing a recent webinar audio track.

Topic $TipTopic

One of the reasons I create my audio mixes in Adobe Audition, rather than Premiere or Final Cut, is that Audition has a panel that precisely measures the technical amplitude (loudness) of my finished mix to make sure it meets spec.

NOTE: Most audio is rejected due to not meeting spec. This solves that problem.

To use this:

  • Export your finished master file from Premiere, then open that movie (not the Premiere sequence) into Adobe Audition.
  • Double-click the audio clip to open it in the Waveform Editor.
  • Then, choose Window > Amplitude Statistics and click Scan.
  • After a short time, which varies depending upon the length of your project, the panel shown in the screen shot appears. Every distributor is different and some require very specific settings.

However, for media I’m posting to the web, the three things I look at are:

  • Peaks around -3 dB
  • Clipped samples = 0 (This means there is no distortion.)
  • LUFS around -16, ±0.5

NOTE: LUFS (also called LKFS) are a measure of the average sound level, unlike a peak. Broadcast and cable specs LUFS around -24. For the web, though, I think that’s too soft. I use -16 LUFS.

Every project I create gets analyzed this way. In fact, these numbers are from the audio file for yesterday’s webinar that I posted last night.


Please rate the helpfulness of this tip.

Click on a star to rate it!

… for Adobe Premiere Pro CC

Tip #1136: New Features in Adobe Premiere Pro

Larry Jordan – LarryJordan.com

Adobe continues to expand its color management for HDR media.

The Adobe Premiere Pro icon.

Topic $TipTopic

With the October, 2020, update, Premiere Pro adds several new features – most revolving around color management. Here’s the list.

  • Color Management of ARRI ProRes. Color management for ARRI ProRes formats with embedded LUTs streamlines the workflow in Premiere Pro. For HDR productions, you can switch out Rec. 709 LUTs and replace them with HLG LUTs
  • Rec. 2100 PQ now supported for HDR workflows
  • ProRes RAW import now supported on Windows for Intel and AMD GPUs.
  • ProRes RAW to Log color space conversion.
  • Improved playback for H.264 and HEVC files using hardware decoding on Windows for Premiere and After Effects.
  • Faster audio pre-roll playback.

Here’s a link to the details.


Please rate the helpfulness of this tip.

Click on a star to rate it!

… for Adobe Premiere Pro CC

Tip #1137: Set vs. Scale to Frame Size. Which to Pick?

Larry Jordan – LarryJordan.com

Set to Frame Size is the best overall option for scaling images.

Malahide Castle, near Dublin, Ireland. (Image courtesy of me.)

Topic $TipTopic

Malahide Castle is a magnificent medieval castle just outside Dublin, Ireland. After having visited it, I decided to create a short visual montage of my photos. Except… when I add still images to the timeline, I need to decide between using Set to Frame Size or Scale to Frame Size. What’s the difference?

Quite a lot, actually. When an image’s frame size is different from the sequence, Premiere resizes it to match. By default, it uses Scale to Frame Size.

You can adjust this behavior globally using Preferences > Media > Default Media Scaling – or – Control – click any clip and select either Scale to Frame Size or Set to Frame Size.

Here are the three scaling options:

  • None. (Only available in Preferences) This displays a clip at 100% size in the timeline, regardless of the frame size of the sequence.
  • Scale to Frame Size. This scales the clip to match the frame size of the sequence, then sets the Scale parameter in Effect Controls > Motion to 100%.
  • Set to Frame Size. This scales the clip to match the frame size of the sequence, then shows the amount the image was scaled in Effect Controls > Motion.

None is the best choice when creating multicam clips.

Set to Frame Size is the best choice for everything else.

While both Scale and Set resize the clip to match the sequence, only the Set option shows you exactly what was changed for the clip. Since image quality decreases as you scale images larger than 100%, with Scale, you have no idea whether an image is larger than 100% of not.

With Set to Frame Size, you always do.


Please rate the helpfulness of this tip.

Click on a star to rate it!

… for Adobe Premiere Pro CC

Tip #1138: Quickly Change Clip Speed

Larry Jordan – LarryJordan.com

Dragging a clip edge is the fastest. Using the Speed dialog is the most precise.

The Rate Stretch tool in the Tools menu.

Topic $TipTopic

There are three ways to change the speed of a clip… well, OK, four. These are the options:

  1. Control-click a clip and choose Speed/Duration.
  2. Choose Clip > Speed / Duration from the menu bar
  3. Type Cmd + R
  4. Or, select the Rate Change tool

Here’s the coolest: The Rate Change tool. Select it from the Tool palette (Shortcut: R), then, with the tool selected, drag the right edge of a clip in the timeline to the duration you need. Rather than trimming the clip, Premiere will change it’s speed to match the duration you need.

To reset the speed, display the Speed/Duration dialog (Shortcut: Cmd + R) and reset the speed to 100%.

NOTE: Windows users, use Cntrl + R.

EXTRA CREDIT

The Speed / Duration dialog is the most precise, but the Rate Change tool is the fastest.


Please rate the helpfulness of this tip.

Click on a star to rate it!

… for Adobe Premiere Pro CC

Tip #1110: Multicam Keyboard Shortcuts

Larry Jordan – LarryJordan.com

Multicam editing is all about efficiency. Keyboard shortcuts help.

Topic $TipTopic

Last week I presented a webinar on Multicam Editing in Adobe Premiere. As I was researching this, I discovered several little-known keyboard shortcuts that make multicam editing more fun. Here’s the list.

Multicam Keyboard Shortcuts

Shortcut What It Does
Shift + 0 Open/Close the Multicam Editor
E Jump the selected edit point to the playhead
1 – 9 If playhead is playing, cut between angles
1 – 9 If playhead is stopped, switch between angles
Control + 1 – 9 If playhead is stopped, cut between angles

Please rate the helpfulness of this tip.

Click on a star to rate it!

… for Adobe Premiere Pro CC

Tip #1111: Adobe Sneak Peaks

Larry Jordan – LarryJordan.com

Here’s the full list of new tech premiered at Adobe Sneaks.

(Image courtesy of pexels.com.)

Topic $TipTopic

Last week, at Adobe MAX, comedian Chelsea Handler co-hosted Sneaks, a preview of the futuristic tech Adobe engineers and researchers are exploring.

These Sneaks preview cutting-edge technologies from Adobe’s labs —and some may even make their way into future Adobe products. From tapping AI to fix blurry videos to enabling collaboration in augmented reality (AR) experiences, these experimental Sneaks push the boundaries of creative innovation.

Here’s the full list.

Project Sharp Shots – powered by Adobe Sensei (Adobe’s AI and machine learning technology)

  • #SharpShotsSneak takes advantage of advancements in computer vision and deep learning to transform blurry videos into sharp, steady, action-packed footage.

Project Scantastic

  • #Scantastic offers an intuitive solution that leverages your smartphone and a photogrammetry pipeline to capture 3D models from the environment with minimal user intervention for immersive, 3D experiences.

Project Material World – powered by Adobe Sensei

  • #MaterialWorld is a tool for image-to-material reverse engineering. It provides an intuitive material identification process that works under natural lighting, avoiding the need for complex capture setup or user inputs. This results in a digital texture so real you can almost feel it.

Project Physics Whiz

  • #PhysicsWhiz introduces a physics-based layout tool that combines a user’s intuitive sense of physical manipulation with the precision of digital tools to simplify object manipulation in 3D digital tools.

Project On the Beat – powered by Adobe Sensei

  • #OnTheBeatSneak identifies out-of-rhythm body movements and aligns them to generate beat-synced videos for the perfect dance video.

Project Comic Blast – powered by Adobe Sensei

  • #ComicBlast disrupts the way comics are created and consumed through efficient, collaborative, and intelligent design and technology paradigms that make comic book creation fun and 100x faster.

Project In Sync

  • #InSyncSneak streamlines the disconnected path from an XD file to a production-ready application. It allows designers to share information about the design and implementation, create a bridge prototype from XD, and quickly push to a production site.

Project 2D Plus

  • #2DPlus enables users to take 2D objects in Illustrator and make them instantly appear 3D. It is a set of features – dynamic shadows, attached shadows, auto-arrange, and graphic lighting, that come together to create 2.5D’ish looking outputs that graphic designers will undoubtedly love, saving a huge learning curve of understanding 3D apps.

Project Typographic Brushes

  • #TypographicBrushes combines users’ drawn stroke inputs, the choice of brush, and the typographic properties of the text object to brings paint style brushes and new-type families to life in seconds.

Project AR Together

  • #ARTogether brings to life a multi-user experience where everyone shares the same view of the physical space and virtual objects, and can author and share AR scenes without compromising the quality of the experience.

EXTRA CREDIT

Here’s a link to see video demos of each of these.


Please rate the helpfulness of this tip.

Click on a star to rate it!

… for Adobe Premiere Pro CC

Tip #1113: Mixed Frame Size Multicam Clips

Larry Jordan – LarryJordan.com

Premiere creates multi-camera source sequences based upon the first clip you select.

A 4k multicam clip (top), edited into a 1080p timeline (bottom).

Topic $TipTopic

Premiere has a special trick that allows it to easily create multi-camera source sequences (multicam) that contain clips of different frame sizes.

The secret is to make sure to select the clip with the largest frame size FIRST when selecting clips to include in a multicam clip.

Then, in the Create Multi-Camera Source Sequence window, set Sequence Preset to Automatic. This creates a multicam that matches the largest clip.

Next, create a sequence with the frame size you need and edit the multicam into it.

The screen shot illustrates a source multicam (top) where the image of earth is 4K, while the pouring steel shots are 1080p. The bottom image shows the same clip edited into a 1080p sequence. The pouring steel images are perfectly framed, while the 4K clip can now be scaled to whatever size you want using Effect Controls.

EXTRA CREDIT

For this to work, be sure to set Preferences > Media > Default Media Scaling to None.


Please rate the helpfulness of this tip.

Click on a star to rate it!