… for Adobe Premiere Pro CC

Tip #626: How to Easily Edit SRT Captions

Larry Jordan – LarryJordan.com

It is easy to make minor corrections to SRT caption files.

This is what an SRT caption text file looks like, viewed in Text Edit.

Topic $TipTopic

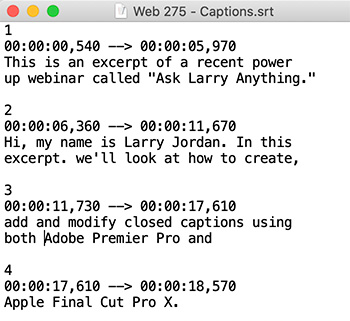
SRT captions are text files which are both easy to read and easy to edit. These text files can be opened in any text editor, such as Text Edit or BBEdit.

The format of the text inside the file is very specific:

  • Caption number. This must be on the top line and a unique, sequential number.
  • Timecode. This indicates the start and end of the caption, with the last set of numbers set off by a comma and representing milliseconds.
  • Caption text. This is one or two lines of text. Notice that this text file does not support significant text formatting.

As long as your text lines don’t run too long, you can easily correct spelling or punctuation errors.

EXTRA CREDIT

While you can correct timing in this file, Premiere makes timing adjustments easier within their respective programs.


Please rate the helpfulness of this tip.

Click on a star to rate it!

… for Adobe Premiere Pro CC

Tip #602: Premiere: Color Wheel Secret Tip

Larry Jordan – LarryJordan.com

Lock the hue while varying the saturation.

Here’s a secret tip when working with the macOS Colors window to choose a color.

Topic $TipTopic

Here’s a secret tip when working with the macOS Colors window to choose a color.

Drag the small puck in the color wheel to choose a color, then press the Shift key.

This constrains the movement of the puck so that it moves in a straight line between its current position and the center.

This allows you to lock the hue while changing the saturation.


Please rate the helpfulness of this tip.

Click on a star to rate it!

… for Adobe Premiere Pro CC

Tip #610: Kerning is Turned Off in Premiere

Larry Jordan – LarryJordan.com

I recommend assigning shortcuts to 5 & 50 unit movement.

Search for “kern” in Keyboard Shortcuts, then assign the one’s you want.

Topic $TipTopic

Kerning is the ability to adjust the space between to letters to make it look more pleasing. Except… kerning is turned off by default in Premiere. Yes, you can select letters and adjust the tracking (Tip #611), but kerning allows us more precision over pairs of letters. While we generally don’t kern body text, we frequently need to kern titles.

To enable kerning shortcut controls:

  • Open Premiere’s Keyboard Shortcuts panel.
  • Search for “kern”
  • Assign shortcuts to the options you prefer.

EXTRA CREDIT

After experimenting with these, I recommend enabling movement by five and fifty units. I assigned these to the comma and period keys, using different modifier keys.

To kern, enable the Text tool and place it between the two letters you want to adjust. Then, type the keyboard shortcuts you just assigned to move the letters closer or farther apart – the exact amount depends upon what looks good to you.


Please rate the helpfulness of this tip.

Click on a star to rate it!

… for Adobe Premiere Pro CC

Tip #611: Tracking Adjusts Letter-spacing

Larry Jordan – LarryJordan.com

In general, widen body text, narrow title text.

Increased tracking widens the spacing between letters, decreased tracking narrows it.

Topic $TipTopic

Tracking adjusts the spacing between letters. This is a helpful technique for titles in video because opening letter spacing often makes text more readable. Here’s how.

The tracking control is located under the font name in the Essential Graphics panel, or as part of the Text effect in Effect Controls.

Opening tracking (adding a positive number) expands the width between characters. Often, for video, widening the tracking makes smaller point size text easier to read.  While I don’t tighten tracking for body text, I do tighten tracking for title text.

How much you adjust tracking is up to you – there’s no magic number. However, in general, you don’t need to adjust tracking by much.

EXTRA CREDIT

In some cases, though, tracking doesn’t give us enough control. That’s where kerning comes in. Tip #610 discusses kerning in Premiere, which is a more precise way to adjust the horizontal spacing between specific pairs of letters; most often for title text.


Please rate the helpfulness of this tip.

Click on a star to rate it!

… for Adobe Premiere Pro CC

Tip #575: Work Faster with Pancakes in Premiere Pro

 Larry Jordan – LarryJordan.com

Whichever sequence is highlighted in blue is the active sequence.

Two sequences stacked in the same Premiere timeline.

Topic $TipTopic

This article, written by Jason Boone, first appeared in PremiumBeat.com. This is an excerpt.

Pancake Timeline was a term first coined by Vashi Nedomansky, ACE, of Vashi Visuals. The method derives its name from the vertical stacking of timelines within the interface. Stacking timelines not only speeds your workflow, but will also help you keep a bird’s-eye view on your work.

The pancake technique isn’t just for pulling good takes from raw footage. Let’s say, for example, you’re creating a demo reel. You open up multiple Premiere Projects at the same time, pancaking three to four timelines from varying projects. Then, you can quickly shuttle through numerous source sequences to pull clips for your reel. This technique will also be quite useful for sporting event highlights. Whatever the case, pancaking timelines is a powerful technique to add to your Premiere Pro tool belt.

Here’s a closer look at how to use this technique to quickly sort through a project’s raw footage.

  1. Prepare the sequences, as normal.
  2. Open both sequences into the timeline.
  3. Grab the tab of whichever sequence you want on top and drag it, inside the frame of the Timeline panel, until the top of the timeline panel turns purple, then release it.
  4. Edit from one timeline to the next. We can now easily bring clips from one sequence to the other, either via drag-and-drop or performing insert and/or overwrite edits.

NOTE: This process is identical to modifying workspaces by dragging panels around, except this time, rather than moving panels, we are moving sequences.


Please rate the helpfulness of this tip.

Click on a star to rate it!

… for Adobe Premiere Pro CC

Tip #586: Reorganize Multicam Sequences

Larry Jordan – LarryJordan.com

Cameras are arranged in the order they were selected.

The Edit Camera window in Adobe Premiere Pro CC.

Topic $TipTopic

There’s a hidden menu in Premiere that allows you to edit and reorganize multicam clips. After creating a multicam sequence, open it in the Source Monitor by double-clicking.

Click the Wrench icon in the lower right corner of the Source Monitor and choose Edit Cameras; near the bottom.

This displays the Edit Camera window:

  • Drag camera names to reorder them. (They are initially organized based upon the order in which they were selected.)
  • Uncheck On/Off to disable the display of a clip, without removing it from the sequence.
  • Change Cameras per page to increase the number of camera angles displayed when you are editing the multicam sequence.
  • When clips are organized to your satisfaction, click OK.

Please rate the helpfulness of this tip.

Click on a star to rate it!

… for Adobe Premiere Pro CC

Tip #587: Easier Multicam Storytelling

Larry Jordan – LarryJordan.com

Editing a multicam in groups helps focus on different parts of your story.

This Page menu appears when there are more camera angles than can appear in the Multicamera Monitor.

Topic $TipTopic

When editing multicam sequences in Premiere, we have the option of specifying how many camera streams we want to display during the edit.

In Tip #586, we learned about the Edit Cameras window. At the bottom of this window, we can choose the number of cameras to display during the edit itself. (The default is four.)

The majority of multicam edits are four cameras or less, which means, most of the time, we don’t need to change this. Still, there are two reasons why you might want to:

  • If you have a large computer monitor and more than four cameras, increasing this allows you to see more cameras onscreen at one time.
  • Decreasing the number of cameras you view at once allows you to concentrate on editing cameras in groups – for example, first edit wide shots for coverage, then go back and edit close-ups for emphasis. Since there is no limit to the number of times you can edit a multicam sequence, editing a sequence in multiple passes allows you to focus on different elements of your story.

The Page menu, shown in the screen shot, allows you to quickly switch between the different groups of cameras in both the Source Monitor and Program panels.


Please rate the helpfulness of this tip.

Click on a star to rate it!

… for Adobe Premiere Pro CC

Tip #566: Vintage Software, NLEs and Mac OS

Robert Withers – http://cinesouvenir.com

The best option for FCP 7 or Premiere CS6 is an older Mac Pro with older OS.

Topic $TipTopic

I decided to keep a vintage MacBook Pro running Mac OS 10.8.5 (Mountain Lion) so I can access FCP 7 and a vintage project edited in the first Premiere Pro CC (2013) It is too late to buy Premiere CS6, the last pre-rent Premiere; now a Creative Suite on Ebay sells for $2,000.

A friend is editing a experimental documentary on FCP 7 on a vintage machine, similar to what Bong Joon-ho did Parasite in 2019.

There’s one function that doesn’t work, which is the Project Manager, but I understand many have had problems with this in other versions.

On my 2018 MacBook Air Premiere Pro doesn’t really run but DaVinci Resolve 15 seems to require much fewer computer resources. It loads in a third of the time of Premiere and I can do basic cuts-only editing of pieces up to about 40 minutes.

I would like to get an iMac but B&H can’t tell you what OS is installed and I don’t want to test Catalina. I understand if you get a machine that was designed to run Mojave you can reinstall it from a drive.

Larry adds: Robert, you might consider getting an older Mac Pro – say around 2012 – which may come with an older OS and will run FCP 7/Premiere Pro CS6 perfectly. Option 2 is to convert your FCP 7 project to Resolve and edit it there. That would be done with a XML transfer.


Please rate the helpfulness of this tip.

Click on a star to rate it!

… for Adobe Premiere Pro CC

Tip #567: YouTube Compression Settings for Premiere Pro

Premiere’s YouTube presets are good – provided you first check H.264.

Key compression settings for YouTube in Premiere Pro CC’s Export Settings screen.

Topic $TipTopic

In Tip #561 I shared YouTube’s optimized compression settings. Here’s how they translate into Adobe Premiere Pro CC.

Select the compression frame size that matches the size of your project. There’s no benefit to making the compressed frame size smaller, and scaling it larger will only make it blurry.

Premiere’s settings closely match YouTube’s recommendations. On the Export Settings screen:

  • Set Format to H.264
  • Pick the YouTube preset that matches the sequence frame size. In general, you’ll only need 720p, 1080p or 2160p.
  • Make sure the box to match frame rate is checked.

The audio compression settings are fine for both stereo and mono.


Please rate the helpfulness of this tip.

Click on a star to rate it!

… for Adobe Premiere Pro CC

Tip #574: The Power of Master Clips

Larry Jordan – LarryJordan.com

Changes to a Master clip affect all its clips in the timeline.

A blur applied to a Master clip in Premiere.

Topic $TipTopic

This article first appeared in MotionArray.com. This is an excerpt.

If you’re like most video editors, you chop little bits out of your main clips to add to your timeline. Sometimes, you end up using a few different bits out of the same file in various places on your main video. What usually happens then is that you make changes to each separate piece on your timeline. 

But here’s the beauty of Master Clip effects. You can make changes to the full original media clip, then when you drag a clip out of it onto your timeline, the changes travel with it. This is a huge time saver, as it means that you really only have to apply the effect to the original file instead of making multiple little edits on bits of pieces of the same file!

  • Simply double-click your video file in the Project Manager to load it into the Source monitor.
  • Next, drag the effects you want to apply from the Effects panel into the Source Monitor.
  • Switch to the Effect Controls panel and adjust as you normally would. You can watch your changes in the Program Monitor, if you select a clip in the timeline that is derived from that Master clip.

The changes will be applied across your project, to whichever clips come from that file – even if they are already edited into the timeline. Quick and easy! 

EXTRA CREDIT

To remove effects applied to a master clip, right-click the file name in the Project panel and choose Disable Masterclip Effects.


Please rate the helpfulness of this tip.

Click on a star to rate it!