… for Visual Effects

Tip #979: Rotoscope Basics in After Effects

Larry Jordan – LarryJordan.com

Rotoscoping separates the foreground from the background.

(Rotoscoped image courtesy of MotionArray.com.)

Topic $TipTopic

This article first appeared in MotionArray.com. This is a summary.

So what is rotoscoping?

In video editing it’s the process of drawing around an object, character, or other part of your scene so that you can isolate it. Usually people will use this term when they’re talking about tracing something that’s moving and that doesn’t have a simple geometric shape.

A typical example is drawing a mask around a person so that you can separate them from the scene that they’re in. This has a huge amount of application to lots of other processes and tools inside After Effects.

But here’s the problem: When we’ve done this for the frame that we’re currently on, this is a video, and if we play our video, the mask stays exactly where it is and we’re left with a terrible looking effect! The reason a lot of people don’t like rotoscoping is because it needs to account for in every single frame in the video.

That can seem insane to some people, so here are some pointers to make the whole process a lot more manageable.

The video tutorial that accompanies this article illustrates basic rotoscoping techniques, then provides links to learn additional rotoscoping skills.


Please rate the helpfulness of this tip.

Click on a star to rate it!

… for Random Weirdness

Tip #949: 6 Film Funding Tips

Larry Jordan – LarryJordan.com

Funding a film is like getting a startup off the ground.

(Image courtesy of Pexels.com.)

Topic $TipTopic

This article, written by Jarett Holmes, first appeared in RitualMusic.com. This is an excerpt.

Armed with a great script, a talented core team and a vision, the often impossible-seeming hurdle remains: Fundraising. Funding a film is like getting a startup off the ground: Get ready to pick up the phone, put yourself way out of your comfort zone, and ask for the money.

Here are six resources to aid in your film fundraising strategy:

  1. Film Fundraising Reading List. This provides nine links to articles and advice on funding, crowd-funding, budgeting and lawyers.
  2. Your Attorney as an Essential Resource. As soon as possible, find a great attorney. Your entertainment lawyer will guide you through the structuring of your company (which will affect how you raise money), the contracts, shareholders agreements and all other business documents.
  3. Friends and Family Network. The first place to turn when fundraising is to the people that have already invested in you, your friends and family.
  4. Crowdfunding. Crowdfunding is a step away from straight friends and family, but there will be overlap. His article discusses and has links to KickStarter, IndieGogo, and Slated.
  5. Grants & Government Funding. Believe it or not, there are initiative’s for the arts, including filmmaking! The article includes links to PBS and GrantSpace.
  6. Accredited Investors. Once you’ve exhausted your immediate network, you may decide to cast the net out into the sea of accredited investors. These investors are high net worth individuals and will want to know exactly how you expect to show them a return.

Conclusion

Raising money for any project a hustle, no doubt about it. But the advice and links in this article can help you get started in the right direction.


Please rate the helpfulness of this tip.

Click on a star to rate it!

… for Adobe Premiere Pro CC

Tip #930: A Quick Way to Focus Faster

Larry Jordan – LarryJordan.com

This is a fast way to focus on what you need to see right now.

Topic $TipTopic

A new feature in the July, 2020, update to Premiere Pro is the ability to close all projects EXCEPT the one you are working on. This is a great way to quickly get rid of clutter to focus on what you are working on right now. Here’s how this works.

If you are working in a production, or if you have multiple projects open, you can now close all other projects except for the one you are working on.

You can do this by:

  • Click File > Close All Other Projects
  • Select one or more projects in the Production panel, right-click and choose Close All Other Projects.
  • In the Project panel menu, choose Close All Other Projects.

Please rate the helpfulness of this tip.

Click on a star to rate it!

… for Apple Final Cut Pro X

Tip #927: Make Compound Clips Independent

Larry Jordan – LarryJordan.com

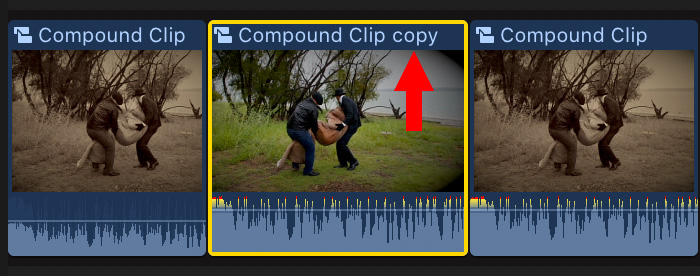
Compound clips are dynamic, unless you make them independent.

The middle compound clip is independent of those around it.

Topic $TipTopic

By default, when you change the contents of a compound clip in the timeline, you change every occurrence of that compound clip wherever it appears. Sometimes, that’s what you want. Here’s what to do when it isn’t.

When you want to change one compound clip, without changing all other clips linked to it, select the compound clip you want to isolate, then choose Clip > Reference New Parent Clip.

This creates an independent copy of the original compound clip. You can then make changes to it, without those changes appearing anywhere else.

EXTRA CREDIT

  • To change the contents of a compound clip, double-click it.
  • To close a compound clip, open any other project into the timeline.

Please rate the helpfulness of this tip.

Click on a star to rate it!

… for Visual Effects

Tip #921: Cinema 4D Quick Tips

Larry Jordan – LarryJordan.com

Fast, free and easy ways to improve your Cinema 4D skills.

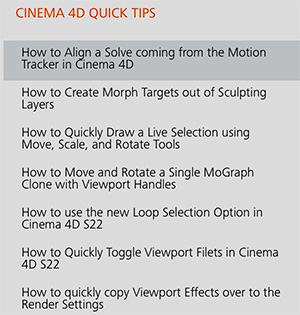
A partial list of Quick Tips from Cinema 4D. All free.

Topic $TipTopic

The rebranded Cineversity, part of Maxon, has published a variety of free Quick Tips on using Cinema 4D. Here’s where they are.

Go to this link.

Then, scroll the list on the right (see screen shot) until you find a subject you want to watch.

Each tip takes only a few minutes to watch.


Please rate the helpfulness of this tip.

Click on a star to rate it!

… for Apple Final Cut Pro X

Tip #906: How to Display 360 VR Video

Larry Jordan – LarryJordan.com

Final Cut can display and navigate 360 VR video on screen and on headset.

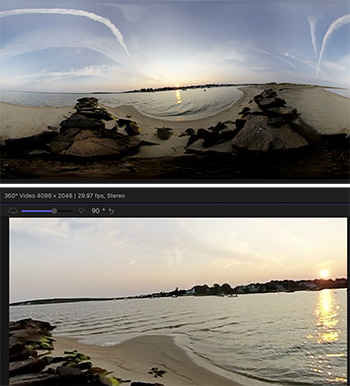
“Normal” display (top) and 360 VR view (bottom). Image courtesy of Allynn Wilkinson.

Topic $TipTopic

360 VR shoots video with the camera at the center of a sphere. You can look around, up or down inside the image as if you were standing still and turning your head.

Final Cut Pro X supports editing and exporting 360 VR video – but, by default, the Viewer does not display it properly. (See screen shot.)

To display 360 VR:

  • Create a new project, and make sure the settings match your 360 VR clip.
  • Choose View > Show in Viewer > 360° (Shortcut: Option + Cmd + 7).
  • Move around the image by dragging inside the 360 view.
  • Adjust the position of the center using the slider in the top left corner. However, this is best left at the default setting of 90°.

While 360 VR is designed for the viewer to move around the shot, you can set the default opening angle by clicking the Reorient (“world”) icon in the low-left corner of the 360° Viewer, then adjusting the shot to suit.

EXTRA CREDIT

You can precisely change the default framing for the selected clip using the Reorient settings in the Inspector.


Please rate the helpfulness of this tip.

Click on a star to rate it!

… for Visual Effects

Tip #901: Better Screen Replacements in After Effects

Larry Jordan – LarryJordan.com

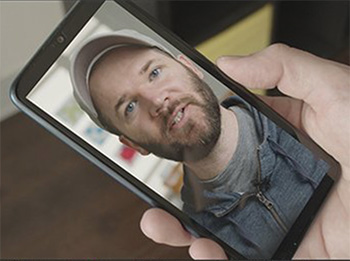
Screen replacements provide higher quality with greater image control.

Image courtesy of Jason Boone, the author of this tutorial.

Topic $TipTopic

Written by Jason Boone, this first appeared in PremiumBeat.com. This tutorial offers a step-by-step guide to one of the most common VFX techniques — the screen replacement using Adobe After Effects.

Shooting a screen almost never looks right. A much better option is to replace the screen with a whole new image. A screen replacement tracks the screen in your shot, then uses that tracking data to “replace” the screen with a separate clip or sequence.

Here’s a summary of the steps:

  • Step 1: Track the Screen. After Effects has a great point tracking system, but I prefer the planar tracker of the Mocha effect. It’s just more versatile when it comes to tracking for screen replacements. And don’t worry, Mocha AE is bundled with After Effects, so you already have it installed.
  • Step 2: Prep the Replacement Clip. Phones use vertical video, which means clips need to be prepped correctly.
  • Step 3: Replace the Screen.
  • Step 4: Isolate Any Screen Reflections. Since the reflection of my original clip is on top of a blank black screen, I can separate it using basic blend modes, such as Lighten, Add, or Screen.

EXTRA CREDIT

In the article, the author provides a video showing exactly how he uses these tools, along with an illustrated transcript of his material.


Please rate the helpfulness of this tip.

Click on a star to rate it!

… for Visual Effects

Tip #902: More Free VFX Tutorials

Larry Jordan – LarryJordan.com

More than 29,000 tutorials covering a wide variety of subjects.

Image courtesy of Pexels.com.

Topic $TipTopic

I was looking for free visual effects tutorials and discovered Envato Tuts+. These self-paced tutorials allow you to learn at your own pace.

Their website states: “We believe everyone can be creative. It’s not a rare or magical talent, just a mindset and a set of skills. We’re all born with curiosity, playfulness, and an ability to learn. As adults, we can choose to foster that creative spark and devote time to master the practical skills needed.”

With more than 29,000 tutorials online, choose from categories such as: Design, Photography, Animation, Video, 3D and Motion Graphics.

Here’s the link


Please rate the helpfulness of this tip.

Click on a star to rate it!

… for Adobe Premiere Pro CC

Tip #873: The Magic of Auto-Ducking

Larry Jordan – LarryJordan.com

Auto-Ducking saves time with the mix, while still allowing changes at any time.

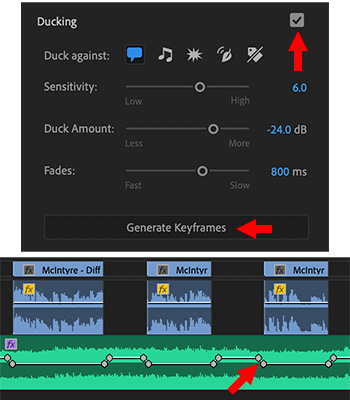
This composite shows the Ducking settings and the results in a music clip.

Topic $TipTopic

Auto-ducking is the process of automatically creating keyframes to reduce the level of a musical background when someone is talking. This is a relatively new feature in Premiere and the good news is that this creates settings which are infinitely adjustable, so if you don’t like the results, they are easy to change.

Here’s how this works.

  • Switch to the Audio workspace.
  • Open the sequence you want to adjust into the Timeline.
  • Select all dialog clips, then click Dialogue in the Essential Sound panel to assign the Tag.

NOTE: If you don’t see this button, click the Edit text button near the top of the panel.

  • Select all the music clips in the Timeline, then click the Music tag.
  • Once you’ve assigned both dialog and music Tags, select the music clip you want to adjust.
  • Check the Ducking checkbox to enable the feature. Leave the default settings as is until you see what this does.
  • Click Generate Keyframes and see how Premiere automatically adds keyframes to reduce the volume of the music whenever dialog is going on above it.

EXTRA CREDIT

Review the Premiere Help files to learn the different options for this feature.


Please rate the helpfulness of this tip.

Click on a star to rate it!

… for Codecs & Media

Tip #884: Include Transparency in HEVC Video

Larry Jordan – LarryJordan.com

HEVC supports transparency, if you know how to create it.

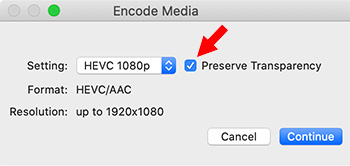
Be sure to check Preserve Transparency when creating an HEVC movie.

Topic $TipTopic

Dan D. found a way to make much smaller files with alpha channels using the HEVC codec. This is a process that Apple introduced just  last year, and it’s only supported on devices running iOS 13, tvOS 13, or macOS Catalina; or later.

The can be used for any video created in any Mac application that includes transparency. Here’s how:

  • Go to System Preferences > Keyboard. Click the Services category on the left, then enable Encode Selected Video Files on the right.
  • From any video application, export a project that contains transparency directly using the ProRes 4444 codec.
  • In the Finder, right-click the resulting .mov and select Services > Encode Selected Video Files.
  • Wait a few seconds for the next menu in the screen shot to appear.
  • Choose HEVC from the menu and pick the frame size that matches your project. Click the check box that says Preserve Transparency.

The resulting movie will be much smaller and retain the transparency information. This technique will work for any video that contains transparency, but requires macOS Catalina or later.

Here’s a tutorial from my website that describes this in more detail.


Please rate the helpfulness of this tip.

Click on a star to rate it!