… for Apple Final Cut Pro X

Tip #530: Enhance Audio in Final Cut

Larry Jordan – LarryJordan.com

Audio can be enhanced manually or automatically.

The Audio Enhancements section of the Audio Inspector.

Topic $TipTopic

This tip originally appeared as an Apple KnowledgeBase article. This is an excerpt.

Final Cut Pro includes several powerful tools for automatically analyzing and enhancing the audio in your projects, including:

  • Loudness: Improves the main audio signal and makes it more uniform.
  • Background Noise Removal: Reduces background noise.
  • Hum Removal: Reduces common electrical hum noise at either 50 or 60 Hz.

All enhancements are designed to correct most common audio problems automatically or with minor adjustments.

You can let Final Cut Pro analyze audio and adjust these problems in your audio clips automatically, or you can make manual adjustments in the Audio Enhancements section of the Audio inspector. You can also analyze and fix audio problems when you import a clip.

NOTE: When you import a clip with the “Analyze and fix audio problems” import option selected, only severe audio problems are corrected. If the clip contains moderate problems, these appear in yellow next to Audio Analysis in the Audio Enhancements section of the Audio inspector after the clip is imported. To correct these problems, you need to automatically enhance audio in the Audio inspector.

In Final Cut Pro, select an audio clip or a video clip with audio in the timeline.

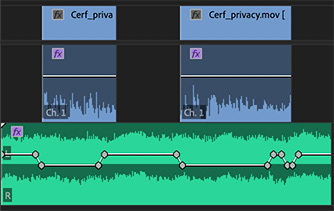
NOTE: Audio enhancement works on the component level, not the clip level. If your audio clip has more than one audio component (for example, a dual mono clip), select an individual component, then proceed with the enhancements.

  • Choose Modify > Auto Enhance Audio (or press Option-Command-A).
  • If it isn’t already open, open the Inspector, then click the Audio button at the top.

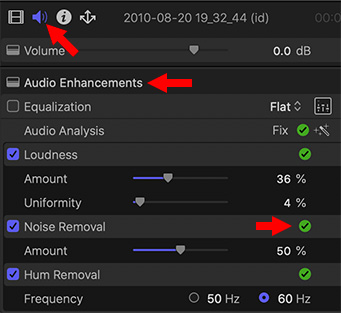
In the Audio inspector, do any of the following:

  • Adjust equalization: In the Equalization section, click the Equalization pop-up menu and choose an equalization preset, or click the Controls button to make manual adjustments.
  • Change loudness settings: Drag the Amount and Uniformity percentage sliders in the Loudness section. The Amount slider increases or decreases the overall loudness (compression) of the clip, and the Uniformity slider increases or decreases the dynamic range affected.
  • Change the percentage of background noise removal: Drag the Amount slider in the Noise Removal section.
  • Remove hum: Select either 50 Hz or 60 Hz in the Hum Removal section.

To turn off an enhancement, deselect its checkbox.

EXTRA CREDIT

  • Blue. A blue checkbox appears next to each enhancement that was turned on to apply a correction. You can turn on additional enhancements by selecting their checkboxes (when an enhancement is turned on, its checkbox is blue).
  • Green. A green checkmark next to an enhancement indicates that the clip was analyzed and, if necessary, adjusted for that enhancement.
  • Yellow. A yellow warning triangle indicates potential problems.
  • Red. A red sign indicates severe problems.

Please rate the helpfulness of this tip.

Click on a star to rate it!

… for Random Weirdness

Tip #527: 5 Tips to Run a Smooth Set

Larry Jordan – LarryJordan.com

Planning and consideration of your crew go a LONG way to a smooth shoot.

Topic $TipTopic

This article, written by Jourdan Aldredge, first appeared in PremiumBeat.com. This is an excerpt.

We’ve all been there. Whether it’s in film school or just shooting short videos with our friends, those “I just got a DSLR, come over on Saturday to help me shoot my short film!” shoots where the director shows up with nothing planned and everything goes wrong happen all the time. It can be a horrifying experience to say the least.

Here are five tips to avoid catastrophe:

  1. Familiarize Yourself with Your Camera
  2. Scout the Location — Don’t Just Show Up!
  3. Compensate Your Actors and Crew
  4. Plenty of Storage and Extra Batteries
  5. You Can’t Fix Everything in Post!

Watch the video linked at the top of this article. There are some great example videos.


Please rate the helpfulness of this tip.

Click on a star to rate it!

… for Adobe Premiere Pro CC

Tip #532: How to Use the Rate Stretch Tool

Larry Jordan – LarryJordan.com

The Rate Stretch tool is a fast way to change the speed of a clip.

The Rate Stretch tool in the Tools panel.

Topic $TipTopic

This article first appeared in MotionArray.com. This is an excerpt.

What if you need your clip to fit an exact space in your edit? The Rate Stretch tool allows you to click and drag a clip to an exact duration, and Premiere will adjust the speed to fit the duration. To use the Rate Stretch Tool, just select it from the Tools panel, then click and drag either end of your clip to the desired length. Premiere Pro will update the speed of the clip.

Keep in mind that a problem with artificial slow motion is that in order to slow down a “shooting” frame rate, Adobe Premiere Pro must somehow generate new frames. It can do that by repeating existing frames or analyzing your footage, then automatically generating new frames.

When the software repeats existing frames, the result is a little bit choppy (which has a time and a place, too!). When it generates new frames, imperfections in the interpretation can cause warping and artifacting errors.


Please rate the helpfulness of this tip.

Click on a star to rate it!

… for Adobe Premiere Pro CC

Tip #533: Normalize Master Track Audio

Larry Jordan – LarryJordan.com

Adjusting the Master Mix guards against excessive overall levels.

Topic $TipTopic

This article first appeared in the Premiere Help Files. This is an excerpt.

Most of the time, we adjust audio levels for each clip, or create a bus and apply effects to the bus. However, you can also monitor and adjust levels in the Master track. This is a fast way to guard against excessive levels in your mix.

You can set the peak volume level for the master track of a sequence. Premiere Pro automatically adjusts the fader for the whole master track. The loudest sound in the track achieves the specified value. Premiere Pro scales any keyframes on the master track upward or downward, in proportion to the adjustment made in overall volume.

Here’s how:

  • Select the sequence you want to normalize.
  • Select Sequence > Normalize Master Track.
  • In the Normalize Track dialog box, type an amplitude value in the dB field. A good number to start with is -3 dB.
  • Click OK.

Please rate the helpfulness of this tip.

Click on a star to rate it!

… for Apple Motion

Tip #495: Use Gradient Blur to Imply Depth-of-Field

Larry Jordan – LarryJordan.com

Gradient Blur simulates depth-of-field by varying the amount of blur in the frame.

Gradient blur applied to an image supplied by Blackmagic Design.

Topic $TipTopic

One of the challenges in using cell phone cameras is that too much of the image is in-focus. The amount of the image that’s in-focus is called “depth-of-field.”
We use depth-of-field to control where the eye looks first in the frame.

When lots of the image is in-focus, we say depth-of-field is deep. When only a small portion of the frame is in-focus, we say depth-of-field is shallow. (And, um, when none of the image is in-focus, we say the image is blurry.)

We can simulate a shallow depth-of-field in Motion using the Gradient Blur. (See screen shot.)

  • Apply Filters > Blur > Gradient Blur to a clip.
  • Drag the white dot to the area you want to stay in-focus.
  • Drag the black dot to the area you want to blur.
  • Adjust the settings in the Inspector to create the look you want.

Please rate the helpfulness of this tip.

Click on a star to rate it!

… for Apple Motion

Tip #507: Create 360° Projects in Motion

Larry Jordan – LarryJordan.com

2D assets don’t suddenly become 360° but this does make it easy to experiment.

To convert an existing Motion project to 360°, change Projection to 360° Monoscopic.

Topic $TipTopic

This article first appeared in an Apple KnowledgeBase article. This is a summary.

If you are looking to experiment with 360° video, Motion can convert a normal Motion project into 360° video without shooting new video. There are limitations, but here’s how it works.

To convert an existing Motion project to 360°:

  • In the Layers list in Motion, click the Project object.
  • In the Properties Inspector, click the Projection pop-up menu, then choose 360° Monoscopic.
  • Any existing root-level 2D groups in your project are converted to 3D groups. (If the project includes 2D groups nested within 3D groups, the 2D groups remain unchanged.)
  • Click Add Object in the toolbar, then choose 360° Environment.
  • A new 360° environment is added to the Layers list.
  • In the Layers list, move the 360° environment to the bottom of the list. (Although not required, this step sets up the project to add and composite elements above the 360° environment.)
  • Next, do one of the following:
    • If your project does not contain a camera, click Add Object, then choose Camera. A new Viewpoint camera is added to your project.
    • If your project contains a camera, select the camera in the Layers list, then in the Camera Inspector, click the Camera Type pop-up menu and choose Viewpoint.
  • In the canvas, click the gray box in the top-right corner of the canvas, then choose the second arrangement in the list (two-up, split view).
  • The canvas is split into two viewports.
  • In the left viewport, click the Camera pop-up menu and choose 360° Look Around. Your project now correctly projects the equirectangular footage. The 360° Look Around view uses the field of view of the active camera.
  • In the right viewport, click the Camera pop-up menu and choose 360° Overview. The canvas displays the entire 360° scene as a flat, equirectangular image alongside the spherical viewer. This image represents the final output of your project.

NOTE: When you convert a normal project to a 360° project, normal footage already in the project is not projected in 360°. Other objects in the project also need to be adjusted. For example, if the project contains a generator that you want projected onto the 360° sphere, you must move the generator inside the 360° environment.

EXTRA CREDIT

The link at the top of this tip takes you to a detailed Apple KnowledgeBase article showing how to work with 360° video in Motion. This tip is only one part of the options that Motion provides.


Please rate the helpfulness of this tip.

Click on a star to rate it!

… for Adobe Premiere Pro CC

Tip #470: How to Improve Chroma-keys in Premiere

Larry Jordan – LarryJordan.com

Adjust until the background is solid black, the foreground solid white.

These are the key tweaks to get a clean chroma-key using Ultra Key.

Topic $TipTopic

Premiere has an excellent chroma-keyer in Ultra Key. But, once you’ve applied the effect, how do you clean the key to get the best results? Here’s the tweaks you need to know.

  • Click the eyedropper tool and click near the face of your talent. However, not so close that you run the risk of catching some hair.

NOTE: If the lighting is uneven, a clean key around the face is most important.

  • Switch the Ultra Key effect Output setting fromm Composite to Alpha Channel. The foreground needs to be solid white, no shades of gray. The background needs to be solid black, no “white dust.”
  • If adjustments need to be made, adjust the background first. For example, if the background isn’t solid black, adjust Pedestal until it is.

NOTE: You may need to add a mask to get rid of garbage in the frame. Most keys require masks.

  • If the foreground has shades of gray, adjust Transparency first. If that doesn’t fully solve the problem, gently tweak Tolerance.

EXTRA CREDIT

The best way to get a clean key is to light the background evenly, at around 50% gray scale on the Waveform Monitor and keep talent at least ten feet in front of the screen.


Please rate the helpfulness of this tip.

Click on a star to rate it!

… for Adobe Premiere Pro CC

Tip #511: Relink Missing Media in Premiere

Larry Jordan – LarryJordan.com

Relinking reconnects media that Premiere can’t find; as long as you didn’t erase it.

A portion of the Link Media dialog in Premiere Pro CC.

Topic $TipTopic

This article first appeared in MotionArray.com. This is an excerpt.

Media can go offline for a variety of reasons. However, once you show Premiere where the media went, relinking is straight-forward. So, what do you do if you can’t link media in Premiere Pro? In this tip, you’ll learn a couple of ways to relink missing footage or other assets in your projects.

RELINK MEDIA

When the dreaded “Missing Media” dialog appears, it is generally because a hard drive or folder was renamed or turned off. (If a media folder was deleted, this procedure won’t help.)

  1. Click Locate on the pop-up window that points out media is missing.
  2. On the left-hand side, navigate to the folder or directory that holds the missing media (this location may vary with each project).
  3. At the bottom right-hand corner of the dialogue box, click Search. Searching will review your media folders to locate the clip you’re looking for.
  4. Once you have found that, highlight the clip, and click OK.
  5. This will relink all of the footage in that folder or directory.
  6. As Adobe Premiere Pro is doing this, it may also be able to find various other assets that might be missing from the same folder. If it finds all of them, all is well and good.
  7. However, if it doesn’t, click Locate again and search all the folders again. Repeat this step until all of your missing media is located. Now, you should be able to proceed again with your edits, error-free.

FIND OFFLINE MEDIA

When the Offline Media error message appears:

  1. Go to the Project Panel.
  2. Search for the word Offline in the Project panel.
  3. Highlight all of the offline media from the search results.
  4. Right-click and select Link Media.
  5. You’ll see the Link Media box come up again.
  6. Click on Locate and Search the main folder following the steps above.
  7. Once the file is found, click OK.

This will relink all the media, and you’ll be good to go!


Please rate the helpfulness of this tip.

Click on a star to rate it!

… for Adobe Premiere Pro CC

Tip #444: Automatic Audio Ducking

Larry Jordan – LarryJordan.com

Auto-Ducking is a VERY fast way to generate standard audio keyframes.

An ambience clip with auto-ducking keyframes applied to it.

Topic $TipTopic

Auto-ducking automatically applies audio level keyframes to a music or sound effects clip in response to dialog clips above it. It generates keyframes very quickly and, even better, each keyframe is fully adjustable after they are applied. Here’s how it works:

  • Switch to the Audio workspace in Premiere.
  • Select all dialog clips, then apply the Dialog tag.
  • Select all the clips you want to “duck,” or lower, when someone is speaking and apply either the Music, Sound Effects or Ambience tag.
  • Open, say, the Music tag.
  • Check Ducking to enable it.
  • Select the icon representing the reference audio for the keyframes; in most cases this will be Dialog.
  • Click Generate Keyframes.
  • Listen to the results. If you don’t like the overall levels, change the Duck Amount to more accurately reflect how much you want the volume lowered.
  • Click Generate Keyframes, again.

Repeat this process until you have levels you like.

NOTE: Modify Fades to adjust how quickly the audio levels change.

EXTRA CREDIT

Every keyframe set by Auto-ducking is a standard keyframe. You can adjust each one individually to create exactly the mix you want. Auto-ducking simply applies them faster.


Please rate the helpfulness of this tip.

Click on a star to rate it!

… for Adobe Premiere Pro CC

Tip #445: More Mask Tricks in Premiere

Larry Jordan – LarryJordan.com

While masks can’t be combined, we can create more than one mask in a clip.

Two separate circle masks applied to the same clip.

Topic $TipTopic

While we can’t combine masks in Premiere, nor select multiple masks at the same time, we can create multiple masks to create unusual shapes. Here’s how.

In this screen shot, I am using two separate circle masks to isolate each of the berries. This effect involves two versions of the same clip:

  • The top clip contains the masks
  • The bottom clip has been desaturated

Because I want to see the desaturated clip below the clip containing the masks, we need to create an Opacity mask. If we simply want to affect a portion of the image, say to apply a blur, we would create a mask in the Blur effect itself.

In this example, I drew two circle masks and adjusted each one’s shape to match the curves of each berry. There’s one mask for each berry. I slightly feathered each mask, then, in the lower clip desaturated it almost completely. (I retained a little bit of color so that the color edges around the berry which weren’t removed by the mask wouldn’t look too obvious.)

If the berries move, click the right-pointing arrow just below the mask name (i.e. Mask (1)) to track the mask with the movement of the berries.


Please rate the helpfulness of this tip.

Click on a star to rate it!