… for Apple Final Cut Pro X

Tip #1417: Use Multiple Drives for Libraries & Media

Larry Jordan – LarryJordan.com

Final Cut has no problems accessing files stored on multiple drives.

Topic $TipTopic

Here’s a question I get asked a lot; this example is from Berta:

“Using FCP X, can I save my library and project files to one external drive while using a second external drive to retrieve the original 4k media?”

The answer is: Yes, with a caution.

As you know, media files are large and require significant bandwidth (data transfer speed from storage to computer) to play smoothly. As long as your drives are large enough to hold your media and fast enough to play it – generally Thunderbolt speeds – using multiple drives is fine.

NOTE: If you are getting dropped frame errors, that means that your storage is too slow.

For my webinars, my media is stored on either a server or a RAID, while my libraries are stored on a separate drive. Final Cut has no problem keeping track of multiple files stored on multiple drives.


Please rate the helpfulness of this tip.

Click on a star to rate it!

… for Apple Final Cut Pro X

Tip #1418: What Do the 3D Text Lighting Controls Do?

Larry Jordan – LarryJordan.com

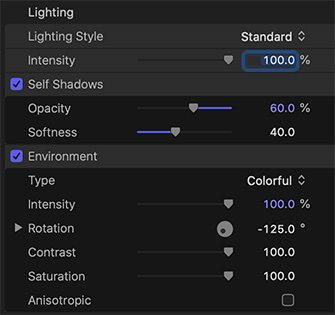
There are LOTS of options for lighting 3D text.

The Lighting options for 3D text in Apple Final Cut Pro.

Topic $TipTopic

(I discovered this tip while researching a recent PowerUP webinar illustrating Lighting Techniques of Apple Motion 5.5.)

The way 3D text in Final Cut Pro looks is extremely flexible. Not just with fonts and sizes, or even surface materials. Nope. The most useful settings are buried in the Lighting section.

  • Lighting Style. This changes the angle of the light hitting the text. There are about a dozen options to play with; I especially enjoy using Above, Below and Backlit.

NOTE: To make this lighting more pronounced, uncheck Environment.

  • Self-Shadows. This feature is unique to 3D text. This enables the shape of a letter to cast a shadow on itself or another letter next to it. I generally decrease Opacity and increase Softness.

NOTE: This setting is off by default.

  • Environment. This illuminates characters based on the choice you make in the Type menu. Experiment with different settings to see which ones you like.

Try selecting Colorful, then adjust the colors by changing the Rotation setting.

NOTE: For greater impact, set Lighting Style to Off.

EXTRA CREDIT

Intensity varies the amount of light radiating off the letters. While dimming the lighting is always possible, you can also increase the intensity – especially for very saturated colors – up to 400%. Ignore the slider and type in a value.


Please rate the helpfulness of this tip.

Click on a star to rate it!

… for Apple Final Cut Pro X

Tip #1419: Use Motion Drop Zones for Lighting Effects

Larry Jordan – LarryJordan.com

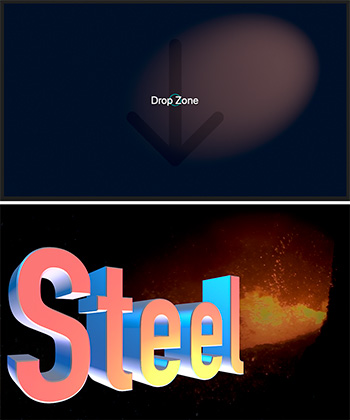
Use Drop Zones in Motion to create lighting effects you can use in Final Cut.

A drop zone, with lighting, in Motion (top), the finished effect in Final Cut Pro.

Topic $TipTopic

(I discovered this tip while researching a recent PowerUP webinar illustrating Lighting Techniques of Apple Motion 5.5.)

Final Cut doesn’t have the same lighting controls that Motion does – and the lights in Motion are pretty amazing! However, there’s a very cool workaround: create a lighting effect in Motion using Drop Zones for the video (top of screen shot).

Then, save them as a Final Cut Generator.

You can then add those lighting effects into a Final Cut Project (bottom of screen shot) and apply, say, 3D text from within Final Cut.

This provides the best of both worlds: lighting effects created in Motion with the ease of editing and integration of Final Cut.


Please rate the helpfulness of this tip.

Click on a star to rate it!

… for Apple Final Cut Pro X

Tip #1391: Interesting Facts About Audio Meters

Larry Jordan – LarryJordan.com

Excessive audio levels are only a problem when you export a project.

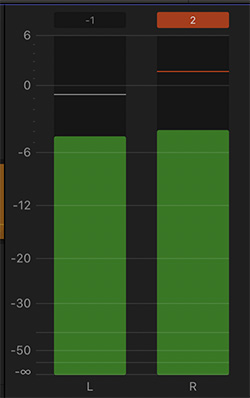
The audio meters in Final Cut Pro, with the right channel exceeding 0 dB.

Topic $TipTopic

Most of us know that the audio meters measure the volume of our sound. But here are some facts you may not know.

  • The green bars measure “peak” audio levels, the instant-by-instant volume (loudness) of each channel of audio.
  • The audio meters measure audio on a scale called “dBFS” (deciBels Full Scale)
  • The horizontal bar above the green is the peak hold indicator. This displays the loudest the audio has been for the last five seconds, or until the audio loudness exceeds the level it is currently displaying.
  • Because the green bars bounce so much, the peak hold indicator makes it easy to see exactly how loud your audio peaks are.
  • To avoid distortion, which is a scratchy, blatty noise in your audio, it is essential to keep all peaks below 0 dB.

NOTE: 0 dB is the loudest your audio can be without causing distortion.

  • If the audio goes over 0 dB, the red indicator glows (see the screen shot) indicating a distortion condition, the affected channel and how many dB too loud the audio is.
  • As long as you haven’t exported your file, no damage is done to your audio; just bring the audio levels down. If the audio is exported, the distortion is permanent. The only way to get rid of it is to adjust audio levels, then reexport the project.

EXTRA CREDIT

Know why audio meters are marked in 6 dB increments? The answer is that when levels change by ±6 dB, the perceived volume of the sound is doubled (+6 dB) or cut in half (-6 dB).

For this reason, all audio meters are marked in 6 dB increments.


Please rate the helpfulness of this tip.

Click on a star to rate it!

… for Apple Final Cut Pro X

Tip #1392: A Quick 3D Rotation

Larry Jordan – LarryJordan.com

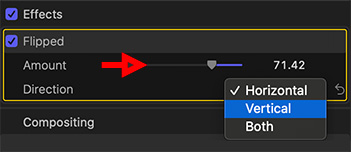
Flipped supports rotating on either the X or Y axis in Final Cut.

The Flipped effect settings.

Topic $TipTopic

There is a hidden setting in the Flipped effect that makes it even more useful.

Apply Effects Browser > Distortion > Flipped to a clip.

This flips a clip either horizontally (the default), vertically or both.

However, the Amount slider rotates a clip from not flipped (Amount = 0) to fully flipped (Amount = 100).

What this means is that you can use the Flipped effect to rotate a clip on the X or Y axis in Final Cut, even though FCP does not directly support these rotations using the Transform settings in the Video Inspector.

Very cool.


Please rate the helpfulness of this tip.

Click on a star to rate it!

… for Apple Final Cut Pro X

Tip #1394: Track Your Changes – Faster

Larry Jordan – LarryJordan.com

Projects change constantly. Final Cut tracks and displays change dates.

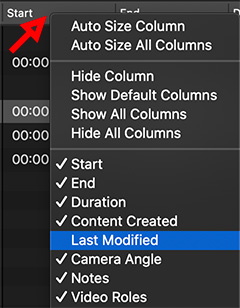
Custom metadata menu, part of the Browser column headers.

Topic $TipTopic

There’s a new feature in Final Cut that can help you track project changes faster – but it is hidden by default.

Switch to List view in the Browser, then Control-click any column header at the top of the Browser.

This displays a popup menu of all the metadata columns that Final Cut tracks for every project and clip.

New with a recent release of Final Cut is the last modification date of any clip or project.

If you’ve lost control over project file names, this is a fast way to see which project you were working on most recently.

EXTRA CREDIT

Can’t see all your file names? Control-click the Name column header and choose Auto Size Column.

Poof! The column width expands so you can see all your file names again.


Please rate the helpfulness of this tip.

Click on a star to rate it!

… for Apple Final Cut Pro X

Tip #1385: Hidden Dissolve Options In Final Cut Pro

Larry Jordan – LarryJordan.com

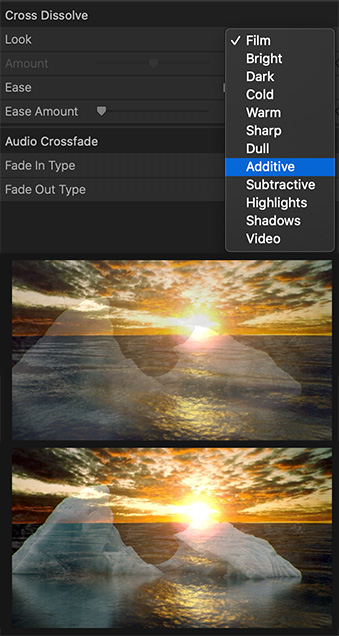
Check out the creative dissolve options by looking in the Video Inspector.

Dissolve settings (top), default dissolve (middle), and Sharp dissolve (bottom).

Topic $TipTopic

Normally, when we need a dissolve in Final Cut, we select the edit point, type Cmd + T, adjust the timing and move on. However, there is a wealth of creative options if you know where to look. Specifically, in the Video Inspector.

Select a dissolve, then look in the Inspector. You’ll find a dozen different creative settings for a dissolve. The default is Video, but, surprisingly, that is also the most modest. (See the screen shot.)

Each of these settings uses different combinations of blend modes, vignettes and color settings to change the look of even the most ordinary of transitions.


Please rate the helpfulness of this tip.

Click on a star to rate it!

… for Apple Final Cut Pro X

Tip #1386: Drop Zone Secret

Larry Jordan – LarryJordan.com

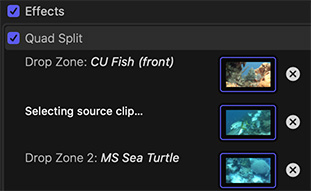
When adding clips to a drop zone, where you click the skimmer determines the In.

Drop zones displayed in the Video Inspector.

Topic $TipTopic

I discovered this tip while researching a recent PowerUP webinar introducing Apple Motion 5.5.

One of the Motion effects I created for this webinar involved combining multiple drop zones into a single “quad split,” where four different images were combined into one.

NOTE: The benefit of creating this as a Motion template is how easily it can be reused, rather than create each effect uniquely in Final Cut.

What I didn’t know till this week was that when you add a video clip to a drop zone, where you click the skimmer (Shortcut: S) in the Browser clip determines the In of the video.

In the past, Final Cut would use the actual start of the video clip. Now, with the Skimmer setting the In, you can use any segment of a clip that you prefer.

Very cool – and a huge time-saver.


Please rate the helpfulness of this tip.

Click on a star to rate it!

… for Apple Final Cut Pro X

Tip #1387: Calculating Clip Positions

Larry Jordan – LarryJordan.com

Final Cut simplified how clips are positioned, making effects easier to calculate.

Repositioning clips in Final Cut is easier due to how it determines clip position.

Topic $TipTopic

I discovered this tip while researching a recent PowerUP webinar introducing Apple Motion 5.5.

All NLEs determine position using pixel coordinates. Where those coordinates start is called the 0,0 position.

Final Cut sets the 0,0 position at the exact center of a project. The significant benefit to this approach is that you can instantly center a clip, regardless of its size, by entering 0,0 in Video Inspector > Transform > Position.

NOTE: Adobe Photoshop and Premiere Pro determine clip positions in a sequence from its upper left corner.

By defining the center as 0,0, the position of the center doesn’t change even when the project size changes. Final Cut’s approach also makes the math of moving clips much easier, because when you move a clip, you are moving it from it’s center, not the upper left corner.

For example, when creating a “quad split” image (see screen shot), where each image is scaled 50%, the center of each frame moves by the same amount, but in different directions:

  • Top left: -320, 180
  • Top right: 320, 180
  • Bottom left: -320, -180
  • Bottom right: 320, -180

The only difference is the sign (positive or negative), the pixel values are all the same.

NOTE: This positioning scheme also means that if something is off-center, it is easy to center simply by entering 0,0 as the position coordinates.


Please rate the helpfulness of this tip.

Click on a star to rate it!

… for Apple Final Cut Pro X

Tip #1352: Change Clip Speed with “Blade Speed”

Larry Jordan – LarryJordan.com

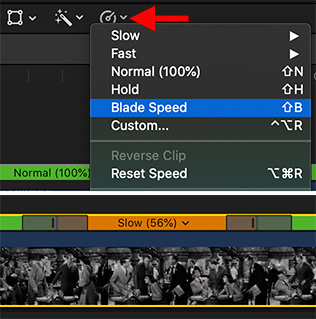
“Blade Speed” puts timing edit points into a clip simplifying clip speed changes.

Retiming icon (top) and a slomo segment in a clip. Drag a black bar to adjust speed.

Topic $TipTopic

When you want to change the speed of a clip, the Blade Speed option is a really good place to start.

If all you want to do is slow the entire clip, select the clip, type Cmd + R and adjust the speed to suit from the popup menu in the center of the Retiming bar.

But, if you want to change the speed during a clip:

  • Put the playhead on the frame where you want the speed change to start.
  • From either the Retiming menu or Viewer icon (illustrated in the screen shot), select Blade Speed (Shortcut: Shift + B).
  • This opens the Retiming bar and puts a timing edit at the point of the playhead. This edit doesn’t cut the clip, but does allow changing the speed of the downstream segment.
  • Drag the black, vertical thumb in the green, orange or blue Retiming bar left (faster) or right (slower) to change the speed of the segment.

The Retiming bar colors are significant:

  • Green: 100% speed
  • Blue: Fast (time-lapse) motion
  • Yellow: Slow motion
  • Red: Still frame

Final Cut automatically enters speed transitions going into and out of the speed change.

Add as many speed change segments as you want, keeping in mind that you are adjusting how quickly the frames in a clip play back. The total number of frames in a clip will limit how much you can adjust speed.

EXTRA CREDIT

To reset the speed of a clip, select it and type Shift + N.


Please rate the helpfulness of this tip.

Click on a star to rate it!