… for Apple Final Cut Pro X

Tip #1353: Disable Speed Transitions

Larry Jordan – LarryJordan.com

Speed transitions ease into a speed change.

Double-click a gray speed transition to enable making a gradual speed change.

Topic $TipTopic

When you change the speed of a clip segment, Final Cut adds speed transitions to smooth the speed change. You can create the speed changes using the Blade Speed tool (Tip #1352) or a speed ramp. (Both are available in the Modify > Retiming menu.

When a speed change is made Final Cut automatically displays the Retiming bar, which is either green, orange or blue.

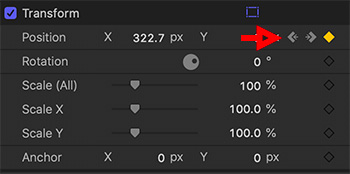
At the point of the speed change, a black, vertical timing thumb appears (see screen shot) surrounded by a gray area; that part of a clip that eases into the new speed rather than a hard cut.

This gray area is the speed transition. Double-click the gray area – not the black thumb itself – and the speed transition dialog opens (see screen shot).

This allows to you turn off the transition, thereby cutting from one speed to the next, as well as edit the frame where the speed change occurs by clicking Edit, then dragging the retiming thumb to a new location.

EXTRA CREDIT

To reset the speed of a clip, select it and type Shift + N.


Please rate the helpfulness of this tip.

Click on a star to rate it!

… for Apple Final Cut Pro X

Tip #1354: Adjust a Speed Transition

Larry Jordan – LarryJordan.com

Just as you can trim the edges of a clip, you can trim the edges of a speed transition.

Drag the edge of a speed transition to change timing.

Topic $TipTopic

By default, when you change the speed of a portion of a clip (Tip #1352), Final Cut inserts a speed transition to smoothly blend the speed change across several frames.

However, just as you can trim the edges of a clip, you can also trim the edges of a speed transition.

Here’s how:

  • Put the timeline playhead on the frame who’s speed you want to adjust.
  • Choose Modify > Retime > Blade Speed (Shortcut: Shift + B)
  • Change the speed of either the upstream or downstream clip segment by dragging the black, vertical “thumb” in the Retiming bar. This also adds a speed transition.
  • Grab the edge of the speed transition in the Retiming bar and drag it. This changes how the speed transition allocates frames from one speed to another.

EXTRA CREDIT

Tip #1353 shows how to disable a speed transition.


Please rate the helpfulness of this tip.

Click on a star to rate it!

… for Apple Final Cut Pro X

Tip #1338: Adjust a Smart Conform

Larry Jordan – LarryJordan.com

Smart Conform is a good start. But you’ll need to use keyframes to make it perfect.

Video Inspector > Transform with keyframes applied to change position.

Topic $TipTopic

Smart Conform converts clips in one aspect ratio to fit inside a project using a different aspect ratio. It does this by analyzing the content of the media, then scaling and repositioning it to best fit in the new project.

To create a Smart Conform:

  • Create a new project with the aspect ratio you need.
  • Edit clips into the new project, as usual.

NOTE: Do not allow the project to change aspect ratio when you edit the first clip into it.

  • Finally select all the clips in the timeline and choose Modify > Smart Conform. In just a few seconds, FCP conforms all selected clips.

The good news is that Final Cut scales and repositions the clips quickly and, most of the time, does a pretty good job.

The bad news is that, unlike Premiere, Final Cut does not motion track the image, which means that as the subject moves over time, the framing may need tweaking.

However, you can quickly tweak your shot – even animate the tracking – by selecting each clip, then, in Video Inspector > Transform, add keyframes to reposition the video as needed to correct any positioning errors.


Please rate the helpfulness of this tip.

Click on a star to rate it!

… for Apple Final Cut Pro X

Tip #1339: Adjust Thumbnails in Timeline

Larry Jordan – LarryJordan.com

We can now adjust the height of timeline thumbnails using this slider.

The Timeline Appearance panel.

Topic $TipTopic

It’s a small thing – but this new feature in the 10.5 update to Final Cut Pro can improve the look of your clips in the timeline; especially if you are editing on a very large screen.

  • Open a project into the timeline.
  • Click the Timeline Appearance button (top red arrow in screen shot) in the top right corner of the timeline.
  • Click the thumbnail icon (middle red arrow) to collapse all timeline clips into thumbnails.
  • Slide the bottom slider (bottom red arrow) left and right to change the height of the thumbnails.

On very large screens, the thumbnails may get too small to see. This adjusts them so that even on a large screen, you can still see the names of your clips.


Please rate the helpfulness of this tip.

Click on a star to rate it!

… for Apple Final Cut Pro X

Tip #1340: Something Playful

Larry Jordan – LarryJordan.com

Luma keys use grayscale values to determine which pixels are transparent.

Tree image courtesy of Melissa Chang, Pexels.com

Topic $TipTopic

We are all familiar with chroma-key, removing the green and replacing the background. But, what if there’s no green? I was playing with a Luma key and rediscovered an old effect.

A chroma-key selects pixels based on their color value. A Luma key selects pixels based on their gray-scale value.

NOTE: In the old days, we used luma keys to superimpose white text on a black title card by shooting each card with a camera then using a luma key to combine the title with a background image.

Here, I have a silhouette of a tree against a white sky.

I stacked the tree above a gradient background and applied Effects > Keying > Luma key.

By default the Luma key removes black. Click Invert to get it to remove white.

NOTE: You can see the settings I used in the screen shot, along with the finished results.

Just because there’s no green in the shot, does not mean you can’t create interesting effects. Luma keys are very old, but still highly useful.

EXTRA CREDIT

Experiment with different backgrounds. I only used a gradient because it was easy to illustrate this effect.

Also, unclick Invert and fill the black branches of the tree with a background.


Please rate the helpfulness of this tip.

Click on a star to rate it!

… for Apple Final Cut Pro X

Tip #1312: The Comparison Viewer Saves Time

Larry Jordan – LarryJordan.com

The Comparison Viewer is very helpful when doing color grading to match shots.

The Comparison Viewer (left) with buttons displayed on bottom.

Topic $TipTopic

I discovered this tip while researching a recent PowerUP webinar covering the new features in Apple Final Cut Pro v. 10.5.

The Comparison Viewer displays two timeline images side-by-side, which can simplify color grading or other tasks where comparing two images is helpful (see screen shot).

To display the Comparison Viewer, go to Window > Show in Workspace > Comparison Viewer (Shortcut: Control + Cmd + 6).

There are two buttons at the top:

  • Timeline. This displays the last frame of the previous clip, or the first frame of the following clip relative to the position of the playhead in the timeline. Switch between views using the Previous Edit / Next Edit buttons at the bottom.
  • Saved. This saves up to 30 still frames, captured at the position of the playhead in the timeline, then displays whichever you select in the Comparison Viewer.

I find using this very helpful whenever I do color grading.


Please rate the helpfulness of this tip.

Click on a star to rate it!

… for Apple Final Cut Pro X

Tip #1313: Copy a Library as Proxy-only

Larry Jordan – LarryJordan.com

Proxy-only libraries are small, fast and easy to share.

The “Copy to Library” dialog box, with settings to create a Proxy Library.

Topic $TipTopic

I discovered this tip while researching a recent PowerUP webinar covering the new features in Apple Final Cut Pro v. 10.5.

A new feature in Final Cut 10.5 is the ability to create a proxy-only Library. This is extremely useful when you need to share a library with a remote editor who doesn’t already have access to the project’s media.

Here’s how.

  • Control-click an existing library you want to share in the Library List to the left of the Browser.
  • Choose Copy to Library > New Library

NOTE: You can also copy one library into another library, for example, to consolidate files.

  • In the resulting window, check the Proxy checkbox.

This copies all library databases, events, projects into a new library. It duplicates any existing proxy files – though doesn’t create new proxies – and vastly reduces the size of the new library, making it much easier to send via the web to another editor.

EXTRA CREDIT

There are a number of other settings in this window. Read more about what this can do in Apple’s Final Cut Pro Help.


Please rate the helpfulness of this tip.

Click on a star to rate it!

… for Apple Final Cut Pro X

Tip #1314: Delete Generated Media More Easily

Larry Jordan – LarryJordan.com

Generated media take storage space – which, sometimes, you need to get back.

This window allows you to select which generated media you want to delete.

Topic $TipTopic

I discovered this tip while researching a recent PowerUP webinar covering the new features in Apple Final Cut Pro v. 10.5.

Generated media are files created by Final Cut to enable your editing. These files are based on your original camera media, serve a variety of purposes, and include:

  • Optimized files
  • Proxy files
  • Render files

The problem is that these files take a lot of space and, most of time, Final Cut does not erase them, just in case you need to use them again. Most of the time, Final Cut needs these for your projects. But, for projects you’ve been working on a while, the storage space required for this generated media can get out of hand.

New with the 10.5 update are more ways to get rid of it. We can now deleted generated media by:

  • Clip
  • Selected group of clips
  • Events
  • Selected group of events
  • Projects
  • Selected group of projects
  • Library

Once you’ve selected something, go to File > Delete Generated [ name of selection ] Media. In the resulting dialog (see screen shot) select the types of files you want to delete.

EXTRA CREDIT

Deleting generated media can not be undone. However, if you delete something that Final Cut needs, FCP will automatically regenerate it. So deleting generated medis is less risky than it seems.


Please rate the helpfulness of this tip.

Click on a star to rate it!

… for Apple Final Cut Pro X

Tip #1298: Shortcuts to Move Clips

Larry Jordan – LarryJordan.com

I use these tips all the time when I need to tweak a clip into better position.

Select a connected clip, then type comma or period to move it left or right.

Topic $TipTopic

While clips in the Primary Storyline are magnetically “connected” to each other, that is not true for any connected clip. Here’s a quick tip that allows you to move connected clips or storylines using only the keyboard.

  • Select the connected clip(s) you want to move.
  • Type comma to move the selected clips left one frame.
  • Type Shift + comma to move the selected clips left ten frames.
  • Type period to move the selected clips right one frame.
  • Type Shift + period to move the selected clips right ten frames.

NOTE: This keyboard shortcut won’t work on clips in the Primary Storyline.

EXTRA CREDIT

This same keyboard shortcut also works for selected edit points.


Please rate the helpfulness of this tip.

Click on a star to rate it!

… for Apple Final Cut Pro X

Tip #1299: Transition Trimming Tricks

Larry Jordan – LarryJordan.com

Dragging these icons trims a clip under the transition without changing the transition duration or custom setings.

The three “drag points” of a transition: Trim the In, both or Out.

Topic $TipTopic

Ever wonder what the icons at the top of transition mean… or do? Here’s the answer.

Dragging these icons trims the clip under the transition without changing the transition’s duration or custom settings.

  • Drag the white double-bars on the left of the transition to trim the In of the In-coming clip. (This performs a ripple trim.)
  • Drag the white double-bars on the right of the transition to trim the Out of the out-going clip. (This performs a ripple trim.)
  • Drag the white bow-tie in the middle to trim both the In and the Out. (This performs a roll trim.)

Remember, you can alter the duration of a transition by dragging a vertical edge.

EXTRA CREDIT

If you don’t see these icons, zoom into the timeline until they become visible.


Please rate the helpfulness of this tip.

Click on a star to rate it!