Media based on 32-bit codecs needs to be converted before it can be played.
Kyno allows conversion of older media even when running on Catalina.
Since the release of macOS Catalina (10.15) older media based on 32-bit codecs no longer plays. If you were able to convert all your media before updating, great. If not, read this.
There’s nothing you can do in Catalina that will allow you to play older media based on 32-bit codecs. Catalina doesn’t support 32-bit anything. However, you are not totally out of luck.
If you have older media, you have two options:
Transfer it to an older system, or borrow or rent one, and convert your media.
A 3rd-party utility – Kyno – can find and convert older media, even if Kyno is running on a Catalina system.
https://www.theinsidetips.com/wp-content/uploads/2019/09/Tips-Logo-700x150.jpg00Larry Jordanhttps://www.theinsidetips.com/wp-content/uploads/2019/09/Tips-Logo-700x150.jpgLarry Jordan2020-03-17 01:30:002020-03-14 12:32:33Tip #535: How to Convert 32-bit Media
Sidecar files track data that the main image file can’t.
Sidecars hold stuff the main file can’t.
Sidecar files are XML computer files that store data (often metadata) which is not supported by the format of a source file. There may be one or more sidecar files for each source file.
In most cases the relationship between the source file and the sidecar file is based on the file name; sidecar files have the same base name as the source file, but with a different extension. The problem with this system is that most operating systems and file managers have no knowledge of these relationships, and might allow the user to rename or move one of the files thereby breaking the relationship.
Examples include:
XMP. Stores image metadata.
THM. Stores digital camera thumbnails
EXIF. Stores camera data to keep it from becoming lost when editing JPG images.
EXTRA CREDIT
Rather than storing data separately, it can be stored as part of the main file. This is particularly done for container files, which allow certain types of data to be stored in them. Instead of separate files on the file system, multiple files can be combined into an archive file, which keeps them together, but requires that software processes the archive file, rather than individual files. This is a generic solution, as archive files can contain arbitrary files from the file system.
Container formats include QuickTime, MXF and IFF.
Please rate the helpfulness of this tip.
Click on a star to rate it!
https://www.theinsidetips.com/wp-content/uploads/2019/09/Tips-Logo-700x150.jpg00Larry Jordanhttps://www.theinsidetips.com/wp-content/uploads/2019/09/Tips-Logo-700x150.jpgLarry Jordan2020-03-17 01:30:002020-03-17 01:30:00Tip #539: What is a Sidecar File?
An illustration of 8-bit vs. 10-bit depth. (8-bit is on top).
Bit depth determines the number of steps between the minimum and maximum of a value. The bit depth number (8, 16, 24) actually describes a power of 2.
A bit depth of 4 = 2^4 = 16 steps
A bit depth of 8 = 2^8 = 256 steps
A bit depth of 10 = 2^10 = 1,024 steps
A bit depth of 16 = 2^16 = 65,536 steps
In the screen shot, the top row represents an image with a bit depth of 8. The lower image represents an image with a bit depth of 10.
NOTE: These are illustrations, actual bit depth variations don’t look quite this bad.
Where higher bit depths help image quality is in color grading, gradients and anywhere smooth shading from one value to another is important.
EXTRA CREDIT
In audio, bit depth determines the dynamic range; the amount of variation in audio levels between soft and loud. Bit depth is only meaningful in reference to a PCM digital signal (i.e. WAV or AIF). Non-PCM formats, such as lossy compression formats (i.e. MP3), do not have associated bit depths.
Please rate the helpfulness of this tip.
Click on a star to rate it!
https://www.theinsidetips.com/wp-content/uploads/2019/09/Tips-Logo-700x150.jpg00Larry Jordanhttps://www.theinsidetips.com/wp-content/uploads/2019/09/Tips-Logo-700x150.jpgLarry Jordan2020-03-17 01:30:002020-03-17 01:30:00Tip #541: What is Bit Depth?
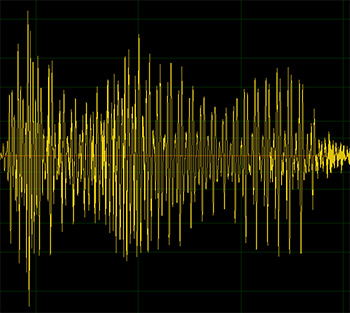
Choose AIF or WAV audio files. File sizes are larger, but the quality is worth it.
A typical monoaural audio waveform of human speech.
This article, written by Charles Yeager, first appeared in PremiumBeat.com. This is a summary.
When using various audio files in your video edits, such as music tracks and sound effects, does the audio file type really make a difference? (Spoiler: yes, it does.) But the real question is why are there so many different audio file formats? And what is the purpose for each one? So let’s break that down, and in so doing, determine the best audio file formats to use when editing videos.
Uncompressed audio formats are the equivalent of RAW video formats.This allows for a wide range of audio bit depth and sample rates. This results in better audio quality and covers the full frequency that the human ear can hear.
Uncompressed audio files are typically easier to work with in audio and video editors because they require less processing to play back. And since uncompressed files contain more data, you’ll get better results when you’re manipulating the audio in post with various effects.
COMPRESSED LOSSLESS
The name “compressed lossless” may sound like a contradiction. However, the compression isn’t occurring in a way that degrades the audio itself. Think of it almost like ZIP-compressing a music file, then unzipping it during playback.
Compressed lossless audio files can be anywhere from 1/2 to 1/3 the size of uncompressed audio files — or even smaller, while the audio quality is still lossless, enabling full frequency playback.
The drawbacks for compressed lossless files are that they are the least supported (compared to uncompressed and compressed lossy.) They also require a little more computing power to play back, because they need decoding.
COMPRESSED LOSSY
Compressed lossy audio formats are likely the most common audio files you use when listening to music. This is because compressed lossy audio files have the most support among portable devices, and they have the smallest file sizes; up to 1/10 WAV or AIF.
Compressed lossy audio files are ideal for streaming online.
However, all that compression comes at a cost. The drawback is that the audio has a limited frequency range and noticeable audio artifacts when compared to a lossless format. Another drawback is that you have less range in post when it comes to editing and audio manipulation.
WHICH TO USE FOR AUDIO EDITING?
WAV or AIF.
Please rate the helpfulness of this tip.
Click on a star to rate it!
https://www.theinsidetips.com/wp-content/uploads/2019/09/Tips-Logo-700x150.jpg00Larry Jordanhttps://www.theinsidetips.com/wp-content/uploads/2019/09/Tips-Logo-700x150.jpgLarry Jordan2020-03-10 01:30:002020-03-10 01:30:00Tip #508: Pick the Best Audio Format for Editing
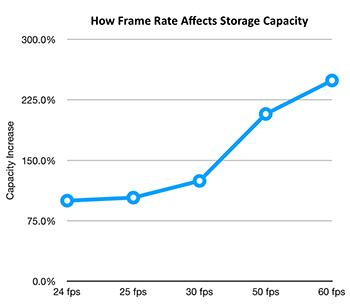
As frame rates increase, file storage needs also increase – dramatically.
I want to look at the effect increasing video frame rates has on storage capacity and bandwidth.
NOTE: In this example, I’m using Apple ProRes as a measurement codec. Other codecs will generate different numbers, but the overall results are the same. Here’s a white paper from Apple with all the source numbers.
Regardless of frame size, as frame rates increase, storage needs and bandwidth also increase. If we set the storage needs of 24 fps video (regardless of frame size) to 100%, then:
25 fps video = 104% capacity and bandwidth increase
30 fps video = 125% capacity and bandwidth increase
50 fps video = 208% capacity and bandwidth increase
60 fps video = 250% capacity and bandwidth increase
Just as capacity increases by these amounts, so, also, does bandwidth. Higher frame rates require bigger and faster storage.
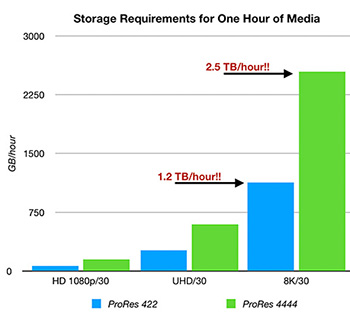
8K files require vast storage with super-fast bandwidth.
File storage requirements as frame size increases for ProRes 422 and 4444.
Technology continues its relentless advance and we are hearing the drumbeats for 8K media. Editing 4K takes a lot of computer horsepower. Editing 8K requires 4 TIMES more than 4K! Which is why Apple is promoting the new Mac Pro for use with 8K workflows.
I don’t minimize the need for a powerful CPU or the potential of the new Mac Pro when editing frame sizes this huge. However, important as the computer is in editing media, the speed and size of your storage are even MORE critical.
Let’s start by looking at storage requirements for different frame sizes of media.
NOTE: For this example, I’m using ProRes 422 and 4444 because Apple has done a great job documenting the technical requirements of these codecs. Other codecs will have different numbers, but the size and bandwidth relationships will be similar.
More specifically, the three frame sizes in my chart are:
1080/30 HD. 30 fps, 1920 x 1080 pixels
UHD/30. 30 fps, 3940 x 2160 pixels
8K/30. 30 fps, 8192 x 4320 pixels
As the screen shot illustrates, an hour of 8K media takes 1.2 TB for ProRes 422 and 2.5 TB for ProRes 4444! These amounts require totally rethinking the capacity of our storage – and remember, this does not include typical work or cache files, many of which will also be 8K.
EXTRA CREDIT
Here’s a link to my website to learn more, including the bandwidth needs of these super-huge frame sizes.
Please rate the helpfulness of this tip.
Click on a star to rate it!
https://www.theinsidetips.com/wp-content/uploads/2019/09/Tips-Logo-700x150.jpg00Larry Jordanhttps://www.theinsidetips.com/wp-content/uploads/2019/09/Tips-Logo-700x150.jpgLarry Jordan2020-03-10 01:30:002020-03-10 01:30:00Tip #514: The Brave New World of 8K Media
Pixel aspect ratios were used in the past to compensate for limited bandwidth.
An exaggerated example of non-square pixels used in a variety of SD video.
Pixel aspect ratios determine the rectangular shape of a video pixel. In the early days of digital video, bandwidth, storage and resolution were all very limited. Also, in those days, almost all digital video was displayed on a 4:3 aspect ratio screen.
This meant that the image was 4 units wide by 3 units high, composed of 720 pixels across and 480 pixels high. (The reason I use the word “units” was that then, like now, monitors came in different sizes, but all had the same resolution regardless of size.)
However, standard definition video, though displayed as a 4×3 images, was composed of 720 pixels horizontally by 480 pixels vertically. This was not 4×3. To get everything to work out properly, instead of being square, each pixel was tall and thin. Each pixel was 0.9 units wide to 1.0 unit tall. (The screen shot shows an exaggerated example of this difference in width.)
As digital video started to encompass wide screen, rather than add more pixels, which was technically challenging, engineers changed the shape of the pixel to be fat. (A pixel aspect ratio of 1.0×1.2) This provided wide screen support (16×9 aspect ratio images) without increasing pixel resolution or, more importantly, file size and bandwidth requirements.
These non-square pixels continued for a while into HD video, with both HDV and some formats of P2 using non-square pixels.
However, as storage capacity and bandwidth caught up with the need for more pixels in larger frame sizes, pixels evolved into the square pixels virtually every digital format uses today. This greatly simplified all manner of pixel manipulation.
However, most compression software has settings that allow it to work with legacy formats back in the days when pixels weren’t square.
Please rate the helpfulness of this tip.
Click on a star to rate it!
https://www.theinsidetips.com/wp-content/uploads/2019/09/Tips-Logo-700x150.jpg00Larry Jordanhttps://www.theinsidetips.com/wp-content/uploads/2019/09/Tips-Logo-700x150.jpgLarry Jordan2020-03-03 01:30:002020-04-05 20:30:08Tip #499: What is Pixel Aspect Ratio?
A sample timecode setting displayed as: Hours, Minutes, Seconds and Frames.
Back in the old days of video tape, all programs originating in North America (and, perhaps, elsewhere) started at timecode hour 01. A tradition that often continues today for broadcast, mostly out of habit. Why?
NOTE: Programs originating in Europe, I discovered many years ago, tended to start at hour 10. This made it easy to quickly see which part of the world a program originated from.
Back in the days of large quad videotape machines, each of which could easily cost a quarter-of-a-million dollars, the tape reels were 15-inches in diameter and weighed up to 30 pounds. The tape flew through the system at 15 inches per second – all to create a standard-definition image!
Setting up a quad tape system for playback required tweaking each of the four playback heads on the machine and adjusting them for alignment, color phase, saturation and brightness. (It was these machines that first taught me how to read video scopes.)
The problem was that getting this much iron moving fast enough to reliably play a picture took time. Eight seconds of time.
So, the standard setup for each tape required recording:
60 seconds of bars and tone (to set video and audio levels)
10 seconds of black
10 seconds of slate
10 seconds of countdown
If timecode started at 0:00:00:00 for the program, that would mean the setup material would start at 23:58:30:00. Since 23 hours is after 0 hours, sending the tape machine to seek the starting timecode – an automated feature that was used all the time in the high-speed, high-pressure turnaround of live news – means the tape deck would scan forward to the end of the tape.
To prevent this, all programs started at 1 hour (or 10 hours) with setup starting at 00:58:30:00.
Interlacing, non-square pixels, and deep compression make this a challenging media format.
HDV (short for high-definition DV) media was a highly-popular, but deeply flawed, video format around the turn of the century.
DV (Digital Video) ushered in the wide acceptance of portable video cameras (though still standard definition image sizes) and drove the adoption of computer-based video editing.
NOTE: While EMC and Avid led the way in computerized media editing, it was Apple Final Cut Pro’s release in 1999 that converted a technology into a massive consumer force.
HDV was originally developed by JVC and supported by Sony, Canon and Sharp. First released in 2003, it was designed as an affordable recording format for high-definition video.
Their were, however, three big problems with the format:
It was interlaced
It used non-square pixels
It was highly! compressed
If the HDV media was headed to broadcast or for viewing on a TV set, interlacing was no problem. Both distribution technologies fully supported interlacing.
But, if the video was posted to the web, ugly horizontal black lines radiated out from all moving objects. The only way to get rid of them was to deinterlace the media, which, in most cases, resulted in cutting the vertical resolution in half.
In the late 2000’s Sony and other released progressive HDV recording, but the damage to user’s perception of the image was done.
NOTE: 1080i HDV contained 3 times more pixels per field than SD, yet was compressed at the same data rate. (In interlaced media, two fields make a frame.)
The non-square pixels meant that 1080 images were recorded at 1440 pixels horizontally, with the fatter-width pixel filling a full 1920 pixel line. In other words, HDV pixels were short and fat, not square.
As full progressive cameras became popular – especially DSLR cameras with their higher-quality images, HDV gradually faded in popularity. But, even today, we are dealing with legacy HDV media and the image challenges it presents.
Please rate the helpfulness of this tip.
Click on a star to rate it!
https://www.theinsidetips.com/wp-content/uploads/2019/09/Tips-Logo-700x150.jpg00Larry Jordanhttps://www.theinsidetips.com/wp-content/uploads/2019/09/Tips-Logo-700x150.jpgLarry Jordan2020-03-03 01:30:002020-03-03 01:30:00Tip #505: Why HDV Media is a Pain in the Neck
We may request cookies to be set on your device. We use cookies to let us know when you visit our websites, how you interact with us, to enrich your user experience, and to customize your relationship with our website.
Click on the different category headings to find out more. You can also change some of your preferences. Note that blocking some types of cookies may impact your experience on our websites and the services we are able to offer.
Essential Website Cookies
These cookies are strictly necessary to provide you with services available through our website and to use some of its features.
Because these cookies are strictly necessary to deliver the website, refuseing them will have impact how our site functions. You always can block or delete cookies by changing your browser settings and force blocking all cookies on this website. But this will always prompt you to accept/refuse cookies when revisiting our site.
We fully respect if you want to refuse cookies but to avoid asking you again and again kindly allow us to store a cookie for that. You are free to opt out any time or opt in for other cookies to get a better experience. If you refuse cookies we will remove all set cookies in our domain.
We provide you with a list of stored cookies on your computer in our domain so you can check what we stored. Due to security reasons we are not able to show or modify cookies from other domains. You can check these in your browser security settings.
Google Analytics Cookies
These cookies collect information that is used either in aggregate form to help us understand how our website is being used or how effective our marketing campaigns are, or to help us customize our website and application for you in order to enhance your experience.
If you do not want that we track your visit to our site you can disable tracking in your browser here:
Other external services
We also use different external services like Google Webfonts, Google Maps, and external Video providers. Since these providers may collect personal data like your IP address we allow you to block them here. Please be aware that this might heavily reduce the functionality and appearance of our site. Changes will take effect once you reload the page.
Google Webfont Settings:
Google Map Settings:
Google reCaptcha Settings:
Vimeo and Youtube video embeds:
Other cookies
The following cookies are also needed - You can choose if you want to allow them:
Privacy Policy
You can read about our cookies and privacy settings in detail on our Privacy Policy Page.