… for Apple Motion

Tip #377: The Record Button Easily Adds Keyframes

Larry Jordan – LarryJordan.com

The Record Button simplifies adding keyframes to projects.

The Record Button in “add keyframe” mode.

Topic $TipTopic

This first appeared in an Apple KnowledgeBase article. There are two ways to apply keyframes in Motion: Automatically and manually. Here’s the automatic method – using the Record button.

Turn on the Record button (Shortcut: A), located at the bottom left of the Viewer, to create a new keyframe whenever you adjust any parameter. This method is useful when you want to create keyframes for multiple parameters in your project.

Here are the steps:

1. In Motion, do one of one following:

  • Click the Record button on the left side of the timing toolbar.
  • Press A.
  • Choose Mark > Record Animation.
    The Record button is highlighted.

2. Select an object in the canvas, Layers list, or Timeline.

3. Drag the playhead to a new position in time.

4. Modify one or more parameters by doing any of the following:

  • Use the onscreen controls to move, scale, or manipulate objects.
  • Use the controls in the Inspector or HUD to move, scale or manipulate objects

NOTE:
Keyframes are added at the current playhead position for any parameters you modified.

5. Repeat steps 3 and 4 to add additional keyframes.

NOTE: As long as the Record button is enabled, any parameter modifications your make in your project are recorded as new keyframes. In the Inspector, all modifiable parameters are highlighted red to remind you that parameter changes are being recorded as keyframes.


Please rate the helpfulness of this tip.

Click on a star to rate it!

… for Visual Effects

Tip #382: Stacking Order Makes a Difference

Larry Jordan – LarryJordan.com

Effects process from top to bottom

Two effects are applied to this clip: On the left, Sepia on top, Border under. On the right, the order is reversed.

Topic $TipTopic

Whether you use Adobe Premiere or Apple Final Cut, the stacking order of your effects makes a difference. Let me illustrate.

In this screen shot, the clip has two effects applied: Sepia and Border. On the left side, Sepia is above the border. So the image is first colorized, then the cyan border is added.

With the image on the right, the Border is on top. This means that the border is added, then both border and image are converted from full-color to Sepia.

If you apply more than one effect to a clip, remember that effects process from top to bottom. You can see the order of your effects in the Inspector (Final Cut) or Effect Controls panel (Premiere).


Please rate the helpfulness of this tip.

Click on a star to rate it!

… for Adobe Premiere Pro CC

Tip #283: AAF vs. EDL vs. OMF vs. XML Export

Larry Jordan – LarryJordan.com

Different applications require different export options.

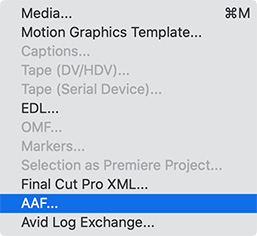
Export options in Adobe Premiere Pro CC.

Topic $TipTopic

Most of the time, when the time comes to export our finished project, we select File > Export > Media. Sometimes, though, we need to move our project to a different program, say for color correction or audio mixing. Which export option should we choose?

  • EDL. This is the oldest, and most limited, transfer format. It only supports 2 video tracks and 4 audio tracks. Unless you are working with VERY old software, this should not be your first choice.
  • OMF. This is an audio-only format. Unlike EDL, which simply points to your media, OMF includes all audio files in the OMF. This guarantees that your audio, along with your edits, will successfully transfer.
  • Final Cut Pro XML. This XML format is based on FCP 7. This is the best choice for moving projects to or from Final Cut Pro 7 or X; though FCP X requires conversion using a utility. Like EDL, this only points to your media. This is also the best choice for many 3rd-party media management systems.
  • AAF. This is the best choice for moving files from Premiere to Avid ProTools or Media Composer. An AAF contains links to audio and video files as well as editing decisions that are to be applied to the audio and video data.
  • Avid Log Exchange. This is the best format for moving Avid Media Composer bins into Premiere.

Please rate the helpfulness of this tip.

Click on a star to rate it!

… for Codecs & Media

Tip #380: Apple Compressor vs. Adobe Media Encoder

Larry Jordan – LarryJordan.com

Adobe Media Encoder is still the fastest.

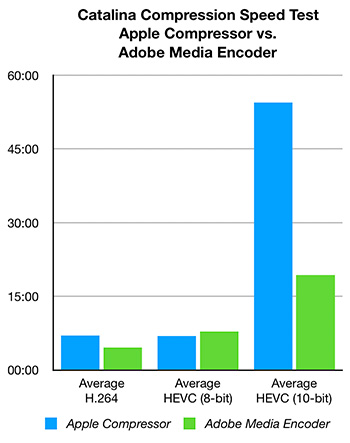
AME (green) is faster than Compressor (blue) in 2 out of 3 compression formats. (Shorter bars are faster.)

Topic $TipTopic

Recently, I compared the compression speed of Adobe Media Encoder with Apple Compressor, both running on the same 27″ iMac (i5) and macOS Catalina. Here’s what I learned.

  • In general, Catalina is a shade slower for both apps than Mojave for compression, ranging from 0% to 14% slower, depending upon the task.
  • HEVC 10-bit compression is still extremely slow because it is not hardware-accelerated in either app.
  • Compressed file sizes are the same for both apps between Mojave and Catalina.

As you can see from the chart, while Media Encoder and Compressor are the about the same speed for HEVC 8-bit, Media Encoder is much faster for H.264 (50%) and HEVC 10-bit (180%).

EXTRA CREDIT

Read the full article with all the details here.


Please rate the helpfulness of this tip.

Click on a star to rate it!

… for Apple Final Cut Pro X

Tip #331: Export & Translate Subtitles

Larry Jordan – LarryJordan.com

The key is to work with your subtitles as plain text.

Topic $TipTopic

Carsten Ress sent this in:

I was looking for a way to export subtitles (in a closed captions format) from FCP X as text, send it to translation, then import it back again as subtitles. I found this workaround that saved me a lot of time.

  1. Export the subtitles as an SRT File
  2. Change the file extension from .SRT to .TXT (ignore the warning that appears). This gives you a text file with the timecode to position the subtitles
  3. The translator substitutes only the text lines within this document with his translation
  4. When translation is finished, change the file extension from .TXT to .SRT
  5. Then import the SRT file into a new language Role and you have all the subtitles translated and with the right timing.

You need to be careful with the TXT document as small changes in the format (for example, adding additional text) can result in error messages during the reimport of the subtitles.

Also, there is a great plugin called “X-Title Caption Convert” from Spherico that allows you to convert closed caption into FCP X titles. This is really helpful if you want to burn the subtitles into the video file and want to have more formatting options.

EXTRA CREDIT

This workaround is delicate. In my last project the translator used double quotations marks which are not supported in SRT files. This led to an error message during the import.

You have to make sure that no “unpermitted” characters are used or search for them and replace them in case you get some error messages while importing the SRT into final cut or if only a part of the subtitles are imported. But if it works, you can really save a lot of time.


Please rate the helpfulness of this tip.

Click on a star to rate it!

… for Random Weirdness

Tip #323: Practical Tips to Avoid Film-making Stress

Larry Jordan – LarryJordan.com

Common sense saves time and reduces stress.

Topic $TipTopic

Lewis McGregor first reported this for PremiumBeat. I’ve summarized his key points here.

Often, stress during a project starts as a small thing that can be easily managed. Sure, these ideas might be common sense tips, but it’s the type of advice you don’t really think about until you find yourself in a particularly stressful situation.

  1. Set up as much as possible before you arrive on location
  2. Minimize the amount of “winging it”
  3. Store and label equipment like a grip truck, even if you drive a small hatchback
  4. Quash what-ifs with backups

Perhaps the causes of your stress are a little different than listed above. Regardless, you can minimize the general stress of shooting solo by focusing on setting up gear ahead of time and the organizing your equipment.


Please rate the helpfulness of this tip.

Click on a star to rate it!

… for Apple Motion

Tip #343: Move Motion Assets to a Different Computer

Larry Jordan – LarryJordan.com

Copy a Motion project file to another computer.

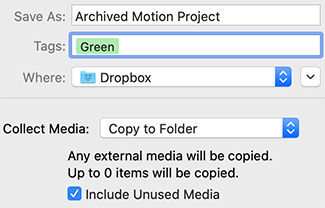
Collect media options in Apple Motion.

Topic $TipTopic

This first appeared as an Apple KnowledgeBase article.

To move a Motion project file to another computer, you must also move all media that the project uses, including all QuickTime, still image, and audio files. In addition, any third-party Motion plug-ins or nonstandard fonts used in the project must be installed on the new computer, or they’ll be unavailable to your project.

Similarly, when you finish a project and want to archive it, it’s a good idea to archive the project file and all media, graphics, fonts, custom behaviors, filters, and third-party add-ons used in the project. If you need to restore the project for later revisions, you’ll have everything you need to get started quickly.

  1. In Motion, save the project file using File > Save as, then choose the Collect Media option and collect all project media into a folder.
  2. Copy the folder containing the saved project file and all media used in the project to another computer or location.

As you can see in this screen shot, archived projects can be saved anywhere.

NOTE: If you move a project to another computer without selecting the Collect Media option, media can go offline (even if you’ve manually moved the media files) due to broken links.


Please rate the helpfulness of this tip.

Click on a star to rate it!

… for Codecs & Media

Tip #346: Compressor is Not Faster in Catalina

Larry Jordan – LarryJordan.com

No speed improvements for H.264 or HEVC in Catalina

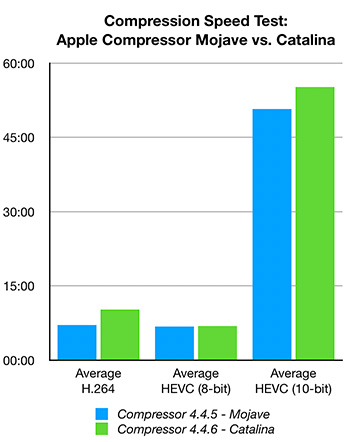
In all tests, average compression speeds in Catalina are slower than Mojave. (Shorter bars are faster.)

Topic $TipTopic

One of the new features in macOS Catalina is a revised graphics engine called Metal 2. Both Final Cut Pro X and Compressor were recently upgraded to support it.

Last week, I did an initial test comparing the speed of Apple Compressor running in macOS Mojave vs. Catalina. I ran these tests on the same computer (an i5) using the same data files and same compression settings using Apple Compressor. The Mojave tests used Compressor 4.4.5. The Catalina tests used Compressor 4.4.6.

NOTE: Additional tests indicate that H.264 compression is faster on iMac Pros and Mac Pros which use the T-2 chip. As well, compression speeds vary depending upon the number and type of applications open at the time of compression.

The short answer is that the latest version of Apple Compressor running on Catalina is slightly slower across all tests than Compressor running on Mojave. I will look at compression results using Adobe Media Encoder in the next Codec Tip Letter.

EXTRA CREDIT

Here’s the full article.


Please rate the helpfulness of this tip.

Click on a star to rate it!

… for Random Weirdness

Tip #227: Place Audio Before Video in Motion Graphics

Larry Jordan – LarryJordan.com

Motion graphics and animation need a different audio workflow.

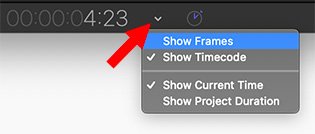
Timecode - or frames - display in Apple Motion.
Click arrow to change between frames and timecode in Apple Motion.

Topic $TipTopic

When it comes to creating animation or a motion graphic video, the hardest thing for folks new to the art is to figure out the timing. How long should a scene last? Or a piece of text hold on screen? How fast are the transitions? Here are some thoughts that can help.

The short answer is that the audio track for anything animated is built BEFORE you create the video, while the audio track for a “normal” video is built after the video is edited.

You could determine timing by dividing a motion graphic video into specific scenes by the clock, then create a storyboard for each scene. But, the problem is that music is not based on the clock. If you are adding a music bed, you need to respect the rhythm of the music, as well as make sure the end of the music in the video is at the end of a musical phrase. This makes your motion graphic sound complete.

NOTE: It is far more important to focus on where music ends than where it begins; because audiences remember the end of something more than the beginning.

Once you start adding dialog or narration, you have two different rhythms working: music and voice. There’s no way you can animate that without carefully listening to and setting your timing based on the actual audio. Which means the audio needs to be complete before animation starts.

This is a key reason why animators prefer to work with frame counts, more than timecode. Frame counts provide a very specific reference that ties perfectly to the sound track. Timecode is better suited to watching video.


Please rate the helpfulness of this tip.

Click on a star to rate it!

… for Visual Effects

Tip #329: Blurs and Mosaics are No Longer Safe

Larry Jordan – LarryJordan.com

Blurs are no longer safeguards against protecting identity.

New graphics technology, combined with AI, recreates high-resolution images from blurry, low-res source files.

Topic $TipTopic

For years, editors have used mosaic and blur effects to hide the identity of on-screen talent. However, recent research has found a way to reverse-engineer a high-quality image of the speaker’s face from a low-resolution blur. Here’s what you need to know.

Research published in Sept. 2018, from universities in the US and China has revealed a technology that “learns to reconstruct realistic [image] results with clear structures and fine details.”

Using a low-resolution image (on the left), their technology creates a high-quality result using off-the-shelf computer hardware and nVidia GPUs. Using AI, the researchers discovered an algorithm “to directly restore a clear high- resolution image from a blurry low-resolution input.”

“Extensive experiments demonstrate that our method performs favorably against the state-of-the-art methods on both synthetic and real-world images at a lower computational cost.”

Here’s a link to their scientific paper. The text is highly technical, but the images are frightening, if you are a producer charged with protecting someone’s identity.

KEY TAKEAWAY

If you want to protect the identity of an on-camera speaker, don’t shoot their face. Today’s technology makes blurs, mosaics and low-res images completely ineffective.


Please rate the helpfulness of this tip.

Click on a star to rate it!