Feathering softens edges in images, shapes or masks.
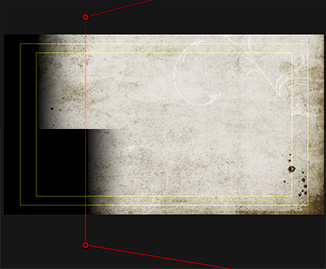
The feathered edge of a mask. The top half shows feathering out, while the lower half illustrates feathering in.
Feathering softens edges. When you soften (feather) an edge, the softening has to go somewhere. This means that you can feather OUT from the edge (top of screen shot) or IN from the edge.
Think of feathering as “blurring the edges.” It affects the edge, but not the rest of the image. Feathering has three components:
The direction of the feather
The amount of the feather
The shape of the ramp from the edge to the surface
Each NLE has options which allow you to adjust each of these parameters.
However, feathering will not allow you to extend an image beyond its original borders.
Please rate the helpfulness of this tip.
Click on a star to rate it!
https://www.theinsidetips.com/wp-content/uploads/2019/09/Tips-Logo-700x150.jpg00Larry Jordanhttps://www.theinsidetips.com/wp-content/uploads/2019/09/Tips-Logo-700x150.jpgLarry Jordan2020-04-08 01:30:002020-04-04 10:41:07Tip #594: What Is Feathering?
“Less is More” and pay attention to brand guidelines.
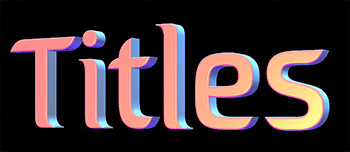
A good title doesn’t have to be complex to be compelling.
This tip, written by Kevin Luiz, first appeared in RedSharkNews.com. This is a summary.
You don’t have to be a master motion graphics guru in order to create effective, and importantly, thematically relevant looking titles for your videos. Here’s how to approach graphical title design even if animation and typography isn’t your primary skillset.
When devising how you’d like to integrate type font, lower thirds and other graphic elements such as logo animations or plates, make sure to request the company’s brand guidelines. This may seem like a “duh” to most, but I can’t tell you how many editors I’ve come across who purposely ignore these sheets to impose their own stylistic agendas. As a general guideline, I’ll spend about an hour sifting through a client’s outlets to get a sense of style before I dig into graphical work.
Theory & Visual Motifs
The theory behind design and motion graphics is to enhance a brand or product and leverage these designs to present information not conveyed in the visual or audible language of film. These elements can also serve as thematic undertones to prop up and assist in the visual motif of your work.
Make It Your Own
When I create motion titles, I might find a piece of footage that has some dead space to the image on one side or the other. I’ll then title the film and position it in that dead space. This does three things; it conveys a piece of information, it adds balance to an image, and it pulls the viewer in as their attention is demanded scanning the image from left to right.
Jack of All Trades. Master of None
With all of these resources being so accessible, you don’t necessarily need to be a master level graphic designer to accomplish a polished “look”. However, I believe you do need to have a really deep understanding of the overall product you are trying to create as well as the information you must convey.
Motion graphics can be very powerful and, with a bit of taste, can really make your products feel like a completed package. In closing, everything in moderation, but don’t be afraid to add a flair of style to your work with some slick graphics if the product calls for it.
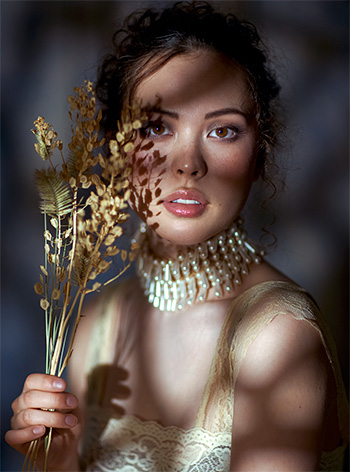
Dappled light makes portraits much more interesting.
A sample dappled light image, courtesy of PetaPixel.com.
This tip, written by Michael Zhang, first appeared in PetaPixel.com. This is a summary.
If you’re looking for at-home photo ideas, here’s an 18-minute behind-the-scenes video by photographer Irene Rudnyk showing how you can get dappled light for a portrait shoot with a small budget and studio space.
In searching for interesting lighting, Rudnyk stumbled across a tutorial by photographer Jake Hicks on emulating dappled light — like what you get through leaves on a sunny day — in the studio.
You’ll need to buy a set of glass blocks. These wave pattern glass blocks are commonly used for windows and walls in showers, bathrooms, and basements. They may cost around $4 each (or less if you find a deal or buy in bulk).
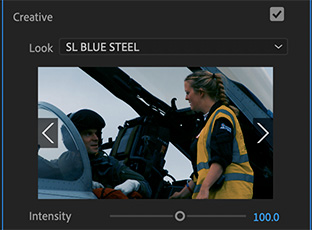
Looks are designed for fast and easy color grading – and applied effects.
A Blue Steel look applied to a clip. (Image courtesy of Hallmark Broadcast Ltd.)
Looks are color-correction and effects presets that quickly change the look of a video clip to something different.
These exist in both Premiere (Lumetri > Color > Looks) and Final Cut (Effects Browser > Looks).
In Final Cut, these are some looks that purely affect the color (i.e. Film Noir), but the majority emphasize an effect more than a look (Rain, CamCorder, Aged Film). Final Cut is trying to help editors who know what they want, but don’t know how to achieve it, get the effect they need for their project.
In Premiere, looks are much more color oriented and there are far more of them, close to eighty, depending upon how you count. You select them from the Creative section of the Lumetri color panel. Premiere is trying to help solve sophisticated color grading challenges without understanding color.
The good thing about all of these looks is that there isn’t a whole lot to adjust. If you like the effect, use it. If not, you can try tweaking, but mostly you just delete it and try something different.
Please rate the helpfulness of this tip.
Click on a star to rate it!
https://www.theinsidetips.com/wp-content/uploads/2019/09/Tips-Logo-700x150.jpg00Larry Jordanhttps://www.theinsidetips.com/wp-content/uploads/2019/09/Tips-Logo-700x150.jpgLarry Jordan2020-04-01 01:30:002020-04-01 01:30:00Tip #579: What Do “Looks” Do?
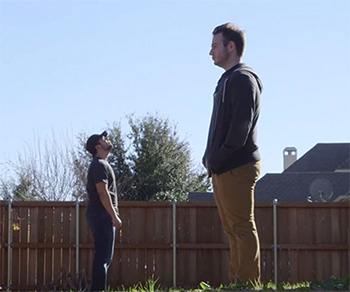
Some very cool effects are very easy to do in-camera.
This is an example of forced perspective.
This article, written by Ryan Connolly at Film Riot, first appeared in PremiumBeat.com. This is an excerpt. Here are five easy in-camera effects you can do yourself.
1. Forced Perspective
Forced perspective is a technique that uses spacing and distance to make objects appear larger or smaller in relation to other objects.
2. Lower Shutter Speed
Using a lower shutter speed is generally done for two reasons. The first: because the location is dark and you need to let in more light. The second is to create motion blur to make the action seem more fluid.
3. Faster Shutter Speed
A faster shutter speed is utilized extensively by professional sport filmmakers. Because of the high shutter speed, you can essentially “freeze” a moment. When using this in conjunction with camera movement, the action seemingly becomes more violent. This technique works great in combat sequences.
4. Lens Whacking
Lens whacking is done by detaching the lens from the mount and then holding it close enough to allow the sensor to still gain an image. The result is very surreal and ethereal.
5. Lens Flare
Lens flare is the natural effect of non-image forming light entering the lens and hitting the sensor, creating the characteristic streak of light.
EXTRA CREDIT
Visit the link at the top of this tip to see a video illustrating all these techniques.
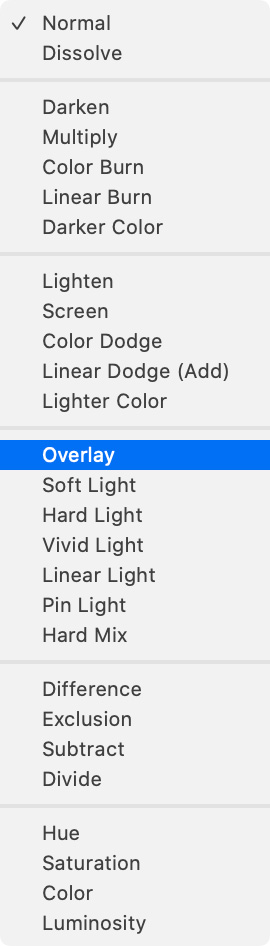
Blend modes combine textures between clips. They are found in all modern NLEs, like this list from Photoshop.
Iain Anderson, at MacProVideo, wrote this up in more detail. But I liked his summary of blend modes, which I have modified from his article.
Blend modes allow us to combine textures, and sometimes colors, between clips or elements that are stacked vertically on top of each other.
Whether you are in Photoshop or Premiere, Final Cut or Motion, blend modes work the same way. These are arithmetical expressions, with nothing to adjust. You either like the effect or you don’t.
NOTE: If you don’t like the effect, tweak either the gray-scale or color value of the top clip and the results will change.
All these settings should be applied to the top clip. It will be the only clip that changes. Here’s what the settings mean.
Normal. This leaves the top clip’s image unaltered
Subtract, Darken, Multiply, Color Burn, and Linear Burn. These combine clips based upon darker grayscale values. For example, the top clip will darken clips below it. Multiply usually works best for adding darker areas.
NOTE: If nothing changes when you apply this setting, your top clip is too light. Darken it.
Add, Lighten, Screen, Color Dodge, and Linear Dodge. These combine textures between clips based upon lighter grayscale values. Screen usually works best for adding bright elements like sparks and flame.
IMPORTANT: Avoid using Add. It creates highlights that exceed legal white values. Screen does not.
Overlay, Soft Light, Hard Light, Vivid Light, Linear Light, Pin Light, and Hard Mix. These combine textures based on mid-tone grayscale values, often in a way that increases contrast. Overlay usually works best, though more often these days, I find myself using Soft Light.
NOTE: For better results, reduce opacity and play with the grayscale settings.
Difference and Exclusion. These mess with color values to create very hallucinogenic effects. What’s happening is that color values in the top clip are mathematically removed from the clips below in slightly different ways. Also useful for spotting the difference between two clips.
Stencil Alpha and Stencil Luma. These insert the background image into the foreground image. Use Stencil Alpha, provided the foreground has an alpha channel. If it doesn’t, use Stencil Luma, but the results may not be as good.
Silhouette Alpha and Silhouette Luma. These cut a hole into the background image based upon the foreground image shape. Again, use Silhouette Alpha if the foreground image has an alpha channel.
Behind. This displays the clips below the current effect. It is used when you are also using Stencil Alpha to insert one image into another.
The bottom choices will vary by application, and are covered in the Help files.
Please rate the helpfulness of this tip.
Click on a star to rate it!
https://www.theinsidetips.com/wp-content/uploads/2019/09/Tips-Logo-700x150.jpg00Larry Jordanhttps://www.theinsidetips.com/wp-content/uploads/2019/09/Tips-Logo-700x150.jpgLarry Jordan2020-03-25 01:30:002020-03-21 10:37:16Tip #556: Blend Modes in Brief
Line Boil used to be considered a mistake. Now, it’s a way to add life to animation.
The PremiumBeat folks posted a YouTube video illustrating how to create a line boil animation.
“Line boil” animation is where lines in an animated figure shiver, or “boil,”” as though every frame was drawn by hand. It gives life and energy to a line drawing by emphasizing rough edges.
Here are the steps:
Using any drawing tool you prefer, create an original image. Line drawings of geometric shapes work best.
Trace the original image by hand, or mouse, create 4 or 5 new images – either as layers or separate images, depending upon the software you are using.
NOTE: It is important that these different iterations not look the same. It’s the variations between them that adds life to the animation.
Loop playback of these frames and watch your simple line drawing come to life.
EXTRA CREDIT
Watch the video linked above to see an illustration of this technique.
Please rate the helpfulness of this tip.
Click on a star to rate it!
https://www.theinsidetips.com/wp-content/uploads/2019/09/Tips-Logo-700x150.jpg00Larry Jordanhttps://www.theinsidetips.com/wp-content/uploads/2019/09/Tips-Logo-700x150.jpgLarry Jordan2020-03-18 01:30:002020-03-14 12:37:33Tip #509: How to Create Line Boil Animation
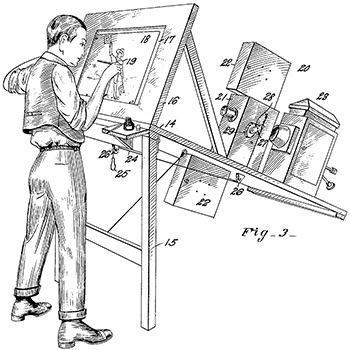
Rotoscoping allows us to transfer an object onto a different background.
Max Fleisher’s original rotoscope (1915).
Rotoscoping is an animation technique that animators use to trace over motion picture footage, frame by frame, to produce realistic action. Originally, animators projected photographed live-action movie images onto a glass panel and traced over the image. This projection equipment is referred to as a rotoscope, developed by Polish-American animator Max Fleischer. This device was eventually replaced by computers, but the process is still called rotoscoping.
In the visual effects industry, rotoscoping is the technique of manually creating a matte for an element on a live-action plate so it may be composited over another background.
Rotoscoping has often been used as a tool for visual effects in live-action movies. By tracing an object, the moviemaker creates a silhouette (called a matte) that can be used to extract that object from a scene for use on a different background. While blue- and green-screen techniques have made the process of layering subjects in scenes easier, rotoscoping still plays a large role in the production of visual effects imagery. Rotoscoping in the digital domain is often aided by motion-tracking and onion-skinning software. Rotoscoping is often used in the preparation of garbage mattes for other matte-pulling processes.
Rotoscoping has also been used to create a special visual effect (such as a glow, for example) that is guided by the matte or rotoscoped line. A classic use of traditional rotoscoping was in the original three Star Wars movies, where the production used it to create the glowing lightsaber effect with a matte based on sticks held by the actors. To achieve this, effects technicians traced a line over each frame with the prop, then enlarged each line and added the glow.
https://www.theinsidetips.com/wp-content/uploads/2019/09/Tips-Logo-700x150.jpg00Larry Jordanhttps://www.theinsidetips.com/wp-content/uploads/2019/09/Tips-Logo-700x150.jpgLarry Jordan2020-03-18 01:30:002020-03-18 01:30:00Tip #542: What is Rotoscoping?
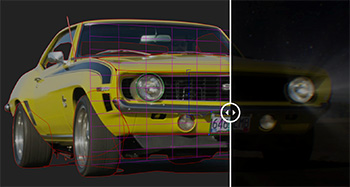
Planar tracking solves problems with lost tracking points.
A planar tracker uses planes and textures to track as opposed to points or groups of pixels. This allows the tracker to stay on track even if your shot contains motion blur or a very shallow depth of field. Here’s a quick overview.
Planar tracking was developed by Allan Jaenicke and Philip McLauchlan in the University of Surrey. They founded Imagineer Systems in 2000 to provide commercial applications for this technology.
“Planar Tracking” gains its name from how the system analyzes the source video. It seeks out different ‘planes’, isolating surfaces that can be followed through a shot. The user can define a plane for the computer to follow, and if tracked successfully, the movement of the ‘tracked’ object can be used to drive the motion of newly composited elements, or inversely to stabilize footage within a frame.
Mocha, by Imagineer Systems, is an example of this technology. Once tracking information is derrived from a videoclip within Mocha, it can be used in After Effects to animate the motion of any composited layer. Virtual elements can use this tracking information to control what is essentially a camera move that mimics that of the original shot, so that the virtual and live action elements appear to have been shot by the same camera.
EXTRA CREDIT
While mocha was the first planar tracker, similar technology can be found in:
Nuke, The Foundry
Syntheyes, Andersson Technologies
Flame, Autodesk
fayIN, fyateq
Learn more from BorisFX, who acquired Imagineer Systems, here.
Please rate the helpfulness of this tip.
Click on a star to rate it!
https://www.theinsidetips.com/wp-content/uploads/2019/09/Tips-Logo-700x150.jpg00Larry Jordanhttps://www.theinsidetips.com/wp-content/uploads/2019/09/Tips-Logo-700x150.jpgLarry Jordan2020-03-18 01:30:002020-03-18 01:30:00Tip #543: What is Planar Tracking?
We may request cookies to be set on your device. We use cookies to let us know when you visit our websites, how you interact with us, to enrich your user experience, and to customize your relationship with our website.
Click on the different category headings to find out more. You can also change some of your preferences. Note that blocking some types of cookies may impact your experience on our websites and the services we are able to offer.
Essential Website Cookies
These cookies are strictly necessary to provide you with services available through our website and to use some of its features.
Because these cookies are strictly necessary to deliver the website, refuseing them will have impact how our site functions. You always can block or delete cookies by changing your browser settings and force blocking all cookies on this website. But this will always prompt you to accept/refuse cookies when revisiting our site.
We fully respect if you want to refuse cookies but to avoid asking you again and again kindly allow us to store a cookie for that. You are free to opt out any time or opt in for other cookies to get a better experience. If you refuse cookies we will remove all set cookies in our domain.
We provide you with a list of stored cookies on your computer in our domain so you can check what we stored. Due to security reasons we are not able to show or modify cookies from other domains. You can check these in your browser security settings.
Google Analytics Cookies
These cookies collect information that is used either in aggregate form to help us understand how our website is being used or how effective our marketing campaigns are, or to help us customize our website and application for you in order to enhance your experience.
If you do not want that we track your visit to our site you can disable tracking in your browser here:
Other external services
We also use different external services like Google Webfonts, Google Maps, and external Video providers. Since these providers may collect personal data like your IP address we allow you to block them here. Please be aware that this might heavily reduce the functionality and appearance of our site. Changes will take effect once you reload the page.
Google Webfont Settings:
Google Map Settings:
Google reCaptcha Settings:
Vimeo and Youtube video embeds:
Other cookies
The following cookies are also needed - You can choose if you want to allow them:
Privacy Policy
You can read about our cookies and privacy settings in detail on our Privacy Policy Page.