When pausing the action, a frame hold segment provides the most flexibility.
The Frame Hold options available for each clip.
In the past, when we needed to freeze the action, we created a stand-alone freeze frame by exporting a still, then, reimporting it and adding it to the Premiere timeline. But, there’s a much better way: Frame Hold.
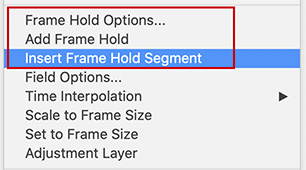
A Frame Hold is attached to the source clip, rather than a separate piece of media. To create it, put the playhead on the frame you want to freeze, then control-click the clip in the timeline. Scroll about half way down to find two options:
Add Frame Hold
Insert Frame Hold Segment.
Add Frame Hold freezes the frame at the position of the playhead and replaces the rest of the clip with the freeze. This is useful when you want to create a freeze, then add a transition.
Insert Frame Hold Segment inserts a two-second freeze at the position of the playhead, then returns to the original video. This is useful when you want to pause the action – say to add a graphic – then return to the action.
EXTRA CREDIT
You can trim the duration of the Frame Hold Segment as long as you use the yellow trimming tool. Rolling the edit point will break the sync between the two shots.
Please rate the helpfulness of this tip.
Click on a star to rate it!
https://www.theinsidetips.com/wp-content/uploads/2019/09/Tips-Logo-700x150.jpg00Larry Jordanhttps://www.theinsidetips.com/wp-content/uploads/2019/09/Tips-Logo-700x150.jpgLarry Jordan2021-01-19 01:30:002021-01-19 01:30:00Tip #1334: Frame Hold vs. Frame Hold Segment
For greatest flexibility, always choose “Set to Frame Size” when scaling images.
When scaling an image, the best option is to select “Set to Frame Size.”
When placing an image, or video, that has a different size from the sequence, Premiere provides three different ways to scale it. But not all these choices are good ones.
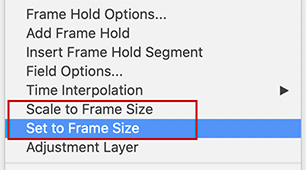
When the clip frame size and sequence frame size don’t match, Premiere offers three options:
None. This places the image at 100% size in the timeline, regardless of the sequence frame size.
Scale to Frame Size. This scales the image to fit in the sequence frame, but does not change the Scale setting in the Effect Controls panel. This means that you don’t know how much the size of an image has been changed.
Set to Frame Size. This scales the image to fit in the sequence frame AND changes the Scale setting in the Effect Controls panel to indicate how much the image size changed.
You can create a default setting using the Default Media Scaling menu in Preferences > Media. Or you can set these individually for each clip by control-clicking the clip in the Timeline. (See screen shot.)
If you want to create “Ken Burns” style moves on stills, None is the best choice.
Otherwise, use Set to Frame Size. This fits the image into the frame and shows how much it was scaled in the Effect Controls panel.
NOTE: I can’t think of any reason to use Scale to Frame Size.
EXTRA CREDIT
Image quality degrades if you enlarge an image much more than 100%.
Please rate the helpfulness of this tip.
Click on a star to rate it!
https://www.theinsidetips.com/wp-content/uploads/2019/09/Tips-Logo-700x150.jpg00Larry Jordanhttps://www.theinsidetips.com/wp-content/uploads/2019/09/Tips-Logo-700x150.jpgLarry Jordan2021-01-19 01:30:002021-01-19 01:30:00Tip #1333: Set vs. Scale to Frame Size
Spectra: High-performance, streaming virtual media encoder.
The Spectra logo.
Last week, Streambox introduced Spectra, a high-performance streaming virtual media encoder.
Spectra can simultaneously deliver high-quality, low-latency stream to multiple remote collaborators anywhere in the world. This means that editors accessing media in the Cloud are no longer limited to low-res proxy images.
For example, the editor or colorist can now view a live, color accurate video/audio stream in the edit suite (or even at home), which provides the same level of confidence they enjoy when working on traditional, in-house systems.
Spectra also works as a plug-in for Avid Media Composer systems. A free trial is available.
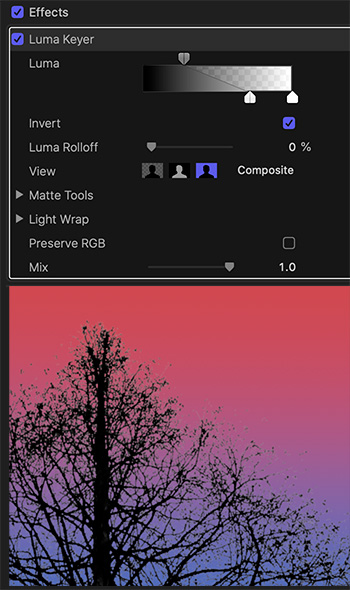
Luma keys use grayscale values to determine which pixels are transparent.
Tree image courtesy of Melissa Chang, Pexels.com
We are all familiar with chroma-key, removing the green and replacing the background. But, what if there’s no green? I was playing with a Luma key and rediscovered an old effect.
A chroma-key selects pixels based on their color value. A Luma key selects pixels based on their gray-scale value.
NOTE: In the old days, we used luma keys to superimpose white text on a black title card by shooting each card with a camera then using a luma key to combine the title with a background image.
Here, I have a silhouette of a tree against a white sky.
I stacked the tree above a gradient background and applied Effects > Keying > Luma key.
By default the Luma key removes black. Click Invert to get it to remove white.
NOTE: You can see the settings I used in the screen shot, along with the finished results.
Just because there’s no green in the shot, does not mean you can’t create interesting effects. Luma keys are very old, but still highly useful.
EXTRA CREDIT
Experiment with different backgrounds. I only used a gradient because it was easy to illustrate this effect.
Also, unclickInvert and fill the black branches of the tree with a background.
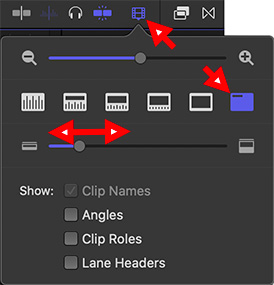
We can now adjust the height of timeline thumbnails using this slider.
The Timeline Appearance panel.
It’s a small thing – but this new feature in the 10.5 update to Final Cut Pro can improve the look of your clips in the timeline; especially if you are editing on a very large screen.
Open a project into the timeline.
Click the Timeline Appearance button (top red arrow in screen shot) in the top right corner of the timeline.
Click the thumbnail icon (middle red arrow) to collapse all timeline clips into thumbnails.
Slide the bottom slider (bottom red arrow) left and right to change the height of the thumbnails.
On very large screens, the thumbnails may get too small to see. This adjusts them so that even on a large screen, you can still see the names of your clips.
Please rate the helpfulness of this tip.
Click on a star to rate it!
https://www.theinsidetips.com/wp-content/uploads/2019/09/Tips-Logo-700x150.jpg00Larry Jordanhttps://www.theinsidetips.com/wp-content/uploads/2019/09/Tips-Logo-700x150.jpgLarry Jordan2021-01-18 01:30:002021-01-18 01:30:00Tip #1339: Adjust Thumbnails in Timeline
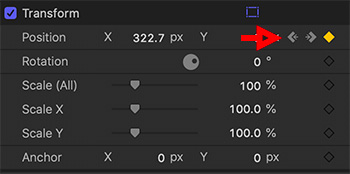
Smart Conform is a good start. But you’ll need to use keyframes to make it perfect.
Video Inspector > Transform with keyframes applied to change position.
Smart Conform converts clips in one aspect ratio to fit inside a project using a different aspect ratio. It does this by analyzing the content of the media, then scaling and repositioning it to best fit in the new project.
To create a Smart Conform:
Create a new project with the aspect ratio you need.
Edit clips into the new project, as usual.
NOTE: Do not allow the project to change aspect ratio when you edit the first clip into it.
Finally select all the clips in the timeline and choose Modify > Smart Conform. In just a few seconds, FCP conforms all selected clips.
The good news is that Final Cut scales and repositions the clips quickly and, most of the time, does a pretty good job.
The bad news is that, unlike Premiere, Final Cut does not motion track the image, which means that as the subject moves over time, the framing may need tweaking.
However, you can quickly tweak your shot – even animate the tracking – by selecting each clip, then, in Video Inspector > Transform, add keyframes to reposition the video as needed to correct any positioning errors.
Please rate the helpfulness of this tip.
Click on a star to rate it!
https://www.theinsidetips.com/wp-content/uploads/2019/09/Tips-Logo-700x150.jpg00Larry Jordanhttps://www.theinsidetips.com/wp-content/uploads/2019/09/Tips-Logo-700x150.jpgLarry Jordan2021-01-18 01:30:002021-01-16 09:58:36Tip #1338: Adjust a Smart Conform
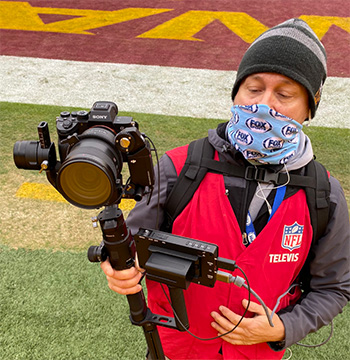
Small package, with great portability and 4K source images.
Mike Smole and the “poor man’s steadicam.”
This article, written by Daron James, first appeared in NofFlmSchool.com. This is a summary.
The Sony a7R IV is changing NFL broadcasts. As first reported by SVG, the Week 15 tilt between Seattle and Washington had the crew using what they dubbed as “The Megalodon,” according to a tweet by reporter Mike Garafolo, where a Sony a7R IV was paired with FE 24-70mm F2.8 GM lens and mounted to a DJI Ronin-S gimbal.
Camera operator Mike Smole called it the “poor man’s Steadicam,” and it was used to capture endzone celebrations to mix in with the broadcast.
Crews had already been using the Sony Alpha cameras to capture warm-up and arrivals shots, but Fox used the Sony Alpha as the 11th camera in the Seattle-Washington game.
The indie package was outfitted for live television with a field monitor and a wireless transmitter that would send a 1080p signal to the camera truck, where it was color corrected to match the broadcast cameras. In all, the rig costs about $10,000, which is pennies in comparison to a broadcast camera.
No Film School spoke with Mike Davies, SVP, technical and field operations at Fox Sports. He told us the feedback has been tremendous.
Read the entire article for more technical details and links.
Please rate the helpfulness of this tip.
Click on a star to rate it!
https://www.theinsidetips.com/wp-content/uploads/2019/09/Tips-Logo-700x150.jpg00Larry Jordanhttps://www.theinsidetips.com/wp-content/uploads/2019/09/Tips-Logo-700x150.jpgLarry Jordan2021-01-15 01:30:002021-01-15 01:30:00Tip #1329: Sony a7R IV & DJI Gimbal Change Football
Script doctors have many roles – but one goal: Make a film as good as it can be.
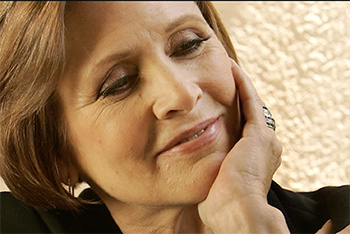
Carrie Fisher, talented script doctor.
This article, written by Jourdan Aldredge, first appeared in PremiumBeat.com. This is a summary.
In the world of screenwriting, there are many, many moving parts. You might think writing a script is as easy as sitting down and putting pen to paper (or, more accurately, opening a laptop and typing away). However, for small indie features to big-budget blockbusters, developing a screenplay can take years and often involves many different writers.
One of the most notable titles for a script revisionist is the infamous “script doctor,” who seems to have magical screenwriting powers in the industry. In this article, let’s take a moment to explore these script doctors and break down who they are and what they actually do.
According to a most basic Wikipedia definition, a script doctor is “a writer or playwright hired by a film, television, or theater production to rewrite an existing script or polish specific aspects of it.” The definition goes on to include examples of specific parts of a script that can be rewritten, including: “structure, characterization, dialogue, pacing, themes, and other elements.”
For those exploring the art of revision and script doctoring today, the basic elements of a script doctor rewrite will usually fall into these distinct rewrite categories.
Brainstorming and Basic Ideation: These script doctors help early on in the process with some of the big picture ideas through brainstorming. They can help lay out the basic elements of a story, define the emotional crux, then leave the majority of the actual script to be written by a single writer.
Story and Character Changes: Conversely, at times a script doctor may be needed after an initial idea is laid out, but to help further develop and refine a project’s central story and characters.
Alternate Scenes and Endings: Similarly, a script doctor is often needed to come in towards the end of the creative process to help wrap up a film that might be stuck on the ending. This is one reason you often see alternate versions or endings in a film that was doctored or rewritten at the last minute.
Audience Feedback Revisions: It’s standard practice for big-budget features to use test screenings and audience feedback to judge if a project is ready to go, or might need revisions to its script or direction. Script doctors can be brought in with the goal of taking audience feedback to help revise a script to better meet audience expectations and demand.
Final Production Polish: Perhaps the most common form of script doctoring comes as a last stage in the script process as a means to help “polish” or “punch-up” a script with extra flourish. These revisions are often minor and quick without changing the crux of a story.
This article has more details on the process of script doctors and fixing scripts, along with a variety of links to learn more.
EXTRA CREDIT
Two famous script doctors: Aaron Sorkin and Carrie Fisher.
With many technological breakthroughs in cameras, professional photographers have access to more tools and accessories than ever! But it’s still the person behind the camera that makes the real difference. That makes it more important for professional photographers and their techniques such as the composition techniques to click the best of the best clicks.
Though professional Photoshop services are there to enhance the images, the main objective of composition is to click the best snap so that it captures the scene as intended and reaches the post-processing table. This blog post will walk professional photographers through many different composition techniques that can be implemented, even when using a smartphone!
The article then illustrates and discusses 15 composition techniques:
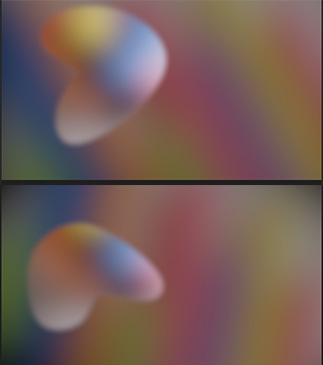
The B-spline mask tool is great when you DON’T want sharp edges.
A morphing blob shape, composed of two still images of colored chalk.
Most of the time, when we need a mask, we’ll use the Bezier tool, because it creates very flexible, highly-precise masks. So, I wondered, when should we use the B-spline mask tool?
The B-spline tool creates “blobs,” masks which have no sharp edges. It reminded me of the Blob generator in Final Cut.
So, I set out to create my own blob and discovered the very interesting effect you see in the screen shot.
Process:
Add Chalk 03 to a layer
Apply Behaviors > Spin to rotate slowly
Apply Filters > Blur > Gaussian Blur
Manually enter an Amount of 700, to make it REALLY blurry
–
Add Chalk 02 on a higher layer
Apply Filters > Blur > Gaussian Blur
Manually enter an Amount of 700
Use the B-spline mask tool to create a blob of this upper layer, then add as much feathering as possible
–
Finally, add keyframes to different B-spline control points so that the shape of the blob animates/morphs over time
Cool.
EXTRA CREDIT
There’s lots of other effects you can add to change the look of this effect. Feel free to play as much as you want.
Please rate the helpfulness of this tip.
Click on a star to rate it!
https://www.theinsidetips.com/wp-content/uploads/2019/09/Tips-Logo-700x150.jpg00Larry Jordanhttps://www.theinsidetips.com/wp-content/uploads/2019/09/Tips-Logo-700x150.jpgLarry Jordan2021-01-14 01:30:002021-01-08 18:02:38Tip #1317: An Example of a B-spline Mask
We may request cookies to be set on your device. We use cookies to let us know when you visit our websites, how you interact with us, to enrich your user experience, and to customize your relationship with our website.
Click on the different category headings to find out more. You can also change some of your preferences. Note that blocking some types of cookies may impact your experience on our websites and the services we are able to offer.
Essential Website Cookies
These cookies are strictly necessary to provide you with services available through our website and to use some of its features.
Because these cookies are strictly necessary to deliver the website, refuseing them will have impact how our site functions. You always can block or delete cookies by changing your browser settings and force blocking all cookies on this website. But this will always prompt you to accept/refuse cookies when revisiting our site.
We fully respect if you want to refuse cookies but to avoid asking you again and again kindly allow us to store a cookie for that. You are free to opt out any time or opt in for other cookies to get a better experience. If you refuse cookies we will remove all set cookies in our domain.
We provide you with a list of stored cookies on your computer in our domain so you can check what we stored. Due to security reasons we are not able to show or modify cookies from other domains. You can check these in your browser security settings.
Google Analytics Cookies
These cookies collect information that is used either in aggregate form to help us understand how our website is being used or how effective our marketing campaigns are, or to help us customize our website and application for you in order to enhance your experience.
If you do not want that we track your visit to our site you can disable tracking in your browser here:
Other external services
We also use different external services like Google Webfonts, Google Maps, and external Video providers. Since these providers may collect personal data like your IP address we allow you to block them here. Please be aware that this might heavily reduce the functionality and appearance of our site. Changes will take effect once you reload the page.
Google Webfont Settings:
Google Map Settings:
Google reCaptcha Settings:
Vimeo and Youtube video embeds:
Other cookies
The following cookies are also needed - You can choose if you want to allow them:
Privacy Policy
You can read about our cookies and privacy settings in detail on our Privacy Policy Page.