New features are nice, but Adobe also needs to prioritize performance and bug fixes.
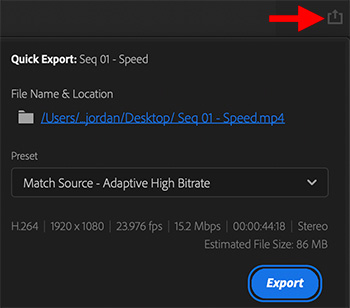
The Quick Export icon in Premiere.
Adobe has quietly moved to monthly updates for all its media software. Here’s what’s new in the November, 2020, update.
Quick Export. This provides direct access to popular and frequently used export settings, right from the header bar in Premiere Pro.
AME APU Optimization. This affects Windows users running Ryzen CPUs, using Radeon GPUs, with up to 4 times faster rendering and smoother playback for 4K sequences thanks to improved memory usage.
Moving into beta is media replacement in motion graphics templates which will provide new options for graphics workflows.
The Quick Export icon is located in the top right corner of the Premiere interface (see screen shot).
https://www.theinsidetips.com/wp-content/uploads/2019/09/Tips-Logo-700x150.jpg00Larry Jordanhttps://www.theinsidetips.com/wp-content/uploads/2019/09/Tips-Logo-700x150.jpgLarry Jordan2020-11-24 01:30:002020-11-21 10:25:11Tip #1189: New Features in Premiere Pro (Nov. 2020)
Compression is getting faster due to new chips supporting hardware acceleration.
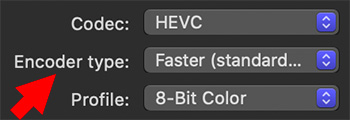
The Encoder type menu option in Apple Compressor 4.5.
As I was preparing this week’s webinar on media compression in Apple Compressor (link) I learned the following:
The new M1 chip from Apple (part of the three new Macs launched last week) can accelerate encoding of H.264, 8-bit HEVC, and 10-bit HEVC using hardware. This vastly speeds compression of these codecs.
NOTE: HDR media requires using a 10-bit codec, which is why compressing 10-bit HEVC quickly is important.
To enable hardware acceleration, be sure to select Faster for the Encoding type.
As well, recent Intel-based Mac computers can use the T2 chip to hardware accelerate 8-bit HEVC and 10-bit HEVC encoding. Again, the Faster Encoding type option should be selected.
NOTE: Selecting Multi-pass switches to software-based encoding. Given the speed and quality of today’s hardware-accelerated compression, there are very few reasons to use this option.
Quick Export is a fast way to create H.264 versions of your timeline.
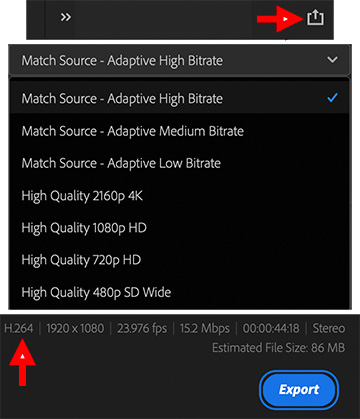
Quick Export icon (top), video format settings (middle) and seven compression options.
Quick Export, new with the Nov. 2020 release of Adobe Premiere Pro, is a single-button way to create H.264 versions of the currently open project in your timeline.
Click the Quick Export icon in the top right corner of the Premiere interface(screen shot, top red arrow).
This displays the Quick Export screen allowing you to change the file name, storage location and compression setting.
Click Preset to pick from eight different compression settings: bit rate (top four) and image size (bottom four) for the exported file. (Middle image) The display at the bottom (bottom red arrow) shows the current export configuration.
When the settings are the way you like – and most of the time, you probably won’t change them, click Export.
NOTE: All these options create H.264 files.
This quickly configures project exports. The export process remains the same.
EXTRA CREDIT
For more export options, simply export your project as always and configure it using the Export Settings window.
Please rate the helpfulness of this tip.
Click on a star to rate it!
https://www.theinsidetips.com/wp-content/uploads/2019/09/Tips-Logo-700x150.jpg00Larry Jordanhttps://www.theinsidetips.com/wp-content/uploads/2019/09/Tips-Logo-700x150.jpgLarry Jordan2020-11-24 01:30:002020-11-21 10:30:08Tip #1187: Using Quick Export
Gaps are black clips that serve a variety of functions – including acting a spacers.
A selected 3-second gap inserted into the Primary Storyline.
This is a simple thing, but I find myself using it in almost every project: adding a gap in my timeline.
Now, I know, gaps – which create flashes of black during playback – are anathema to most editors. As they should be – flashes of black generally indicate bad editing.
But, when I’m creating a rough cut, adding a gap makes for a nice spacer separating different sections of my edit, which means I can quickly find it again. I also use these to flag quotes, or where I was working when I take a break.
NOTE: Yes, I know, I could leave a marker. But I’m already using markers and gaps are a whole lot easier to see.
Because the magnetic timeline snaps the edges of clips together, creating a gap requires thinking differently. In fact, there are three ways to add a gap:
The Position tool (Shortcut: P). Select something, move it and Final Cut leaves a gap between where it was and where it is now. This works, but I need something faster.
Select a clip, then press the Forward delete key (on laptops, type Shift + Delete). This replaces the selected clip with a gap.
Or, my favorite, type Option + W (Menu:Edit > Insert Generator > Gap). This inserts a 3-second gap at the position of the playhead.
EXTRA CREDIT
A gap is actually a clip containing silent audio and black video. You can trim, move and delete gaps the same as any other clip.
Please rate the helpfulness of this tip.
Click on a star to rate it!
https://www.theinsidetips.com/wp-content/uploads/2019/09/Tips-Logo-700x150.jpg00Larry Jordanhttps://www.theinsidetips.com/wp-content/uploads/2019/09/Tips-Logo-700x150.jpgLarry Jordan2020-11-23 01:30:002020-11-21 10:04:49Tip #1194: Sometimes, a Gap is More Than Black
Every shot starts with one, but what do you really know about the clapperboard?
(Image courtesy of Pexels.com.)
Most of the time, the tips for this Tip Letter focus on production. Mostly. Recently, I came across a fascinating article on the history of clapperboards that fits right in.
This article, written by Jourdan Aldredge, first appeared in PremiumBeat.com. This is a summary.
Every shot starts with one, but what do you really know about the iconic film clapperboard? Let’s take a look.
The clapperboard was not always called a clapperboard, and, in fact, has had many different names over the years:
Sound marker
Slate
Sync slate
Dumb slate
Time slate
Clapboard
Clapperboard
Cue board
Film sticks
Sound sticks
And many, many more…
The clapperboard was very much an invention of necessity, and variations of the board date back to the earliest days of even silent cinema. A “slate board” could be found on silent film sets as a way to record and identify the type of film stock that was being used for the shoot.
The hinged, clappy part of the clapperboard was the innovation of Australian studio head F. W. Thring. When pioneering sound engineer Leon M. Leon thought to combine Thring’s hinged sticks with the slate board, the clapperboard we now know was born.
As we’ve moved into modern filmmaking, the standard chalkboard and dry-erase style clapperboards have of course transitioned as well. Modern digi-slates can be used to change and display all the relevant information digitally, as well as display SMPTE time code to further help with the pulling of metadata. There are also some other cool breakthroughs with digital slates and apps that are worth checking out.
Ultimately, it comes down to your filmmaking style and the specific needs of your production. A clapperboard will always be a useful tool, a helpful reminder, and a dependable source of information (should any of the digital alternatives fail you at some point).
EXTRA CREDIT
Jourdan’s article also has three interesting videos:
The history of clapperboards
How to Slate the Camera
And a montage of slates from Quentin Torentino’s Inglorious Basterds
Please rate the helpfulness of this tip.
Click on a star to rate it!
https://www.theinsidetips.com/wp-content/uploads/2019/09/Tips-Logo-700x150.jpg00Larry Jordanhttps://www.theinsidetips.com/wp-content/uploads/2019/09/Tips-Logo-700x150.jpgLarry Jordan2020-11-20 01:30:002020-11-14 11:11:27Tip #1160: The Secret History of Clapperboards
Clamping the signal affects the video scopes, but does NOT affect the video.
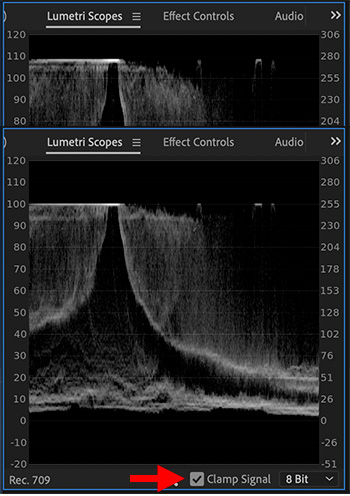
Unclamped video (top) vs. clamped video. The red arrow shows the checkbox.
The Lumetri Scopes have a “Clamp Signal” checkbox. It is checked on by default. What does this do and how does it affect your video?
First introduced in 2017, the Clamp Signal checkbox in the Lumetri Scopes panel limits the scope’s display to the visible spectrum for Rec. 709 media. Selected by default, this setting lets the scopes show values only from 0 through 100. If you want to see how much of the signal is being clipped, deselect the Clamp Signal check box.
The screen shot illustrates a signal which is unclamped, top, and clamped, bottom. Notice how the source clip has white levels that approach 110%. The red arrow indicates the checkbox itself.
The KEY thing you need to know is that checking this has NO effect on the video in the timeline. It only adjusts the scope display.
For web video, levels over 100% for Rec. 709 footage are no big deal – the web can play anything. But for projects destined for broadcast, cable, digital cinema or DVD, white levels must never exceed 100% for Rec. 709 media. (A bit lower is actually preferable.)
While the checkbox is nice, it is a better idea, most of the time, to see accurate video levels, so leave this box unchecked. This is not the default setting.
Please rate the helpfulness of this tip.
Click on a star to rate it!
https://www.theinsidetips.com/wp-content/uploads/2019/09/Tips-Logo-700x150.jpg00Larry Jordanhttps://www.theinsidetips.com/wp-content/uploads/2019/09/Tips-Logo-700x150.jpgLarry Jordan2020-11-17 01:30:002020-11-17 01:30:00Tip #1182: What Does Clamp Signal Do?
The key is to be sure you are pressing the keys before you restart your system.
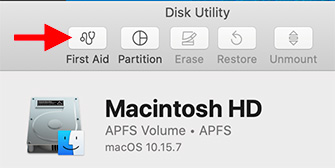
Select the drive you want to repair, then click First Aid in Disk Utility.
There’s a new way to keep your Mac running smoothly – it’s called “Recovery Mode.” Here’s how it works.
Shut down your Mac. (You can do this from a restart, but the timing of when to press the keys is trickier.)
Before you push the power button, press and hold Cmd + R. Then, turn your system on.
Continue pressing both keys until the startup thermometer gets about half-way across the screen.
What you’ve just done is tell your Mac to boot into a hidden start-up volume called the Recovery disk. You can’t run your normal applications with it, but you CAN:
Reinstall the latest version of macOS.
Repair your boot disks using Disk Utility
And two other options that I, ah, forget
Once boot up finishes, you’ll see a menu with four choices. Click the bottom one: Run Disk Utility.
When it opens, you’ll see two internal drives in the sidebar on the left:
Macintosh HD
Macintosh HD – Data
Select each one in turn and run First Aid. This fixes any problems with your boot disks; which are the ones most likely to show signs of disk corruption.
NOTE: In the distant past, we would sometimes zap the PRAM or reset the SMC. The vast majority of the time those old stand-bys won’t help today. Recovery Mode will.
When you are done, restart your Mac and get back to work.
NOTE: This is a good utility to run every month or so and is much superior to launching into Safe Boot, which we used to do in the past.
Please rate the helpfulness of this tip.
Click on a star to rate it!
https://www.theinsidetips.com/wp-content/uploads/2019/09/Tips-Logo-700x150.jpg00Larry Jordanhttps://www.theinsidetips.com/wp-content/uploads/2019/09/Tips-Logo-700x150.jpgLarry Jordan2020-11-13 01:30:002020-11-08 10:06:20Tip #1151: Rescue Your Storage Using Recovery Mode
Audio effects process in a specific order. Make sure the Limiter/Compressor is last.
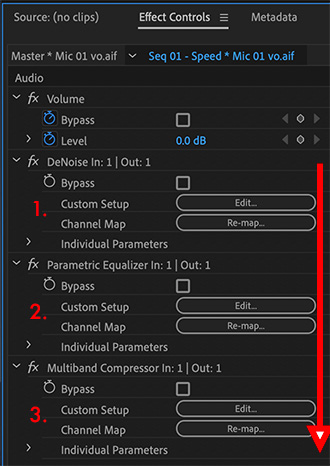
A typical stack with noise reduction (top), EQ (center), and Compression/Limiting at the bottom.
When adding effects to audio clips in Premiere (or Audition), the order in which those effects are applied makes a difference. Here’s what you need to know.
Audio effects are processed from the top of the Effect Controls panel to the bottom. (See screen shot.)
The first effect to apply – if you need it – is noise reduction. Get rid of what you don’t want before you start shaping the sounds you do. Remember, your goal is to reduce noise, not eliminate it. If you want it gone, re-record in a studio.
NOTE: Noise reduction can often degrade the spoken voice. By processing this early, you can then use effects farther down the “stack” to try to replace what noise reduction took away. This is why we reduce, not remove, noise.
Next, add any EQ or special effects you need to shape the sounds the way you want. Add any reasonable number of filters here.
Finally, at the bottom and ALWAYS last, apply either a compression or limiter filter. This makes sure that audio levels don’t exceed the level you specifiy.
I should mention that you don’t apply both a compression filter AND a limiter filter to the same track. Pick one or the other.
NOTE: For my mixes, I apply the Multiband Compressor to all dialog tracks, with the Limiter filter applied to the master track and set to -3 dB to catch any errant levels before they distort the final mix. I don’t generally use compression on either effects or music.
Please rate the helpfulness of this tip.
Click on a star to rate it!
https://www.theinsidetips.com/wp-content/uploads/2019/09/Tips-Logo-700x150.jpg00Larry Jordanhttps://www.theinsidetips.com/wp-content/uploads/2019/09/Tips-Logo-700x150.jpgLarry Jordan2020-11-10 01:30:002020-11-10 01:30:00Tip #1150: Audio Effect Order is Important
Running Amplitude Statistics means that I can guarantee that my audio meets spec.
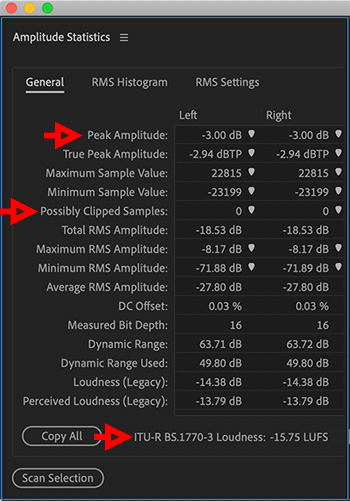
The Amplitude Statistics window, showing a recent webinar audio track.
One of the reasons I create my audio mixes in Adobe Audition, rather than Premiere or Final Cut, is that Audition has a panel that precisely measures the technical amplitude (loudness) of my finished mix to make sure it meets spec.
NOTE: Most audio is rejected due to not meeting spec. This solves that problem.
To use this:
Export your finished master file from Premiere, then open that movie (not the Premiere sequence) into Adobe Audition.
Double-click the audio clip to open it in the Waveform Editor.
Then, choose Window > Amplitude Statistics and click Scan.
After a short time, which varies depending upon the length of your project, the panel shown in the screen shot appears. Every distributor is different and some require very specific settings.
However, for media I’m posting to the web, the three things I look at are:
Peaks around -3 dB
Clipped samples = 0 (This means there is no distortion.)
LUFS around -16, ±0.5
NOTE: LUFS (also called LKFS) are a measure of the average sound level, unlike a peak. Broadcast and cable specs LUFS around -24. For the web, though, I think that’s too soft. I use -16 LUFS.
Every project I create gets analyzed this way. In fact, these numbers are from the audio file for yesterday’s webinar that I posted last night.
List View displays all kinds of media statistics – you get to pick what you want to see.
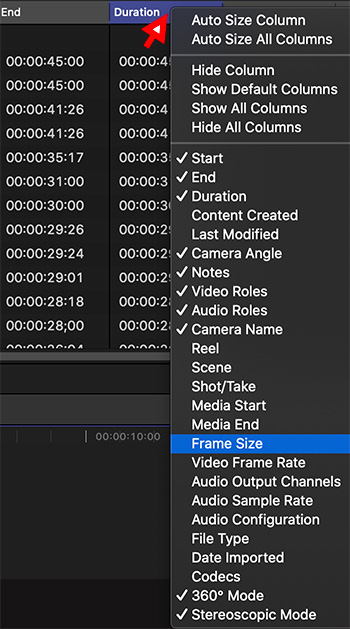
Control-click any List view column header to display new columns.
List view, in the Final Cut Pro X Browser, is the place to look for all kinds of useful statistics about your media. Here are three tricks that make using List view a lot more useful.
TRICK #1
Drag any column header – except the name column – horizontally to change the order in which they display information. (This is similar to Numbers or Excel.)
TRICK #2
Drag the vertical line separating any column header to make it wider or narrower. (Again, like Numbers and Excel.)
TRICK #3
Control-click any column header to select the columns you want to display.
NOTE: The six organizational options at the top of this list may also make your organizing faster and easier.
Please rate the helpfulness of this tip.
Click on a star to rate it!
https://www.theinsidetips.com/wp-content/uploads/2019/09/Tips-Logo-700x150.jpg00Larry Jordanhttps://www.theinsidetips.com/wp-content/uploads/2019/09/Tips-Logo-700x150.jpgLarry Jordan2020-11-09 01:30:002020-11-08 09:31:28Tip #1148: Adjust List View Columns and Layout
We may request cookies to be set on your device. We use cookies to let us know when you visit our websites, how you interact with us, to enrich your user experience, and to customize your relationship with our website.
Click on the different category headings to find out more. You can also change some of your preferences. Note that blocking some types of cookies may impact your experience on our websites and the services we are able to offer.
Essential Website Cookies
These cookies are strictly necessary to provide you with services available through our website and to use some of its features.
Because these cookies are strictly necessary to deliver the website, refuseing them will have impact how our site functions. You always can block or delete cookies by changing your browser settings and force blocking all cookies on this website. But this will always prompt you to accept/refuse cookies when revisiting our site.
We fully respect if you want to refuse cookies but to avoid asking you again and again kindly allow us to store a cookie for that. You are free to opt out any time or opt in for other cookies to get a better experience. If you refuse cookies we will remove all set cookies in our domain.
We provide you with a list of stored cookies on your computer in our domain so you can check what we stored. Due to security reasons we are not able to show or modify cookies from other domains. You can check these in your browser security settings.
Google Analytics Cookies
These cookies collect information that is used either in aggregate form to help us understand how our website is being used or how effective our marketing campaigns are, or to help us customize our website and application for you in order to enhance your experience.
If you do not want that we track your visit to our site you can disable tracking in your browser here:
Other external services
We also use different external services like Google Webfonts, Google Maps, and external Video providers. Since these providers may collect personal data like your IP address we allow you to block them here. Please be aware that this might heavily reduce the functionality and appearance of our site. Changes will take effect once you reload the page.
Google Webfont Settings:
Google Map Settings:
Google reCaptcha Settings:
Vimeo and Youtube video embeds:
Other cookies
The following cookies are also needed - You can choose if you want to allow them:
Privacy Policy
You can read about our cookies and privacy settings in detail on our Privacy Policy Page.