… for Adobe Premiere Pro CC

Tip #770: Enable Automatic Project Saving

Larry Jordan – LarryJordan.com

Save projects automatically whenever autosave creates a backup.

The Auto Save preference with automatic project saving enabled.

Topic $TipTopic

A hidden feature in Premiere is the ability to save projects whenever Auto Save creates backups. However, this feature is off by default. Here’s how to turn it on.

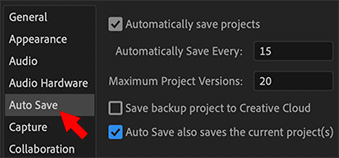
Open Preferences > Auto Save and check the bottom checkbox: “Auto Save also saves the current project(s).”

Now, when Premiere creates a backup of your current project, it will also save that project.

EXTRA CREDIT

Auto Save is designed to save every 15 minutes (or whatever time you’ve entered for “Automatically Save Every”). However, Auto Save does not run if nothing has changed in the project during that time.

Keep in mind that this should NOT substitute for you saving your work. This feature simply makes sure that, if a crash occurs, you don’t lose everything. For this reason, don’t rely exclusively on Premiere to save your work. Cmd/Cntrl + S is still your best friend.


Please rate the helpfulness of this tip.

Click on a star to rate it!

… for Apple Motion

Tip #751: 16 Simulation Behaviors & What They Do

Larry Jordan – LarryJordan.com

The easiest way to learn these is to play with them and see what they do.

The Simulation Behavior submenu in Apple Motion.

Topic $TipTopic

The following text is from the Apple Motion Help files.

There are 16 Simulation behaviors in Motion:

  • Align to Motion behavior changes the orientation of an object to match its direction along an animation path.
  • Attracted To behavior in Motion pulls an affected object toward a designated target.
  • Attractor behavior in Motion pulls objects toward the affected object.
  • Drag behavior in Motion simulates the force of friction on a moving object, slowing it down over time.
  • Drift Attracted To behavior in Motion pulls an affected object toward a designated target, then makes the object come to rest, rather than overshooting the target and bouncing around.
  • Drift Attractor behavior in Motion pulls other objects toward the affected object, then makes those objects come to rest, rather than overshooting the affected object and bouncing around.
  • Edge Collision behavior in Motion causes an object to collide with and bounce off the edges of the canvas frame.
  • Gravity behavior in Motion causes an object to fall over time.
  • Orbit Around behavior in Motion causes the affected object to circle around a designated target.
  • Random Motion behavior animates an object along a random path.
  • Repel behavior in Motion pushes objects away from the affected object.
  • Repel From behavior in Motion pushes the affected object away from a designated target.
  • Rotational Drag behavior in Motion simulates the force of friction on spinning objects.
  • Spring behavior in Motion causes the affected object to move back and forth around a designated target.
  • Vortex behavior in Motion causes objects to circle around the affected object.
  • Wind behavior in Motion “blows” an object in a specified direction.

Please rate the helpfulness of this tip.

Click on a star to rate it!

… for Adobe Premiere Pro CC

Tip #753: Basic Color Correction

Larry Jordan – LarryJordan.com

These controls provide detailed control over the grayscale values in your image.

The Basic Color Correction controls in the Lumetri Color panel.

Topic $TipTopic

Using controls in the Basic Correction section, you can correct video that’s too dark or too light, and adjust both the hue (color or chroma) and luminance (exposure and contrast) in your clip. Here’s how the Basic Color Correction controls work.

WHITE BALANCE

  • White Balance. The white balance in a video reflects the lighting conditions under which the video was shot. Adjusting the white balance can effectively improve the ambient color of your video. Adjust the white balance in your clip by changing the Temperature and Tint properties. Use the slider controls to fine-tune the values until you achieve the desired color balance.
  • Temperature. Fine-tunes the white balance using a color temperature scale. Move the slider to the left to make the video appear cooler, and to the right for warmer colors.
  • Tint. Fine-tunes the white balance to compensate for a green or magenta tint. To add green tint to the video, move the slider to the left (negative values), and to add magenta, move it to the right (positive values).

TONE

Adjust the tonal scale of the video clip using the different tone controls.

  • Exposure. Sets the brightness of the video clip. Moving the Exposure slider to the right increases tonal values and expands highlights, and moving the slider to the left decreases tonal values and expands shadows. Adjust the slider until the video looks good with the desired brightness.
  • Contrast. Increases or decreases contrast. Adjusting the contrast mainly affects the midtones of color in your video. When you increase contrast, the middle-to-dark areas become darker. Similarly, decreasing the contrast makes the middle-to-light areas lighter.
  • Highlights. Adjusts bright areas. Drag the slider to the left to darken highlights. Drag to the right to brighten highlights while minimizing clipping.
  • Shadows. Adjusts dark areas. Drag the slider to the left to darken shadows while minimizing clipping. Drag to the right to brighten shadows and recover shadow details.
  • Whites. Adjusts white clipping. Drag the slider to the left to reduce clipping in highlights. Drag to the right to increase highlight clipping.
  • Blacks. Adjusts black clipping. Drag the slider to the left to increase black clipping, making more shadows pure black. Drag to the right to reduce shadow clipping.

Please rate the helpfulness of this tip.

Click on a star to rate it!

… for Codecs & Media

Tip #756: AME: New Adobe Stock Encoding Presets

Larry Jordan – LarryJordan.com

Six new ProRes presets for Adobe Stock media.

The new Adobe Stock encoding presets for Adobe Media Encoder.

Topic $TipTopic

Adobe Media Encoder has six new Adobe Stock encoding presets in the May, 2020 update. These six presets include video-only, as well as audio and video settings for three frame sizes:

  • HD (1920 x 1080 pixels)
  • UHD (3840 x 2160 pixels)
  • 4K (4096×2160 pixels)

All three use ProRes 422 HQ, and encode into a Rec. 709 color space QuickTime movie using frame rates that match the source media.


Please rate the helpfulness of this tip.

Click on a star to rate it!

… for Codecs & Media

Tip #758: AME: New ProRes Encode Presets

Larry Jordan – LarryJordan.com

The new ProRes encoding settings in AME for QuickTime and MXF OP1a.

Topic $TipTopic

The May, 2020, update to Adobe Media Encoder now includes twelve new ProRes compression presets for both Windows and Mac versions. Presets are located in the Broadcast category and include:

  • Apple ProRes Proxy
  • Apple ProRes LT
  • Apple ProRes 422
  • Apple ProRes 422 HQ
  • Apple ProRes 4444 (with and without an alpha channel)

The only format missing is ProRes 4444 XQ, which is a high-end origination format, so it isn’t surprising that AME doesn’t include it.

NOTE: ProRes RAW can only be recorded by a camera, it isn’t a delivery format.

The settings support two wrapper formats:

  • QuickTime
  • MXF OP1a

By default, each setting matches the frame size and frame rate of the source media, though this can be modified when the preset is applied.


Please rate the helpfulness of this tip.

Click on a star to rate it!

… for Codecs & Media

Tip #759: AME: New HEVC Encoding Presets

Larry Jordan – LarryJordan.com

All HEVC presets are set at 8-bit, which is faster, but not suitable for HDR media.

The HEVC encoding presets in Adobe Media Encoder.

Topic $TipTopic

The May, 2020, update to Adobe Media Encoder now includes seven new HEVC (H.265) compression presets for both Windows and Mac versions. Presets are located in the HEVC category and include:

  • SD 4:3
  • SD 16:9
  • 720p HD
  • 1080p HD
  • 4K UHD
  • 8K UHD

There’s also an option to match the source media frame size, for example, for vertical media.

Each preset defaults to 8-bit encoding to take advantage of the speed of hardware acceleration. However, HDR clips require 10-bit encoding, which is available, but compresses at a MUCH slower rate.


Please rate the helpfulness of this tip.

Click on a star to rate it!

… for Apple Final Cut Pro X

Tip #747: Video Analysis Options

Larry Jordan – LarryJordan.com

Analysis will take time, but it also runs in the background.

Video analysis options in the Media Import window of Final Cut Pro X

Topic $TipTopic

The following text is from the Apple Final Cut Pro X Help files. The analysis options are located in the Media Import window, or the Modify menu for clips already imported into the browser.

NOTE: Analysis runs in the background and how long it takes is dependent upon the length of your media and the speed of your CPU.

Final Cut Pro provides video and still-image analysis options that can automatically balance color in video and detect people and shot angles in video or still images. You can analyze video during import, or analyze video clips in the browser after import. Based on the results of the analysis, analysis keywords are added to clips or clip ranges.

Final Cut Pro provides these video and still-image analysis options:

  • Analyze for balance color: Analyzes video clips to detect color balance and contrast. Color is automatically balanced when you add the clip to the timeline. You can turn automatic color adjustments on and off at any time.
  • Remove pulldown: Analyzes video clips and removes pulldown patterns.
    (This option is available only when importing from a tape-based camera or device; i.e. interlaced media.)
  • Find people: Analyzes video clips and still images for the number of people present and shot types. After analysis, any of the following keywords are added to the clips or clip ranges: One Person, Two Persons, Group, Close Up Shot, Medium Shot, and Wide Shot.

NOTE: To easily locate clips with “find people” analysis keywords, select the “Create Smart Collections after analysis” checkbox.

  • Consolidate find people results: Consolidates all of the “find people” analysis keywords into one shot type keyword and one people keyword for every 2-minute segment of video. The shot type keyword chosen is the one for the widest shot type, and the people keyword chosen is the one representing the most people. For example, if a video segment contains Medium Shot, Wide Shot, One Person, and Group keywords, the segment’s analysis keywords are reduced to Wide Shot and Group during consolidation.
  • Create Smart Collections after analysis: Creates a Smart Collection for each keyword applied when video clips and still images are analyzed for the presence of people. The Smart Collections are listed alphabetically in a People folder inside the event in the Libraries sidebar.

When you drag a media file from the Finder to a Final Cut Pro event or the timeline, the import begins automatically, without displaying a window of import options. You can set automatic import options in the Import pane of Final Cut Pro preferences.


Please rate the helpfulness of this tip.

Click on a star to rate it!

… for Apple Final Cut Pro X

Tip #748: Audio Analysis Options

Larry Jordan – LarryJordan.com

Audio analysis runs in the background and, generally, is very fast.

Audio analysis options in the Media Import window of Final Cut Pro X

Topic $TipTopic

The following text is from the Apple Final Cut Pro X Help files. The analysis options are located in the Media Import window, or the Modify menu for clips already imported into the browser.

NOTE: Analysis runs in the background and how long it takes is dependent upon the length of your media and the speed of your CPU.

Final Cut Pro provides automatic analysis options that can fix common audio problems, analyze and group audio channels, and remove silent channels. You can analyze audio during import, or analyze video clips with audio issues in the browser or in the timeline.

Final Cut Pro provides these audio analysis options:

  • Analyze and fix audio problems: Analyzes the audio for hum, noise, and loudness. Final Cut Pro automatically fixes problems that are considered severe (marked in red) and flags problems that are considered moderate (marked in yellow).
  • Separate mono and group stereo audio: Audio channels are analyzed and grouped as dual mono or stereo, depending on the results of the analysis. Automatically corrected audio channels are marked as Autoselected.
  • Remove silent channels: Audio channels are analyzed, and silent channels are removed. Clips that have had channels removed are marked as Autoselected.

When you drag a media file from the Finder to a Final Cut Pro event or the timeline, the import begins automatically, without displaying a window of import options. You can set automatic import options in the Import pane of Final Cut Pro preferences.


Please rate the helpfulness of this tip.

Click on a star to rate it!

… for Apple Final Cut Pro X

Tip #749: Introduction to Clip Analysis

Larry Jordan – LarryJordan.com

Finding people isn’t always reliable, but worth trying.

Areas with clip analysis keywords are indicated by a purple line in the browser.

Topic $TipTopic

The following text is from the Apple Final Cut Pro X Help files. The analysis options are located in the Media Import window, or the Modify menu for clips already imported into the browser.

You can have Final Cut Pro analyze your media (video, audio, and still images) and automatically correct common problems. For example, you can balance color and remove excess hum or loudness.

You can also analyze clips to identify their contents. Analysis can detect the number of people in a shot and identify whether the shot is a close-up, medium, or wide shot. This is helpful if you need to quickly find a certain type of clip while viewing footage or editing a project.

You can analyze media during import or after you import the media into Final Cut Pro. You can also set Final Cut Pro to automatically analyze clips you drag directly to the Final Cut Pro timeline from the Finder.

After certain types of analysis, keywords are automatically added to clips or clip ranges based on the results of the analysis. For example, a clip showing several people might have the Group and Medium Shot keywords assigned. In the browser, clips with analysis keywords have a purple line at the top. (Clips with keywords you add manually or keywords imported from Finder tags or folder names have a blue line at the top.)

EXTRA CREDIT


Please rate the helpfulness of this tip.

Click on a star to rate it!

… for Apple Motion

Tip #721: Secrets of the Spin Behavior

Larry Jordan – LarryJordan.com

The Spin behavior can spin on any axis; you just need to know where to click.

The Spin behavior rotating clock-wise around both the X and Y axes.

Topic $TipTopic

There’s a hidden feature in the Spin behavior that can add visual interest to your movement: Pseudo-3D. Here’s how it works.

When you apply the Spin behavior (Basic Motion > Spin) to an element, we are used to dragging the arrow at the top to get an object spinning.

The secret is the blue arrow at the center. This determines the axis around which the rotation (spin) takes place.

NOTE: This 3D movement works whether a group is set for 2D or 3D.

One of my favorite tricks is to spin an element on the Y-axis, which creates the illusion of spinning it back into 3D space.

EXTRA CREDIT

  • Press and hold the Shift key while dragging the top edge to constrain movement to the Y-axis.
  • Press and hold the Shift key while dragging the left edge to constrain movement to the X-axis.
  • To reset this effect, select it, then go to Inspector > Behaviors and click the Reset Parameter setting.

Please rate the helpfulness of this tip.

Click on a star to rate it!