The grid is a very useful tool for aligning elements.
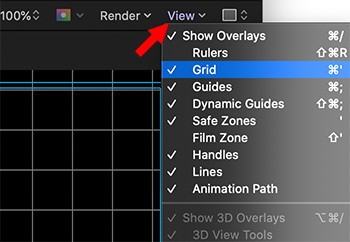
The View menu from inside Apple Motion.
Hidden in Motion is the ability to display a grid in the Viewer, which greatly simplifies aligning elements.
To reveal it, choose Grid from the View menu in the top right corner of the Canvas (Viewer).
EXTRA CREDIT
To adjust grid spacing and color, go to Preferences > Canvas.
Please rate the helpfulness of this tip.
Click on a star to rate it!
https://www.theinsidetips.com/wp-content/uploads/2019/09/Tips-Logo-700x150.jpg00Larry Jordanhttps://www.theinsidetips.com/wp-content/uploads/2019/09/Tips-Logo-700x150.jpgLarry Jordan2020-02-20 01:30:002020-02-20 01:30:00Tip #466: How to Display a Grid in Motion
Effects presets save time when you are reusing your effects.
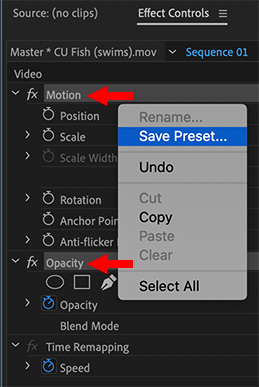
Select effects categories, then Control-click to reveal Save Preset option.
Saving effects presets can save a lot of time, if you find yourself using the same effects settings over and over. But creating them isn’t obvious. Here’s what you need to know.
First, select a clip and make the effects changes you want to save into a preset.
Next, Cmd-click the category names containing the settings you want to save. (See the screen shot.) For example, if you changed the Position setting, then Cmd-click Motion.
Control-click one of the selected Categories to display the Save Preset option.
In the Preset dialog, name and describe the preset.
Scale applies the effect to the entire length of a clip.
Anchor to in point and Anchor to out point use the duration from the beginning or end of the clip when applying the preset to future clips
Click OK to save the preset.
EXTRA CREDIT
Presets are stored in Effects > Presets.
To delete a Preset, select it in the Effects panel, then Control-click and select Delete.
Please rate the helpfulness of this tip.
Click on a star to rate it!
https://www.theinsidetips.com/wp-content/uploads/2019/09/Tips-Logo-700x150.jpg00Larry Jordanhttps://www.theinsidetips.com/wp-content/uploads/2019/09/Tips-Logo-700x150.jpgLarry Jordan2020-02-18 01:30:002020-04-05 20:55:11Tip #393: How to Create Effects Presets in Premiere
Type Control – Y to reveal the skimmer info panel.
The Skimmer in Final Cut Pro X allows us to quickly review clips in the Browser. But, did you know it has a hidden feature that’s just a keystroke away? It does.
Type Control – Y.
This displays the skimmer info panel, displaying the name of the clip and the timecode location of the skimmer. This makes controlling the skimmer much more precise.
Please rate the helpfulness of this tip.
Click on a star to rate it!
https://www.theinsidetips.com/wp-content/uploads/2019/09/Tips-Logo-700x150.jpg00Larry Jordanhttps://www.theinsidetips.com/wp-content/uploads/2019/09/Tips-Logo-700x150.jpgLarry Jordan2020-02-17 01:30:002020-02-17 01:30:00Tip #437: Secrets of the Skimmer
The Precision Editor is a great way to learn about trimming clips.
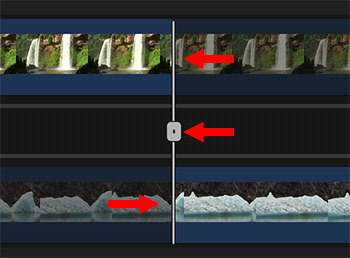
An edit point opened for trimming in the Precision Editor of Final Cut Pro X.
The Precision Editor in Final Cut Pro is an incredibly useful teaching tool in Final Cut Pro. If you haven’t played with it, you are missing a treat. Here’s what it does.
To access the Precision Editor, double-click any edit point in the timeline. The Out-going clip is displayed on top.
The darkened portions of each clip are the “handles,” extra media that we need for trimming and transitions. Trimming ends when we run out of handles.
To trim the Out, drag the top white line.
To trim the In, drag the bottom white line.
To roll trim both clips, drag the middle white line.
This is the best illustration of trimming I’ve ever seen, making it understandable even to people who are new to editing. I use it in every class.
To close the Precision Editor, press the ESC key.
EXTRA CREDIT
The reason I don’t use the Precision Editor for my own trimming is that it does not allow me to trim audio separately from video; which is a technique I use all the time.
Still, from a teaching point of view, the Precision Editor is unequaled.
Please rate the helpfulness of this tip.
Click on a star to rate it!
https://www.theinsidetips.com/wp-content/uploads/2019/09/Tips-Logo-700x150.jpg00Larry Jordanhttps://www.theinsidetips.com/wp-content/uploads/2019/09/Tips-Logo-700x150.jpgLarry Jordan2020-02-17 01:30:002020-02-17 01:30:00Tip #438: Secrets of the Precision Editor
This article is an excerpt from an Apple KnowledgeBase article.
The Path layout method lets you place text on a baseline path that you can warp to create curving or angular trails of text. After you create text on a path, you can modify or extend the path, add or remove control points, or animate text on the path.
CREATE TEXT ON A PATH
In Motion, select text in the canvas, Layers list, or Timeline.
In the Layout pane of the Text Inspector, click the Layout Method pop-up menu, then choose Path.
The Path Options controls become available, near the bottom of the Layout pane.
In the canvas toolbar, select the Text tool (shortcut: T), then click the text in the canvas.
NOTE: Step 3 is important—the Text tool must be selected to view or edit the text path.
The path appears below the text. The default path shape is a straight line (an open spline) with three control points.
NOTE: To add a control point, Control-click the path and choose Add Point.
Read the rest of the article to learn how to adjust, extend or modify the path.
Please rate the helpfulness of this tip.
Click on a star to rate it!
https://www.theinsidetips.com/wp-content/uploads/2019/09/Tips-Logo-700x150.jpg00Larry Jordanhttps://www.theinsidetips.com/wp-content/uploads/2019/09/Tips-Logo-700x150.jpgLarry Jordan2020-02-13 01:30:002020-02-13 01:30:00Tip #446: Move Text on a Path
Looking for a fast way to evenly light a green-screen background?
Move outside.
Let the sun light both your talent and background. However, to avoid screaming at your screen during editing, make SURE your green – or blue – background is as smooth as possible. Wrinkles are almost impossible to key well.
Please rate the helpfulness of this tip.
Click on a star to rate it!
https://www.theinsidetips.com/wp-content/uploads/2019/09/Tips-Logo-700x150.jpg00Larry Jordanhttps://www.theinsidetips.com/wp-content/uploads/2019/09/Tips-Logo-700x150.jpgLarry Jordan2020-02-12 01:30:002020-02-09 07:44:53Tip #340: Quick Green Screen Lighting Tip
There are two options to backup a project. Which is best?
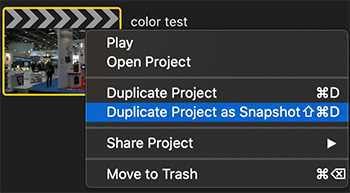
Duplicate Project is faster, Duplicate Project as Snapshot is a better choice.
One of the big benefits of Final Cut Pro X is its ability to instantly save whenever you do something. Which is fine, most of the time. But, what if you want to make a protection copy of just a single project? Now you have two options:
Duplicate Project.
Duplicate Project as Snapshot.
Which do you use? Duplicate Project as Snapshot. (To view this menu, Control-click the Project image or name in the Browser.)
These each create an identical protection copy until you are using multicam or compound clips. When you duplicate a project as a snapshot, Final Cut Pro embeds copies of compound or multicam “parent” clips in the duplicate, so any changes to other instances of those clips do not affect the duplicate.
If you work on projects that contain compound clips and multicam clips, you can use the Duplicate Project as Snapshot command to create a self-contained backup version of a project that includes referenced compound clips or multicam “parent” clips. Changes you make to other instances of the compound clips or multicam clips do not affect the versions in the duplicate, so your project is protected from accidental changes.
Please rate the helpfulness of this tip.
Click on a star to rate it!
https://www.theinsidetips.com/wp-content/uploads/2019/09/Tips-Logo-700x150.jpg00Larry Jordanhttps://www.theinsidetips.com/wp-content/uploads/2019/09/Tips-Logo-700x150.jpgLarry Jordan2020-02-10 01:30:002020-02-10 07:26:31Tip #406: What’s the Best Way to Backup a Project?
A second computer monitor is a big help when editing video.
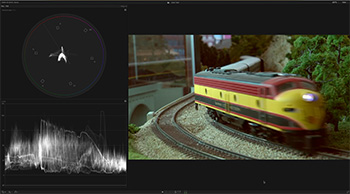
Video scopes displayed vertically on a second computer monitor running FCP X.
Tip #392 showed how to use a second computer monitor attached to your Mac when editing with Final Cut Pro X. One of the benefits of using a second monitor is that it allows us to display both a larger video image in the Viewer and much larger video scopes. Here’s how.
NOTE: Displaying Final Cut Pro X to a second monitor is always full-screen; you can’t scale the interface.
Display the Viewer on the second monitor.
Type Cmd+7 to display video scopes. (They appear on the second monitor along with the Viewer.)
Go to the View menu in the top right corner of the video scopes and change them to a vertical alignment (top row, second box).
Depending upon the size of your monitor, you can display a 4K image full screen, and still have room for the scopes.
Cool.
Please rate the helpfulness of this tip.
Click on a star to rate it!
https://www.theinsidetips.com/wp-content/uploads/2019/09/Tips-Logo-700x150.jpg00Larry Jordanhttps://www.theinsidetips.com/wp-content/uploads/2019/09/Tips-Logo-700x150.jpgLarry Jordan2020-02-10 01:30:002020-02-08 17:24:19Tip #449: Scopes on a Second Monitor
The default gradient settings in Motion are not that good. These are better.
Changing Start and End to equal, but opposite, values creates a much smoother gradient.
This tip was suggested by a comment from Mark Spencer to Tip #93.
In that original tip, I wrote that the gradients in Motion are not particularly smooth; rather, I recommended that you create smooth gradients in Photoshop, then import them into Motion. While this works, Mark pointed out that we can create much smoother gradients if we “play with the numbers.”
For instance, in this screen shot, I’ve created a gradient where the same color (lower blue bar) fades from transparent to fully opaque (top white bar).
The problem is that the default settings for a gradient create a very abrupt change.
To fix this:
Twirl down the small arrow to the left of the word “Gradient”
Change both the Start and End values to equal, but opposite, larger numbers.
For example, to create a smooth gradient that fills the frame, change Start to a positive value equal to 1/2 the horizontal width of your project and End to a negative value equal to 1/2 the width of your project. In this screen shot, I created a smooth gradient for a 1280 x 720 project. Half of 1280 is 640.
Please rate the helpfulness of this tip.
Click on a star to rate it!
https://www.theinsidetips.com/wp-content/uploads/2019/09/Tips-Logo-700x150.jpg00Larry Jordanhttps://www.theinsidetips.com/wp-content/uploads/2019/09/Tips-Logo-700x150.jpgLarry Jordan2020-02-06 01:30:002020-02-02 11:00:06Tip #434: Create Smoother Gradients in Apple Motion
The Multiband Compressor amplifies soft passages without altering the level of louder ones.
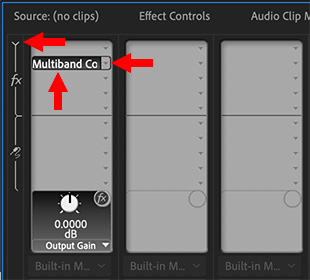
The FX panel in the Audio Track Mixer in Adobe Premiere Pro CC.
The best way to control the levels in your dialog is to use the Multiband Compressor filter. This raises the softer passages in your audio, without causing the louder passages to distort. Here’s a simple way to use it.
Make sure that all dialog audio is on as few tracks as possible and that no other audio is on those same tracks.
Open the Audio Track Mixer in Premiere. (Not the Clip Mixer.)
At the very top of the mixer, twirl down the small, right-pointing triangle to reveal the FX settings for the track(s) containing dialog.
Click one of the small right-pointing arrows in the FX settings panel and choose Amplitude and Compression > Multiband Compressor.
Double-click the words “Multiband Compressor” to reveal the interface.
Don’t be intimidated by how this looks! You only have three settings to change.
Change the Presets menu at the top to Broadcast.
Change the Margin, on the right, to -3 dB.
Uncheck the Brickwall Limiter, also on the right.
That’s it. The difference in the quality and levels of your dialog is amazing!
We may request cookies to be set on your device. We use cookies to let us know when you visit our websites, how you interact with us, to enrich your user experience, and to customize your relationship with our website.
Click on the different category headings to find out more. You can also change some of your preferences. Note that blocking some types of cookies may impact your experience on our websites and the services we are able to offer.
Essential Website Cookies
These cookies are strictly necessary to provide you with services available through our website and to use some of its features.
Because these cookies are strictly necessary to deliver the website, refuseing them will have impact how our site functions. You always can block or delete cookies by changing your browser settings and force blocking all cookies on this website. But this will always prompt you to accept/refuse cookies when revisiting our site.
We fully respect if you want to refuse cookies but to avoid asking you again and again kindly allow us to store a cookie for that. You are free to opt out any time or opt in for other cookies to get a better experience. If you refuse cookies we will remove all set cookies in our domain.
We provide you with a list of stored cookies on your computer in our domain so you can check what we stored. Due to security reasons we are not able to show or modify cookies from other domains. You can check these in your browser security settings.
Google Analytics Cookies
These cookies collect information that is used either in aggregate form to help us understand how our website is being used or how effective our marketing campaigns are, or to help us customize our website and application for you in order to enhance your experience.
If you do not want that we track your visit to our site you can disable tracking in your browser here:
Other external services
We also use different external services like Google Webfonts, Google Maps, and external Video providers. Since these providers may collect personal data like your IP address we allow you to block them here. Please be aware that this might heavily reduce the functionality and appearance of our site. Changes will take effect once you reload the page.
Google Webfont Settings:
Google Map Settings:
Google reCaptcha Settings:
Vimeo and Youtube video embeds:
Other cookies
The following cookies are also needed - You can choose if you want to allow them:
Privacy Policy
You can read about our cookies and privacy settings in detail on our Privacy Policy Page.