… for Adobe Premiere Pro CC

Tip #412: Secret Multicam Setting Tip for Premiere Pro


The order you select clips when creating a multicam clip makes a difference.

When building a multicam clip, select the largest frame size first.

Topic $TipTopic

Last week, I was talking with Adobe about multicam editing and discovered a secret configuration tip for multicam editing that I didn’t know. When you are building a multicam clip, the first clip you click on determines two important things:

  • The camera placed into the Camera 1 editing position
  • The settings for the multicam clip

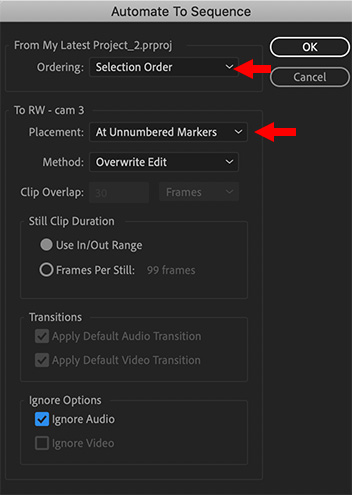
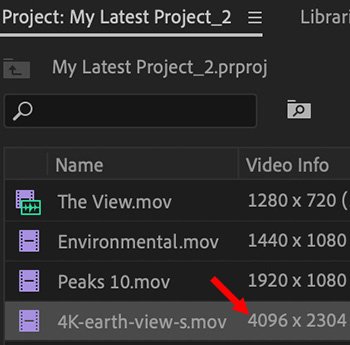
Here, I’m combining four clips into a multicam project. This is the worst of all worlds: different frame sizes and different frame rates.

NOTE: For best results and the easiest editing, all clips in a multicam sequence should have the same codec, frame size and frame rate. If you have problems editing, transcoding them into the same codec and frame rate will help.

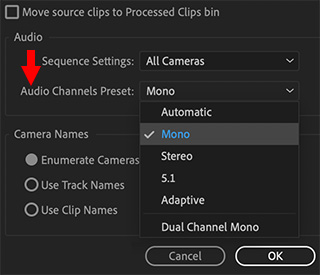
In this screen shot I selected the 4K clip first. This means that Premiere will build a multicam sequence that matches the 4K clip, while not scaling the remaining clips.

NOTE: The best way to build a multicam clip, after selecting your media, is to choose Clip > Create Multicam Source Sequence, or right-click one of the selected clips.

Very cool.


Please rate the helpfulness of this tip.

Click on a star to rate it!

… for Codecs & Media

Tip #427: Create a LUT in Photoshop

Larry Jordan – LarryJordan.com

Photoshop can create LUTs that work in Premiere, Resolve or Final Cut Pro X.

Save LUT settings in Photoshop using the CUBE format.

Topic $TipTopic

LUTs are a great way to take log or RAW images and convert them into something pleasing to look at. You can even use this technique for Rec. 709 media, which we use every day in HD projects.

Here’s a technique that creates LUTs that work in Premiere, Final Cut or Resolve.

  • In Photoshop, import a still frame from your video that you want to create a LUT for.
  • NOTE: This image needs to retain some detail in the highlights. TIFF or PNG are the best export formats to use.

  • Select the layer containing the image and choose Layer > New > Background from Layer. (This setting is important.)
  • Add at least one Adjustment layers, then adjust Levels and other settings to the adjustment layer to create the look you want.
  • NOTE: Do not adjust the image, only modify the adjustment layer.

Here’s the magic part – as long as you convert the image into a background and use adjustment layers, you can take your look and convert it into a LUT which can be opened in Premiere, Resolve, or Final Cut.

  • In Photoshop, choose File > Export > Color Lookup Tables.
  • Give the file a description that makes sense to you. Then, and this is a KEY step, select the CUBE format. This format is required by all our NLEs.
  • Click OK,give it a name and location, then save it.
  • Switch over to your NLE and import your new custom LUT and apply it to your footage.

Done. This LUT can be used across multiple projects and multiple NLEs.

EXTRA CREDIT

Here’s an article that walks you through all the steps in more detail.


Please rate the helpfulness of this tip.

Click on a star to rate it!

… for Adobe Premiere Pro CC

Tip #431: A Faster Way to Build a Premiere Sequence

Larry Jordan – LarryJordan.com

Automate to Sequence is a very fast way to create an edit.

The Automate to Sequence dialog in Adobe Premiere Pro CC.

Topic $TipTopic

This article first appeared in MotionArray. This is an excerpt.

Let’s say you are building a montage or music video where the audio determines where the edits need to be.

  • Add your audio to the timeline.
  • Play the audio and add markers (shortcut “M“) where you want to add shot changes; generally on the beat.
  • Select the clips you want to add in the order you them added to the sequence.
  • Click the Automate to Sequence button in the lower right of the Project Panel.
  • In the dialog displayed in this screen shot, make SURE to set Placement to At Unnumbered Markers.
  • Click OK and, poof!, instant sequence.

EXTRA CREDIT

Review Premiere’s Help Files to learn what the other automation settings do.


Please rate the helpfulness of this tip.

Click on a star to rate it!

… for Apple Final Cut Pro X

Tip #411: What Do the Color Wheel Controls Do?

Larry Jordan – LarryJordan.com

Color can be controlled for the entire clip or isolated to shadows, mid-tones or highlights.

The four color controls in a Final Cut Pro X color wheel.

Topic $TipTopic

Each color wheel in Final Cut Pro X has four controls. These color controls can apply either to a selected clip, a group of clips, or a mask within a clip. As well, they can apply to the entire clip or isolated to shadows, mid-tones, or highlights.

From left to right, these are:

  • Saturation. This determines the amount of color in the selected clip or mask. Drag up to increase the amount, or down to decrease.
  • NOTE: As you drag the Hue puck, the color of the Saturation slider changes to reflect the change in hue.

  • Hue. Drag this dot out of the center to apply a color shift to the image. To add red, drag up left, drag right to add blue or down left to add green. The farther from the center this dot moves, the more intense the color.
  • NOTE: Press Option while dragging this puck to reduce the amount of change while dragging.

  • Luminance. Drag this triangle up to boost luminance, down to decrease it.
  • Hooked arrow. This resets all color values to their defaults, which makes no changes to an image.

EXTRA CREDIT

It is possible to alter these settings and exceed the legal range for the color space of your project. Always use the video scopes when making corrections.


Please rate the helpfulness of this tip.

Click on a star to rate it!

… for Apple Final Cut Pro X

Tip #425: Apply LUTs in Final Cut Pro X

Larry Jordan – LarryJordan.com

LUTs convert raw sensor data into pleasing images.

The Camera LUT menu, in the Info Inspector inside Final Cut Pro X.

Topic $TipTopic

A LUT (Look-Up Table) is a data table that converts raw camera sensor data into an attractive image. While we generally don’t use them for Rec. 709 HD footage, we use them all the time for RAW, Log, and other HDR media.

The reason LUTs exist is that most sensors capture more color and gray-scale data than our monitors can display. LUTs allow us to convert and optimize an image for a particular scene or display. Final Cut Pro X supports two types of LUTS:

  • Camera LUTs. These convert from camera log format to the working color space of the current library. Camera LUTs are created by camera manufacturers and shipped with their cameras.
  • Custom LUTs. These allow us to create, import, or share custom looks for our video clips or projects. Custom LUTs are created by DPs, colorists, anyone, in fact, that wants to tweak their images using 3rd-party LUT software.

To apply a LUT:

  • Open the Info Inspector.
  • At the bottom, switch from Basic to General.
  • Scroll about 1/3 the way down to Camera LUT, then, from the menu, select the one that matches your camera or your look.

With LUTs, you either like the look or your don’t; there’s nothing to adjust.

EXTRA CREDIT

There are hundreds of 3rd-party LUTs you can add to Final Cut. Look for those in the CUBE or MGA format.


Please rate the helpfulness of this tip.

Click on a star to rate it!

… for Apple Motion

Tip #401: Define a Play Range in Motion

Larry Jordan – LarryJordan.com

Play ranges allow you to concentrate on a section of your project.

A modified play range in Apple Motion.

Topic $TipTopic

This article first appeared as an Apple KnowledgeBase article. This is an excerpt.

Ordinarily, clicking the Play button plays your project from the current position of the playhead to the last frame. However, you can change the play range of your project by modifying the In and Out points in the Timeline ruler or by using Menu commands. You might do this to focus on a specific section as you fine-tune your project or make other changes.

To customize the In or Out in Motion, do one of the following:

  • In the ruler, drag the In marker from the left edge of the timeline ruler to the frame where you want to set the new In. (Or, drag the Out marker from the right side of the timeline to a new position.) As you drag, the playhead moves with your pointer. When you release the mouse button, the playhead snaps back to its previous position.
  • In the timeline ruler, move the playhead to the frame where you want to set the In point, then choose Mark > Mark Play Range In. (Or, Mark > Mark Play Range Out.)
  • In the timeline ruler, move the playhead to the frame where you want to set the In point, then press Option-Cmd-I. (Or, press Option-Cmd-O).

EXTRA CREDIT

To reset the In and Out:

  • Choose Mark > Reset Play Range.
  • Press Option-X.

The In and Out points reset themselves to the beginning and end of the project.


Please rate the helpfulness of this tip.

Click on a star to rate it!

… for Apple Motion

Tip #410: Solo or Lock Layers in Motion

Larry Jordan – LarryJordan.com

Solo or lock elements in Motion

Topic $TipTopic

This article first appeared as an Apple KnowledgeBase article. This is an excerpt.

To solo an object:

You can “solo” a layer or group to hide all other layers and groups in the project. This technique can be useful to isolate a single layer or group in the canvas to animate or manipulate it without interfering with other objects in your composition.

  • In the Layers list in Motion, select layers or groups to solo.
  • Choose Object > Solo (or press Control-S).

NOTE: You can also Control-click an object in the Layers list, then choose Solo from the shortcut menu.

All other layers or groups are deactivated, and only the soloed object is visible in the canvas. When the selected item is soloed, the solo menu item displays a checkmark.

EXTRA CREDIT

Locked objects cannot be modified or moved, and their parameters cannot be altered or animated. However, animation and behaviors previously applied to a layer or group still play. Locking a group also locks all layers and groups nested in it.

To lock an object, or group, click the Lock icon on the right side of the element you want to lock.


Please rate the helpfulness of this tip.

Click on a star to rate it!

… for Visual Effects

Tip #413: Mask Multiple Clips with an Adjustment Layer

Larry Jordan – LarryJordan.com

Adjustment layer masks can apply to one or more clips.

Masking applied to an adjustment layer in Final Cut Pro X.

Topic $TipTopic

Both Adobe Premiere Pro and Apple Final Cut Pro X support adjustment layers; though you’ll need to create one first for Final Cut. This is a technique you can use in both.

NOTE: This tutorial explains how to create an adjustment layer for FCP X.

If you want to mask a single clip, Draw Mask in FCP X, or the masking tools in the Effect Controls panel (Premiere) work great. But, what if you want to mask multiple clips?

Well, you could create a mask in one clip, then copy and paste it to multiple clips. That works, until you need to make a change. Adjusting multiple clips is a pain in the neck.

Here’s the better way: Use an adjustment layer.

In Premiere:

  • Open the sequence you want to mask.
  • Choose File > New > Adjustment layer and match the settings in your sequence.
  • Add the adjustment layer to the top of your timeline, then select it.
  • Use the masking tools in the Effect Controls panel to create the shape and effect you want.

In FCP X:

  • After you create an adjustment layer, you’ll find it in the Titles browser. Drag it so it is on top of all other clips in the timeline.
  • Apply Effects > Masks > Draw Mask to the adjustment layer.
  • Create the shape and effect you want.

In both software, once the mask is applied to the adjustment layer, all clips under it will be masked. If you need to make changes, you only need to change the adjustment layer.

This is a huge timesaver.


Please rate the helpfulness of this tip.

Click on a star to rate it!

… for Visual Effects

Tip #418: What is an Anchor Point?

Larry Jordan – LarryJordan.com

The anchor point determines rotation and scaling.

A repositioned anchor point in Adobe Premiere Pro CC.

Topic $TipTopic

When it comes to altering the position of an image, both Premiere and Final Cut allow us to adjust the “anchor point.” But what does it do?

The anchor point is that spot around which an image rotates or scales.

By default, it is in the center of the frame, allowing us to rotate or scale from the center. However, you can achieve some interesting effects by moving it.

In Premiere:

  • Select the clip you want to adjust. (Anchor points are adjusted on a clip-by-clip basis.)
  • Click the word Motion in Effect Controls, then drag the plus sign in a circle in the Program Monitor to where you want to reposition the anchor point. (See the screen shot.)

In Final Cut Pro X:

  • Select the clip you want to adjust. (Like Premiere, anchor points are adjusted on a clip-by-clip basis.)
  • While you can’t adjust the anchor point by dragging, you can change its position in the Video inspector > Transform > Anchor.

Finally, adjust rotation or scale and watch what happens.


Please rate the helpfulness of this tip.

Click on a star to rate it!

… for Adobe Premiere Pro CC

Tip #409: Select Audio Options for a Multicam Clip in Premiere

Larry Jordan – LarryJordan.com

Choosing the right audio options can simplify your audio mix.

The default setting is not ideal. Set multicam audio options to match this.

Topic $TipTopic

After you’ve selected the clips you want to build into a multicam clip, then chosen Clip > Create Multicam Source Sequence, this dialog shows up.

If all your audio is stored in one camera clip, choose Sequence Setting > Camera 1. Otherwise, choose Sequence Settings > All Cameras.

Next, here the options in Audio Channels Preset:

  • Automatic. Automatic reads the channelization of the first clip and maps all source audio based on that channelization. No mix down is done and no source audio is ever lost. Extreme example: if you have 3 source clips and the first one is stereo and the second one is 10 channel multi-mono and the third one is 5.1 (not very common but just an extreme example) you have a total of 18 source channels and the resulting clip will edit to into the multicam clip as 9 separate stereo clips. This is a great example of why automatic is not a great choice unless all of your sources are all stereo (and you want them mapped as stereo) or all mono (and you want them all mapped as mono).
  • Mono. This takes all source channels regardless of their native channelization and brings them in as mono when the multicam clip is edited into your sequence.
  • Stereo. This takes all source channels regardless of their native channelization and brings them in as stereo when the multicam clip is edited into your sequence.
  • 5.1. This creates a surround clip of the source audio. Surround is a great distribution format, but a miserable format for editing. Avoid using this.
  • Adaptive. This maps all source channels into single track item. This allows you to hear everything but is really tough to edit.

In almost all cases, Mono is the best choice for multi-track audio editing.


Please rate the helpfulness of this tip.

Click on a star to rate it!