… for Adobe Premiere Pro CC

Tip #562: The Timeline’s Magic Wrench

Larry Jordan – LarryJordan.com

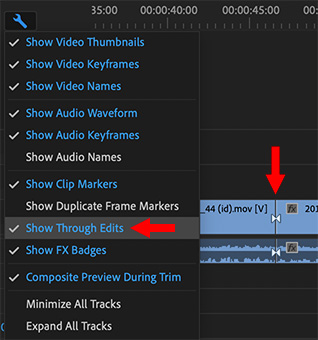
There’s a lot of configuration options in this one menu.

The Wrench configuration menu for Premiere’s Timeline. Blue indicates enabled features.

Topic $TipTopic

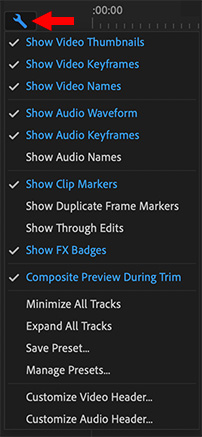
In the top-left corner of the Timeline is a wrench icon. This contains a wide variety of configuration settings to enable the timeline to look the way you want for your style of editing.

As the screen shot illustrates, features in blue are enabled, those in white are not. To toggle a feature on or off, click it.

  • Show Duplicate Frame Markers displays a blue bar at the bottom of a clip who’s frames duplicate the same clip used elsewhere in the same sequence. (This is a holdover from the days of film, when there was only one original film negative.)
  • Show Audio Names displays the file name in an audio clip. This is useful when editing dual-system sound where the audio file has a different name from the video file.
  • Show Through Edits is covered in Tip #563.
  • Minimize/Expand All Tracks is a fast way to adjust the height of all tracks in the timeline.
  • Save/Manage Presets saves these configuration settings, then switch between them as needed.
  • Customize Audio/Video Header customizes the icons displayed in the Track Header.

These provide lots of interesting customization options that you can adjust at any time.


Please rate the helpfulness of this tip.

Click on a star to rate it!

… for Adobe Premiere Pro CC

Tip #563: What’s a Through Edit?

Larry Jordan – LarryJordan.com

A Through Edit is a cut in the middle of clip with no changes on either side.

Use the timeline wrench to enable Through Edits, visible on the right.

Topic $TipTopic

There’s a hidden feature in Adobe Premiere that highlights unnecessary edits. But, it’s turned off by default. Here’s how to turn it on.

A Through Edit is a cut in a clip where there is no change on either side of the clip. Most of the time, they exist by mistake.

Still, it is good practice to get ride of them, if, for no other reason, than to avoid confusion over what’s a “real” edit and what’s a mistake.

To see them, click the Wrench icon at the top left of the timeline and enable Show Through Edits.

All Through Edits in the timeline now display a pair of white triangles, as shown under the red arrow in the screen shot.

To remove a Through Edit and rejoin the two sides of the clip, right-click the Through Edit and choose Join Through Edits.


Please rate the helpfulness of this tip.

Click on a star to rate it!

… for Apple Final Cut Pro X

Tip #529: Add Keyframes with the Range Tool

Larry Jordan – LarryJordan.com
This tip originally appeared as an Apple KnowledgeBase article. This is an excerpt.

With Final Cut Pro, you can use keyframes to create simple changes to audio over time, such as fading the volume or an effect in or out in the middle of a clip.

NOTE: A “keyframe” indicates where a parameter, such as volume, changes. The minimum number of keyframes for any effect are two, which mark the start and end of the change.

You can also place keyframes at specific points in a clip to change the parameter value of an audio enhancement or effect at those points. For example, you can keyframe specific points for an effect such as reverb or distortion.

USE THE RANGE TOOL

When making volume adjustments to a clip in the timeline, you can use the Range Selection tool to add keyframes automatically across a selected range.

  • Click the Tools pop-up menu above the timeline and choose Range Selection (or press R).
  • Drag across the area where you want to adjust the volume or effect.
  • Adjust the volume or effect within the range by dragging the effect’s horizontal control up or down.

Keyframes are automatically created within the range.

EXTRA CREDIT

Tip #553 illustrates how to add keyframes to audio effects using the hidden Audio Animation bar.


Please rate the helpfulness of this tip.

Click on a star to rate it!

… for Apple Final Cut Pro X

Tip #553: Add Audio Effect Keyframes in FCP X

Larry Jordan – LarryJordan.com
This tip originally appeared as an Apple KnowledgeBase article. This is an excerpt.

Tip #529 illustrated how to use the Range tool to quickly add volume keyframes to a clip. However, we can also use the Audio Animation editor to add keyframes for audio effects, such as reverb or distortion. Here’s how.

  • Apply an audio effect to a clip in the Timeline. (In this example, we’ll use Distortion > Telephone.)
  • Select the clip in the timeline, then choose Clip > Show Audio Animation (or press Control-A).
  • Select the effect in the Audio Inspector, then click the disclosure button (right red arrow) to expand that effect in the Audio Animation editor.
  • Use the Range tool to select the value you want to modify.
  • Drag the control line up or down to set keyframes.

EXTRA CREDIT

  • Drag keyframes left or right to reposition.
  • Drag keyframes up or down to modify the setting.
  • You can set keyframes manually in the Audio Animation bar by Option-clicking the line you want to modify.
  • Control-click a keyframe to delete it.

Please rate the helpfulness of this tip.

Click on a star to rate it!

… for Random Weirdness

Tip #528: A Look at YouTube’s NLE

Larry Jordan – LarryJordan.com

The YouTube logo.

Topic $TipTopic

This article, written by Jourdan Aldredge, first appeared in PremiumBeat.com. This is an excerpt.

In the short but storied history of digital video editing platforms, we’ve seen just a few familiar names reign king — Apple Final Cut Pro, Adobe Premiere Pro, and more recently, DaVinci Resolve. However, while the big giants may still dominate the marketplace, it hasn’t stopped many other third parties and platforms from launching editing applications of their own.

Some are doing it to capture the market. While others — like YouTube — are simply trying to provide a more full, robust service to their current offerings. If you’ve uploaded a video to YouTube in the past year or so, you may have noticed that the social video-sharing platform is working hard to add tons of different functionality, controls, and analytics as its creator space continues to grow.

To get started, all you need to do is upload a video — or choose one you’ve already uploaded — and find the “Editor” tab in the studio.

Overall, at this stage the YouTube Video Editor is best for first time vloggers, or those needing to quickly edit tons of videos or long-form streams. However, I wouldn’t rule out YouTube simply using this as a first step, as they may build out the app much more in the future.

EXTRA CREDIT

Read Jourdan’s detailed review by clicking the link at the top of this article.


Please rate the helpfulness of this tip.

Click on a star to rate it!

… for Apple Motion

Tip #536: Add an Audio Fade in Apple Motion

Larry Jordan – LarryJordan.com

Keep all your audio work very, very simple in Motion.

Select the audio clip in the Audio panel, then apply and adjust effects.

Topic $TipTopic

Apple Motion really doesn’t like audio. A good operating rule is: Only import final mixes into Motion. Don’t try to do a mix in Motion itself; it will drive you nuts.

However, sometimes you still need to add a fade. Here’s how.

  • Import the audio clip you need.
  • Select Layers > Audio to display the clip. (It’s actually called the Project Panel, but no one remembers that.)
  • Select the clip in the Audio panel.
  • Apply Behaviors > Audio > Fade In/Fade Out.
  • Display the HUD and adjust the open and closing fade durations.
  • Just as with any other effect, adjust the timing using the Mini-Timeline.

EXTRA CREDIT

If you hear an audio pop at the end, trim the audio clip to end one frame before the fade ends. That pop should not be there, but Apple has never gotten around to fixing it.


Please rate the helpfulness of this tip.

Click on a star to rate it!

… for Adobe Premiere Pro CC

Tip #523: What is Multicam Flattening in Premiere Pro?

Larry Jordan – LarryJordan.com

Flattening is the last step in editing a multicam sequence.

Screen shots from Activity Monitor.
Storage bandwidth during a multicam edit (top) and after flattening (bottom).

Topic $TipTopic

Flattening disconnects unused multicam clips from the timeline. The big benefit is that it decreases the load on your storage system during playback. Here’s what you need to know.

When you are editing a multicam sequence, all the clips in your sequence are playing at once. Depending upon the codec, frame size, frame rate and bit depth you are using, this can require massive speed from your storage.

For example, in this screen shot, the top image show a multicam clip playing at 73 MB/sec. While not huge – or even large by 4K standards – this number indicates how hard your storage is working to supply all those streams in real time. (You can see this for yourself in Utilities > Activity Monitor > Disk.)

When you flatten a multicam clip, you disconnect, permanently, all the angles that you are not using in the final edit. This means that rather than playing all the clips at once, Premiere is only playing the one clip you have on screen at that instant.

As you can see in the bottom screen shot, this cuts total media bandwidth a lot!

While every multicam clip is different, the savings in unnecessary wear-and-tear on your system, combined with faster overall performance, means that when you are happy with your multicam edit flatten it.

To do so, select the multicam clip, then choose Clip > Multicamera > Flatten.


Please rate the helpfulness of this tip.

Click on a star to rate it!

… for Apple Motion

Tip #515: Using the Active Camera Menu

Larry Jordan – LarryJordan.com

Controlling a camera in 3D space is tricky. The Active Camera menu helps you manage.

The Active Camera menu in Apple Motion 5.x.

Topic $TipTopic

As you move into 3D space in Motion, the Active Camera menu becomes an essential navigation tool. The Camera pop-up menu is divided into three sections: Top, Middle, and Bottom.

The top section lets you select the active scene camera as well as any other scene cameras you’ve added to your project. A Motion project can have more than one camera.

  • Active Camera/Camera: When you choose Active Camera from the pop-up menu, the topmost camera in the Layers list at the current playhead position (in the Timeline) becomes the active camera. The active camera is the camera through which you view your project in the canvas. It’s also the camera view that’s rendered when you export your project. If a project contains only one scene camera (as shown above), two items appear at the top of this pop-up menu: Active Camera and Camera, which represent the same camera.
  • If a project contains more than one scene camera (as shown below), all scene cameras appear at the top of the Camera pop-up menu, under the Active Camera item. To make a different scene camera the active camera, choose a different camera from the top section of the pop-up menu. (Scene cameras listed in this section of the Camera pop-up menu appear in the same order as they do in the Layers list.)

The middle section of the Camera pop-up menu lets you choose a reference camera to help you see your composition from various angles. Choose any of the following to activate a reference camera view:

  • Perspective: Like a real-world camera, views the scene with perspective distortion. For example, layers farther away from the camera appear smaller than layers closer to the camera. The perspective view defaults to a view from the front center.
  • Front: This orthogonal camera looks straight down the Z axis and shows a perpendicular view from the front of the scene.
  • Back: This orthogonal camera looks straight down the Z axis and shows a perpendicular view from the back of the scene.
  • Left: This orthogonal camera looks straight down the X axis and shows a perpendicular view from the left of the scene.
  • Right: This orthogonal camera looks straight down the X axis and shows a perpendicular view from the right of the scene.
  • Top: This orthogonal camera looks straight down the Y axis and shows a perpendicular view from the top of the scene.
  • Bottom: This orthogonal camera looks straight down the Y axis and shows a perpendicular view from the bottom of the scene.
  • Note: The orthogonal camera views (Front, Back, Left, Right, Top, and Bottom) ignore perspective.

NOTE: The reference camera views cannot be exported. However, you can still animate a scene camera when a reference camera view is selected.

Because objects (except 3D text) are 2D (flat), they may not be visible in the canvas when you choose an orthogonal camera view (Front, Back, Left, Right, Top, and Bottom). This is because orthogonal views are at right angles (perpendicular) to 2D elements in your project. When you select an object that’s invisible to an orthogonal reference camera, a thin white line represents the object in the canvas.

The bottom section of the Camera pop-up menu allows access to five frequently used commands:

  • Reset View: Resets the camera view to its default orientation. (Control-R)
  • Select Active Camera: Selects the active camera in the project—the topmost camera in the Layers list that is visible at the current frame (when there are multiple cameras existing at the same frame in time). (Control-Option-C)
  • Fit Objects Into View: Reframes the current camera to fit the selected objects into the canvas. (F)
  • Frame Object: Frames the selected objects in the active view. If no objects are selected, Frame Object resets the reference camera to view all objects in the scene. (Shift-Command-F)
  • Focus On Object: Used when a camera has depth of field turned on. Adjusts the camera’s Focus Offset to the selected object. (Control-F)

After you choose a camera view (scene camera or reference camera), use the 3D view tools to pan, orbit, or dolly the camera.

EXTRA CREDIT

To avoid getting lost, I generally just use the Active Camera and Top perspective.

The Motion help files have much more on working with cameras in 3D space.


Please rate the helpfulness of this tip.

Click on a star to rate it!

… for Adobe Premiere Pro CC

Tip #463: Nests Help Organize Timelines

Larry Jordan – LarryJordan.com

Nests treat a group of clips as if they were a single clip.

Topic $TipTopic

Nesting combines multiple elements, like clips, into one “thing,” called a nest. It’s easier to perform a task on a single nest than repeat the same task on multiple clips. Nests are not only more organized, they are also more efficient. This is the basic theory of nesting in Premiere Pro.

Nesting creates a new sequence that’s stored in the original sequence. Nested sequences can live inside other sequences, and can also contain other nested sequences inside them (a nest within a nest within a nest, etc.).

When a nested sequence is created, it will have the same specifications (resolution, frame rate, etc.) as the current sequence. It will begin at the first frame of the first selected clip in the timeline and end on the last one. It won’t be linked to the parent sequence, and the timecode won’t correlate like a sub-sequence.

NOTE: Nesting high-resolution media (larger than your sequence resolution) will rasterize your footage. Scaling up the nested sequence will pixelate the image. Consider this before nesting your clips.

To create a nest:

  • Select the clips in the timeline you want to nest
  • Right-click any selected clip and choose Nest
  • Name the new sequence and click OK

The new nest appears in the timeline at the position of the selected clips.

To open a nest, double-click it. It opens as an additional sequence in the timeline.

Trim, reposition and apply effects to a nest the same as a clip. All the clips inside the nest will act as though the effect was applied to each of them.

Here’s a link to learn more.


Please rate the helpfulness of this tip.

Click on a star to rate it!

… for Apple Final Cut Pro X

Tip #491: What is Broadcast Safe?

Larry Jordan – LarryJordan.com

The Broadcast Safe effect clamps levels to keep them legal.

The left side shows the source image. The right side shows the results of applying Broadcast Safe.

Topic $TipTopic

“Broadcast Safe” refers to luma and chroma levels that are within long-established bounds required for broadcast, cable and digital cinema. The problem is that most digital cameras – both still and video – record levels in excess of these amounts.

Many of us create and post video for the web, which can easily handle any images recorded by a digital camera today. Web video does not require Broadcast Safe.

However, older distribution formats are limited in what they can transmit or distribute. For example, in this screen shot, the white levels in the left image exceed 100%, which is an illegal value for broadcast. As well, the black levels are below 0%, which is also an illegal level.

We have two options to correct this:

  • Color Board/Color Wheel settings
  • Broadcast Safe effect

Adjusting levels using the Color Inspector allows us to retain highlight and shadow detail. But, these filters also require us to adjust every clip to be sure it is safe for broadcast.

A faster way to work is to apply the Color > Broadcast Safe effect. This “clamps” white levels exactly at 100% and black levels exactly at 0%. The Broadcast Safe effect is very fast, but the limitation is that we lose all highlight/shadow detail in the clamped areas.

For some shots, such as at night with a distance street light, this is not a problem. For other shots, say the bride’s dress in the sunlight, clamping will lose all details in the highlights, which will turn the bride’s dress into mush.

There’s no perfect answer. When you care about texture in the clamped areas, use the Color Inspector. When you don’t care about the texture, use Broadcast Safe.

EXTRA CREDIT

For Rec. 709 footage, the default settings should be fine.


Please rate the helpfulness of this tip.

Click on a star to rate it!