… for Apple Motion

Tip #386: Filters that Blur Alpha Channels

Larry Jordan – LarryJordan.com

Blurring the alpha channel blurs a foreground image.

Image courtesy of Apple, Inc.

Topic $TipTopic

This is an excerpt from the Apple Motion user guide.

Blurring the alpha channel allows you to blur a foreground object into a background element. In fact, there are filters you can use to manipulate or even replace a layer’s alpha channel.

The process of improving a keying effect or of customizing an alpha channel created using shape or image masks may require the use of special filters. Although you can apply any filter to a shape or image mask to modify that mask’s effect, the filters described in this section modify a layer’s entire alpha channel, including the sum of all masks and other filters applied to that layer.

For example, if you’ve applied a keying filter, you can use the following filters to modify the resulting alpha channel even though no mask appears for that layer in the Layers list or Timeline:

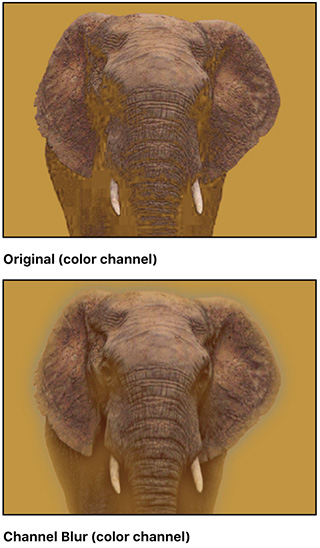
  • Channel Blur: This filter, found in the Blur category of the Filters library, lets you selectively blur the alpha channel. You can set the amount of horizontal and vertical blur independently.
  • Matte Magic: This filter, found in the Keying subcategory of the Filters library, lets you manipulate various qualities of an alpha channel, shrinking, feathering, and eroding the alpha channel to fine-tune it.

Please rate the helpfulness of this tip.

Click on a star to rate it!

… for Apple Motion

Tip #388: Garbage Masks in Motion

Larry Jordan – LarryJordan.com

Virtually all keys benefit from a garbage mask.

This is Drew in a really, really bad key.

Topic $TipTopic

This is an excerpt from the Apple Motion User Guide. Garbage masks are really useful because they help you, ah, get rid of the garbage. Here’s how it works

After you apply a key, you may need to crop unwanted background elements that can’t be keyed, such as the edge of a blue screen stage, lighting rigs, or tape that appears in the background. Using the Mask tool, you can create a garbage mask that removes unwanted elements.

NOTE: The Mask tool is not a filter, its a tool; located in the Toolbar at the bottom of the Motion interface.

There are five masking tools in Motion:

  • Rectangle Mask
  • Circle Mask
  • Freehand Mask
  • Beziér Mask
  • B-spline Mask

Create a Garbage Mask

In Motion, select the keyed layer and use a mask tool to draw a mask around the foreground subject.

NOTE: If the subject is moving, the garbage mask must be animated using keyframes.

By default, the Mask Blend Mode is set to Add, which crops everything outside the mask, while leaving the transparent areas in the mask alone. To crop out areas within masks, choose Subtract from the Mask Blend Mode pop-up menu.


Please rate the helpfulness of this tip.

Click on a star to rate it!

… for Adobe Premiere Pro CC

Tip #289: Create a Hold Frame

Larry Jordan – LarryJordan.com

Hold frames are a great way to pause the action.

The red arrow indicates the start of a Hold frame in Premiere.

Topic $TipTopic

Hold frames are still images created in a clip in Premiere’s timeline that allow you to pause the action. There are two versions of a Hold frame – here’s how to create both.

  • In the Premiere timeline, put your playhead on the frame you want to freeze.
  • Control-click the clip and choose one of two options:
  • Add Frame Hold. This freezes the frame under the playhead until the end of the clip. Perfect for a dramatic freeze and a slow fade to black.
  • Insert Frame Hold Segment. Inserts a two-second freeze frame at the position of the playhead, then the action resumes.

In both cases, you can trim the end of the Hold frame to whatever duration you need. I use these a lot!


Please rate the helpfulness of this tip.

Click on a star to rate it!

… for Adobe Premiere Pro CC

Tip #290: Dynamic Trim: Trim Clips in Real-Time

Larry Jordan – LarryJordan.com

This is a very fast way to trim edits in realtime.

The Dynamic Trim window in Adobe Premiere Pro CC.
The blue bars indicate which edit point is selected. Drag to trim – or use J-K-L keys.

Topic $TipTopic

Hidden in the Premiere interface is the Dynamic Trim window, which provides the ability to trim an edit point in realtime. This is a great way to trim an action scene when you need to see it in realtime to figure out the best places to change shots.

  • Double-click any edit point to open the window. The out-going clip is on the left, the in-coming clip is on the right.
  • Click an image to select a clip. (Notice the blue bars bracketing the left window? This means the out-going clip is selected.)
  • Drag inside an image to trim the Out (left) or In (right.). Or, click the vertical border between the two images to trim both; again, by dragging the mouse.

NOTE: You can also use the buttons at the bottom of the window to trim in 1 or 5 frame increments.

  • But! The real magic comes when you use the J and L keys. J to play backward, L to play forward. Whenever you press K, the selected edit point is trimmed in realtime.

If you are editing on action, this can make your trims a whole lot faster while enabling you to trim while watching the scene in realtime.


Please rate the helpfulness of this tip.

Click on a star to rate it!

… for Codecs & Media

Tip #397: What Do Compressor Frame Sizes Mean

Larry Jordan – LarryJordan.com

Don’t scale images larger than 100%

The Frame Size selector in Apple Compressor.

Topic $TipTopic

The Frame Size setting in Apple Compressor determines precisely how your images are scaled during compression. Here’s what the settings mean.

Automatic. This outputs a compressed file at the same frame size as the source file.

Category: Up to…

This creates a compressed frame size that is the same size as the source file UNLESS the source file is larger than the “Up to” amount.

For example, if Up to was set to 1280 x 720, a 480 x 270 clip would be scaled to 480 x 270, while a 1920 x 1080 clip would be scaled to 1280 x 720.

Category: Manual

This scales a compressed frame size to exactly this frame size, regardless of the frame size of the source file.

For example, if Manual was set to 1280 x 720, a 480 x 270 clip would be scaled to 1280 x 720, while a 1920 x 1080 clip would also be scaled to 1280 x 720.

Category: Constrained

This allows scaling a compressed file to any frame size, provided it remains within the defined aspect ratio.

For example, choosing Custom 16:9, would allow scaling any 16:9 master to any frame size, as long as it retains the 16:9 aspect ratio; say 960 x 540.


Please rate the helpfulness of this tip.

Click on a star to rate it!

… for Codecs & Media

Tip #398: Use Watch Folders in AME for Automation

Larry Jordan – LarryJordan.com

Watch Folders automate media compression.

A sample Watch Folder in Adobe Media Encoder, with settings applied.

Topic $TipTopic

If you are creating lots of movies that always get the same compression settings or want to automatically compress and transfer files to social media – using Watch Folders in Adobe Media Encoder can make your life a lot easier.

A Watch Folder is a specific location on your computer – either on an internal, external or network drive – into which you drop files to be compressed.

As long as Adobe Media Encoder is running – and this won’t work if it isn’t – once a file is copied into a Watch Folder location you specify, AME will compress it based on the settings applied to that folder.

For example, in this screen shot, within a few seconds after a file is copied into a folder named: “Compress for YouTube,” AME will compress it using the “YouTube 1080p Full HD” preset compression settings.

When compression is complete, the master file will be moved to the Source folder inside this Watch folder, while the compressed file is moved to the Output folder.

Automatically

EXTRA CREDIT

You can apply multiple settings to the same Watch Folder, for example to create and transfer files to YouTube, Facebook and Vimeo. Each of these settings will automatically transfer the compressed file up to your account on each service.

I used Watch Folders a lot when the Digital Production Buzz covered NAB. We were regularly dropping 5-8 files an hour into this folder, then posting them as soon as they showed up in the Output folder. This saved us precious minutes for each show compared to compressing each file manually.


Please rate the helpfulness of this tip.

Click on a star to rate it!

… for Apple Final Cut Pro X

Tip #342: Uses for Emoji in Final Cut Pro X

Larry Jordan – LarryJordan.com

Emojis give an entirely different look to info-graphics and titles.

A portion of the emoji panel in Apple Final Cut Pro X.

Topic $TipTopic

It started with macOS Sierra, but for those who, like me, didn’t get the memo, we can now add emojis to titles in Final Cut Pro X. It couldn’t be easier – here’s how.

  • Place your cursor in a text clip where you want an emoji to appear.
  • Type Control + Cmd + Spacebar.
  • Double-click any emoji icon to add it to your title at the position of the cursor.

Very cool – and very easy.


Please rate the helpfulness of this tip.

Click on a star to rate it!

… for Apple Final Cut Pro X

Tip #379: Change Gradient Colors

Larry Jordan – LarryJordan.com

Fonts don’t need to be white. You have LOTS of options.

The gradient color picker for text in Apple Final Cut Pro X.

Topic $TipTopic

This Tip is an excerpt from a longer Apple KnowledgeBase discussion of gradients.

Normally, text in a title or generator has only one color – and the default is white. However, you can replace the solid color with a gradient, then change the colors of the gradient. We have LOTS of options. Here’s how.

  • Select the text clip.
  • Select the text you want to modify in either the Inspector or the Viewer.
  • In the Text Inspector, scroll down and show Face.
  • Change Fill with to Gradient.
  • Twirl down the arrow next to Gradient to reveal the gradient color picker.
  • The top white bar represents opacity over time. Generally, leave that alone.
  • Click one of the color squares at the bottom to select it.
  • Either click the color chip, or the arrow next to the color chip, to display a color picker (there are two different options, depending upon where you click).
  • To add another color to the gradient, click once in the thin horizontal color bar.
  • Drag a color square to change the gradient.

Once you start playing, you’ll discover all kinds of things you can do with this gradient color tool.


Please rate the helpfulness of this tip.

Click on a star to rate it!

… for Apple Motion

Tip #341: Uses for Emoji in Motion

Larry Jordan – LarryJordan.com

Emojis add interest to any title and greater clarity to labels.

The emoji panel in Apple Motion.

Topic $TipTopic

You may have missed the memo, I certainly did, but we can now add emojis in any field that accepts text; including layer labels! Here’s how.

  • In Motion, open any object that allows you to type text. For example, titles, layer labels, even some parameter names.
  • Type Control + Cmd + Spacebar. This displays the emoji panel.
  • Double-click any emoji icon to add it to the text field.

Now that I’ve discovered how this works, I’m adding emojis everywhere!


Please rate the helpfulness of this tip.

Click on a star to rate it!

… for Adobe Premiere Pro CC

Tip #287: What Do These Blue Boxes Do?

Larry Jordan – LarryJordan.com

Blue buttons simplify complex audio and video routing tasks.

The track header section of the Premiere timeline.

Topic $TipTopic

The Track Header on the left side of the Premiere timeline has two columns of blue buttons. Here’s what they do.

It is important to remember that there is no relationship between the two sets of buttons.

The blue buttons on the left side act as a “patch panel.” They determine which tracks from a clip in the Source Monitor or Project panel edit to specific tracks in the Timeline. For example, to edit audio only, turn OFF all blue buttons attached to video tracks.

The blue buttons on the right side determine which Timeline tracks are active. This affects copy/paste operations as well as selecting and cutting tracks.

  • To turn off a blue button click it.
  • To turn off, or on, all audio or all video buttons, Shift-click one of them.
  • To change the position of a button, drag it.

Please rate the helpfulness of this tip.

Click on a star to rate it!