Tracking is easy, selecting the shape is the really hard part.
The Area Brush in action, selecting multiple portions of a moving image.
New to Mocha Pro 2020 is the Area Brush with Quick Mask. Area Brush is designed to speed up and simplify Mocha shape creation for planar tracking and masking projects with simple paint strokes.
The power of the Area Brush is the ability to quickly create multiple add or subtract shapes on the same Mocha layer for advanced tracking. Here are some tips to use it effectively.
Select the Area Brush and paint on-screen If you have a Wacom tablet, the brush will scale based on pressure sensitivity.
Click on the Quick Mask button OR any other tool to convert your paint to spline and begin tracking.
Keystroke/Shortcuts
[ – scale brush radius down
] – scale brush radius up
Subtract from the mask in Quick Mask Mode:
Alt + paint (Windows)
Option + paint (macOS)
Please rate the helpfulness of this tip.
Click on a star to rate it!
https://www.theinsidetips.com/wp-content/uploads/2019/09/Tips-Logo-700x150.jpg00Larry Jordanhttps://www.theinsidetips.com/wp-content/uploads/2019/09/Tips-Logo-700x150.jpgLarry Jordan2019-12-18 01:30:002019-12-18 01:30:00Tip #181: The New Area Brush in Mocha Pro 2020
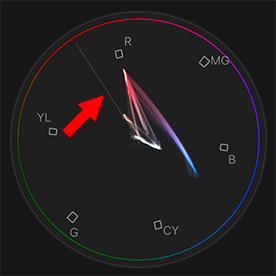
The skin tone line indicates the color of red blood under skin.
An interesting quirk about color is that the dominant factor giving our skin its color is not the skin, but the red blood under it. From a colorist’s point of view, blood provides color, while skin provides gray-scale.
NOTE: Yes, individuals are different. And, yes, you can apply whatever color you want to achieve a specific look. However, these general guidelines can help you get your actors to look believable and natural when you need to fix a color cast or bad lighting.
This line – see the screen shot – in the Vectorscope is called the “skin tone” line because it represents the color of red blood under skin. Whether an actor is caucasian, asian, hispanic or black, we all have the same color blood.
While there are individual variations, if you want an actor to look “normal,” make sure the color of their skin is plus or minus 2° of this line. Asians are slightly below the line, everyone else is on or slightly above the line.
Here’s a table that illustrates different ethnic groups, along with the saturation and gray-scale levels for normally-lit skin. (Think lighting for a studio talk show.)
Ethnic Group
Saturation
Gray-Scale
Caucasian
40%
50-70%
Asian
35%
40-60%
Hispanic
30%
35-50%
Black
20%
15-35%
Men are, generally, 5% darker and 5% less saturated than women.
Please rate the helpfulness of this tip.
Click on a star to rate it!
https://www.theinsidetips.com/wp-content/uploads/2019/09/Tips-Logo-700x150.jpg00Larry Jordanhttps://www.theinsidetips.com/wp-content/uploads/2019/09/Tips-Logo-700x150.jpgLarry Jordan2019-12-18 01:30:002019-12-16 19:17:01Tip #305: What’s the “Skin Tone Line?”
If you, like me, go to the Mac App Store when you get an update alert, you are missing some key media updates.
Whenever Apple updates Final Cut Pro X, Motion or Compressor, they generally also update the Pro Video codecs. However, these do NOT update through the Mac App Store.
These are “system-level” codecs. This means that these codecs are valuable to all editors: Avid, Premiere and Final Cut. Any Mac-based editor can benefit.
https://www.theinsidetips.com/wp-content/uploads/2019/09/Tips-Logo-700x150.jpg00Larry Jordanhttps://www.theinsidetips.com/wp-content/uploads/2019/09/Tips-Logo-700x150.jpgLarry Jordan2019-12-17 01:30:002020-06-19 16:02:44Tip #112: How to Update Apple’s Pro Video Codecs
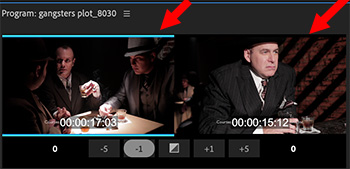
The out-going clip is highlighted in blue, allowing trimming via keyboard or mouse.
Hidden within the Premiere timeline is a powerful trimming tool: Dynamic Trim. This feature shows the last frame of the outgoing clip and the first frame of the incoming clip, allowing you to easily trim between them.
Here’s how it works.
Double-click an edit point to display the Dynamic Trim window.
Click the left image in the Trim window to ripple trim the outgoing clip. (The blue bars highlight the left side.)
Click the right image in the Trim window to ripple trim the incoming image. (The blue bars highlight the right side.)
Click the boundary between the two images in the Trim window to select both sides of the selected edit point. (The blue bars highlight both sides.)
Once you select which side, or sides, of the edit point you want to trim, either click the timecode numbers at the bottom or drag the image left and right.
Here’s the really cool part. Type J to move backward or L to move forward. Whenever you type K, the edit point is trimmed in real time to the position of the playhead. Press the spacebar to preview the edit point in real-time.
Close this window by clicking anywhere in the Timeline.
EXTRA CREDIT
Click the square in the center between the two sets of timecode numbers to apply the default video transition.
Please rate the helpfulness of this tip.
Click on a star to rate it!
https://www.theinsidetips.com/wp-content/uploads/2019/09/Tips-Logo-700x150.jpg00Larry Jordanhttps://www.theinsidetips.com/wp-content/uploads/2019/09/Tips-Logo-700x150.jpgLarry Jordan2019-12-17 01:30:002019-12-14 15:01:40Tip #272: Trim Faster with Dynamic Trim
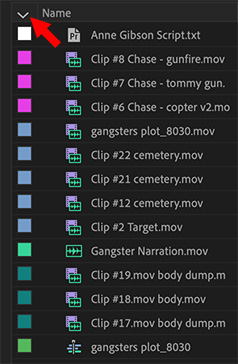
Assign and organize clips by color in the Project panel.
Hidden in plain sight in the Project panel is a very cool organizational tool – colors! Not only can we organize clips by bins and file names, but also by color. For example, color all talking heads magenta, while B-roll shots are blue and reaction shots orange. Or change colors by scene.
While the obvious benefit of using colors is that it provides another way of organizing clips, a hidden benefit is that those colors follow the clips into the Timeline, allowing you to see at a glance where all your talking heads, for example, are located.
Here’s how this works.
In the Project panel, switch to List view.
Select all the clips you want to assign to a specific color.
Right-click on a color chip and select Label.
Choose the color you want to apply to the selected clips.
Click the top of the color column, indicated by the red arrow, to group and sort colors; click a second time and the order is reversed.
Please rate the helpfulness of this tip.
Click on a star to rate it!
https://www.theinsidetips.com/wp-content/uploads/2019/09/Tips-Logo-700x150.jpg00Larry Jordanhttps://www.theinsidetips.com/wp-content/uploads/2019/09/Tips-Logo-700x150.jpgLarry Jordan2019-12-17 01:30:002019-12-14 15:04:43Tip #273: Organize Clips by Color
By default, when you import media clips (video, audio, or still images), Final Cut Pro analyzes existing clip metadata to assign one of five default roles to the video and audio components of each clip: Video, Titles, Dialogue, Music, or Effects. (Specifically, Final Cut Pro assigns a subrole of one of the default roles to each video or audio component.)
You can adjust the assignment of audio roles on import in two ways: by setting the role assignment manually or by having Final Cut Pro create custom roles automatically while importing media files with iXML metadata.
NOTE: iXML metadata is applied to clips by some high-end audio recording gear. For example, during production, a sound recordist might enter “Boom mic” and “Jessie lav mic” on the recording device to identify the audio channels of a recording. During import, Final Cut Pro can use the iXML names to create subroles named “Boom mic” and “Jessie lav mic” and assign them to the corresponding audio components in the imported clips.
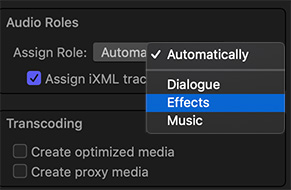
For any given import session, you can override the automatic role assignment process so that every imported audio component is assigned a role of your choosing. You can specify one of the three default audio roles or a custom role that you create. When you import with this setting enabled, Final Cut Pro assigns a unique subrole (from the role you specify) to every component in each clip.
For example, imagine that you’ve recorded several hundred natural sound files for use as Foley sound effects in your video project. By default, Final Cut Pro assigns the Dialogue role to natural sound recordings (with no additional metadata). Instead, you could assign the more appropriate Effects role to every clip in the import session.
To open the Import pane of Final Cut Pro preferences, choose Final Cut Pro > Preferences (or press Command-Comma), then click Import.
In the Audio Roles section, click the Assign Role pop-up menu and choose a role.
NOTE: The Assign Role pop-up menu also appears in the Audio Roles section on the right side of the Media Import window. All default and custom audio roles appear in this pop-up menu.
Import the files.
The role you chose is assigned to the imported clips. (More precisely, components in the imported clips are assigned subroles of the role you chose.)
You can change this and any other import preferences using the settings in the Media Import window or the Import pane of Final Cut Pro > Preferences. To revert to the default setting, so that roles are assigned automatically when you import clips, click the Assign Role pop-up menu and choose Automatically.
Please rate the helpfulness of this tip.
Click on a star to rate it!
https://www.theinsidetips.com/wp-content/uploads/2019/09/Tips-Logo-700x150.jpg00Larry Jordanhttps://www.theinsidetips.com/wp-content/uploads/2019/09/Tips-Logo-700x150.jpgLarry Jordan2019-12-16 01:30:002019-12-16 01:30:00Tip #299: Set Custom Audio Roles During Import
Have you ever had that sinking feeling that you just destroyed an edit because you deleted/moved/adjusted something you shouldn’t? Yeah, me, too. Here’s how to prevent it.
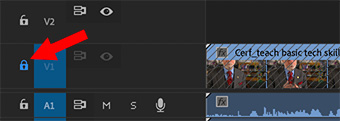
Minimize the chance for errors by locking your tracks.
Click the Track Lock icon – yup, it looks like a lock. Blue locks are locked, white locks are unlocked. The default is unlocked.
Shift – click to lock all audio or all video tracks.
To work on one track and lock all others, Shift – click any lock to lock all tracks, then click the lock for the one track you want to adjust.
NOTE: When a track is locked, diagonal hash lines appear on the track.
EXTRA CREDIT
These locks are not for security, you can’t password-protect them. Rather, they are to help prevent mistakes.
Also, keep in mind that if you lock a video track, for example, you are still able to move its audio track, which would knock it out of sync.
Please rate the helpfulness of this tip.
Click on a star to rate it!
https://www.theinsidetips.com/wp-content/uploads/2019/09/Tips-Logo-700x150.jpg00Larry Jordanhttps://www.theinsidetips.com/wp-content/uploads/2019/09/Tips-Logo-700x150.jpgLarry Jordan2019-12-12 01:30:002019-12-12 01:30:00Tip #237: Prevent Accidents – Lock It Down
Click the “thumb” to the right of the sequence name in Timeline to set timecode.
Timecode is a label for every frame of video in a clip, or the sequence itself. It’s composed of four pairs of numbers representing HOURS:MINUTES:SECONDS:FRAMES. Every frame in a clip has a unique timecode associated with it.
Think of timecode as the address of a house, it allows us to quickly find any frame in a clip. (Timecode can match between clips, in which case, an NLE can tell which frame is in which clip by combining the timecode with the clip name and its path.)
NOTE: For those who need to deal with drop-frame vs. non-drop-frame, the difference is the last colon. If the last symbol is a colon (:), the clip is non-drop-frame. If the last symbol is a semi-colon (;), the clip is drop-frame.
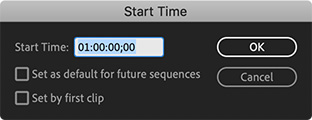
By default, the starting timecode for a sequence is 00:00:00:00. However, there are times when you need to change it; for example, sequences destined for broadcast.
To change the starting timecode:
Click the 3-line “stacked pancakes” immediately to the right of the sequence name in the Timeline.
Enter the starting timecode for the sequence.
Check Set as default for future sequences if you want to make this the default setting.
Check Set by first clip if you want the sequence to inherit the timecode of the first clip you edit into the sequence.
EXTRA CREDIT
While it’s possible for timecode to match time of day, most of the time it does not. Don’t get confused. Timecode is a label expressed as time, not a time-of-day reference.
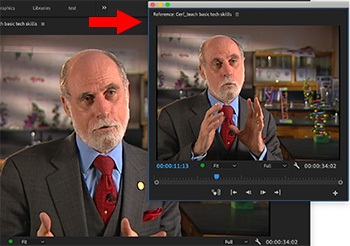
The Reference Monitor floats above the Program Monitor.
The reference monitor acts like a secondary Program Monitor. You can use it to compare different frames from the same sequence side-by-side, display video scopes, display different text overlays, or view the same frame using different viewing modes.
To open the reference monitor, choose Window > Reference Monitor.
To “gang” (which means to connect) the reference monitor to the program monitor, click the Wrench icon in the lower right-corner of the reference monitor and pick the top option: Gang to Program Monitor.
If the monitors are not ganged, you can drag the playhead to different frames in each monitor for comparison.
EXTRA CREDIT
Click the Wrench icon in the reference monitor to see a variety of other display options.
Please rate the helpfulness of this tip.
Click on a star to rate it!
https://www.theinsidetips.com/wp-content/uploads/2019/09/Tips-Logo-700x150.jpg00Larry Jordanhttps://www.theinsidetips.com/wp-content/uploads/2019/09/Tips-Logo-700x150.jpgLarry Jordan2019-12-12 01:30:002019-12-12 01:30:00Tip #252: What’s the Reference Monitor?
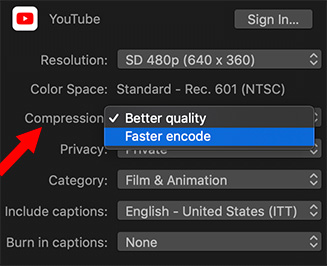
Your project is done and you need to get it to YouTube, Facebook or Vimeo. While I normally recommend always exporting a high-quality master file – both for archiving and future compression – sometimes, you just don’t have the time.
So, you are looking at this screen and debating between Faster Encode and Better Quality. You spent a LOT of time on this project – which should you pick?
Faster Quality.
In the past, before hardware acceleration, Better Quality created smaller files and higher image quality. Today, that’s no longer the case. Tests I recently made with Apple Compressor show that Faster Enocde – which uses hardware acceleration is:
Much faster
Creates smaller files more than 1/2 the time
Creates image quality equal to or better then Better Quality
BONUS
The compression engine used by Compressor is the same engine used by Final Cut. The only difference is the interface each has to prep a file for compression.
We may request cookies to be set on your device. We use cookies to let us know when you visit our websites, how you interact with us, to enrich your user experience, and to customize your relationship with our website.
Click on the different category headings to find out more. You can also change some of your preferences. Note that blocking some types of cookies may impact your experience on our websites and the services we are able to offer.
Essential Website Cookies
These cookies are strictly necessary to provide you with services available through our website and to use some of its features.
Because these cookies are strictly necessary to deliver the website, refuseing them will have impact how our site functions. You always can block or delete cookies by changing your browser settings and force blocking all cookies on this website. But this will always prompt you to accept/refuse cookies when revisiting our site.
We fully respect if you want to refuse cookies but to avoid asking you again and again kindly allow us to store a cookie for that. You are free to opt out any time or opt in for other cookies to get a better experience. If you refuse cookies we will remove all set cookies in our domain.
We provide you with a list of stored cookies on your computer in our domain so you can check what we stored. Due to security reasons we are not able to show or modify cookies from other domains. You can check these in your browser security settings.
Google Analytics Cookies
These cookies collect information that is used either in aggregate form to help us understand how our website is being used or how effective our marketing campaigns are, or to help us customize our website and application for you in order to enhance your experience.
If you do not want that we track your visit to our site you can disable tracking in your browser here:
Other external services
We also use different external services like Google Webfonts, Google Maps, and external Video providers. Since these providers may collect personal data like your IP address we allow you to block them here. Please be aware that this might heavily reduce the functionality and appearance of our site. Changes will take effect once you reload the page.
Google Webfont Settings:
Google Map Settings:
Google reCaptcha Settings:
Vimeo and Youtube video embeds:
Other cookies
The following cookies are also needed - You can choose if you want to allow them:
Privacy Policy
You can read about our cookies and privacy settings in detail on our Privacy Policy Page.