… for Apple Motion

Tip #963: Apple Updates Motion

Larry Jordan – LarryJordan.com

Apple updates Motion to support 3D shapes and a faster way to creates borders.
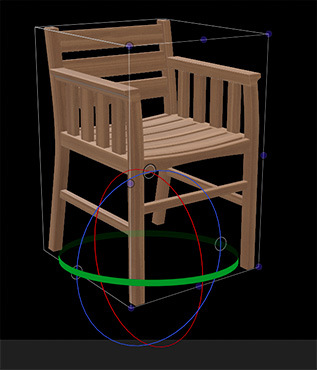
The 3D Transform tool adjusting on of the new 3D models in Motion 5.4.9.

Topic $TipTopic

Last week, Apple continued the evolutionary growth of Motion – to version 5.4.6 – along with updates for Final Cut Pro X and Compressor. While none of these features are revolutionary, all are useful and include:

  • Support for 3D models, along with 60 new 3D models in the Motion Library
  • Importing 3D models in the USDZ format.
  • A new Stroke filter which quickly outlines objects using an associated alpha channel

These free updates are accessed through the Mac App Store.

EXTRA CREDIT

The 5.4.4 release of Motion also included:

  • Metal-based processing engine to improve playback, rendering, and compositing.
  • Creating 8K motion graphics by harnessing the power of multiple GPUs, up to 28 CPU cores, and Afterburner with Mac Pro (2019).
  • Ability to view stunning HDR titles and effects with Apple Pro Display XDR.

Here’s a link to learn more.


Please rate the helpfulness of this tip.

Click on a star to rate it!

… for Apple Motion

Tip #969: New! 3D Objects in Motion

Larry Jordan – LarryJordan.com

3D objects are ideally suited for 3D text and camera moves.

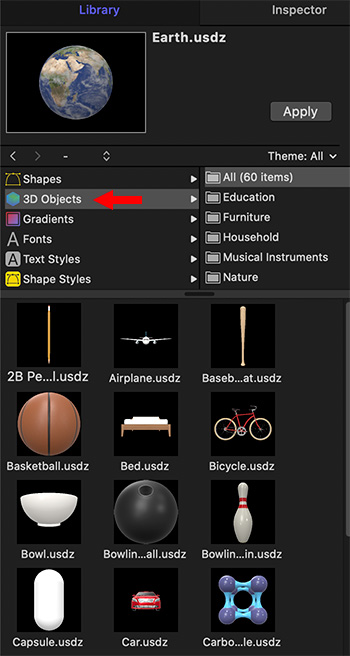
A portion of the 3D objects available in the latest release of Motion – 5.4.6.

Topic $TipTopic

A key group of new features in the 5.4.6 update to Motion are 60 new 3D objects in the Motion Library. Each of these elements can be rotated in any direction, unlike video, which is always 2D.

To access these go to Library > 3D Objects. (See screen shot.)

Add them to a project the same as any other object.

The easiest way to rotate or position them is using the 3D Transform tool (Shortcut: Q). If you want more precision, select the object, then go to Inspector > 3D Object and adjust the Orientation settings.

EXTRA CREDIT

These can be scaled over 300% and still retain texture, meaning that flying a camera through one of these objects won’t become pixelated until it gets very large in the frame.


Please rate the helpfulness of this tip.

Click on a star to rate it!

… for Apple Motion

Tip #970: Colorizing 3D Objects

Larry Jordan – LarryJordan.com

Colors applied to a 3D object apply to the entire object, even as it moves or rotates.

Gradient Colorize (left) and Colorize (right) applied to a white 3D mug.

Topic $TipTopic

3D objects are new with the 5.4.6 update to Apple Motion. Tip #969 describes what these are. However, many of the these objects are pure white. Here’s how to change that.

While we can’t, at least yet, apply textures to 3D shapes (and have them retain their “3D-ness”), we can apply color.

In the screen shot, the white 3D mug has two different filters applied:

  • Filters > Color > Colorize. This is the green color.
  • Filters > Color > Gradient Colorize. This is the pink color.

NOTE: I created this effect by blending three different screen shots in Photoshop.

I tend to prefer the results of the Gradient Colorize because I can apply a slightly different shade of the color to emphasize shadows.

NOTE: Keep in mind that this color will “stick” even as you rotate the object.


Please rate the helpfulness of this tip.

Click on a star to rate it!

… for Apple Motion

Tip #953: So, What’s the Difference?

Larry Jordan – LarryJordan.com

Project settings determine presets and where they are saved.

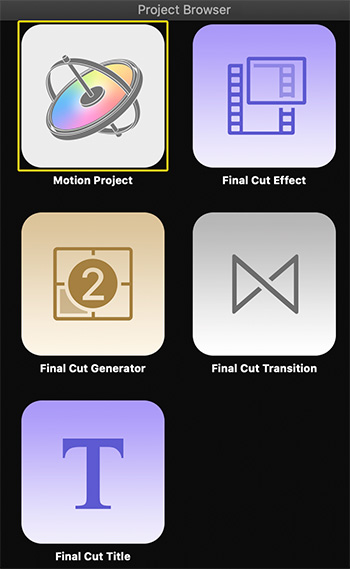
The five project choices in the Motion Project Browser.

Topic $TipTopic

When you open the Project Browser to create a new Motion project, you are confronted by five project choices before you can start creating. What’s the difference between them?

All five project presets are identical in terms of what Motion can do. The differences are preset layers when you open a new project and where a project is saved.

  • Motion Project. This has no presets and can be saved anywhere. It can also be converted into a Generator for Final Cut Pro X when you save it.
  • Final Cut Effect. This opens with a drop zone placeholder for the underlying clip when this effect is applied to a clip in the Final Cut timeline. It is always saved into the category of your choice in the Effects browser.
  • Final Cut Generator. There are no presets. It is always saved into the category of your choice in the Generators browser.
  • Final Cut Transition. This opens with two drop zone placeholders; one for the outgoing clip and one for the incoming clip; but no applied transition between them. It is always saved into the category of your choice in the Transitions browser.
  • Final Cut Title. This opens with a drop zone placeholder for the background clip when this effect is applied to a clip in the Final Cut timeline. There is also a default text layer, placed as a lower-third, which can be formatted and moved as necessary. It is always saved into the category of your choice in the Titles browser.

Please rate the helpfulness of this tip.

Click on a star to rate it!

… for Apple Motion

Tip #955: Shift the Anchor Point

Larry Jordan – LarryJordan.com

Use the Anchor tool to quickly move the anchor point.

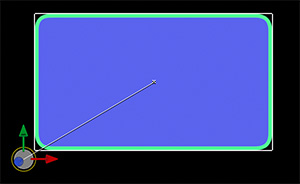
The anchor point was moved to the lower left corner of this rectangle.

Topic $TipTopic

The Anchor Point is that part of an element that determines where it will scale or rotate. By default it is at the dead-center of an element. Here’s how to move it.

  • In the Layers panel, select the element with the anchor point you want to change.
  • In the Tools panel, select the Anchor Point tool (second from the top).
  • Drag the white circle (see screen shot) from the center of the selected element to a new location.

Test the results by rotating the element using the Rotation settings in Inspector > Properties.

NOTE: In this example, I dragged it outside the rounded rectangle, which is perfectly legal though not normal, in order to make the contents of the anchor point more visible.

EXTRA CREDIT

You can also set the anchor point by typing specific number values in Inspector > Properties. However, the Anchor Point tool is much faster, though less precise.


Please rate the helpfulness of this tip.

Click on a star to rate it!

… for Apple Motion

Tip #956: Well… THAT was Obvious

Larry Jordan – LarryJordan.com

The Drop Shadow tool is a fast way to access Inspector settings.

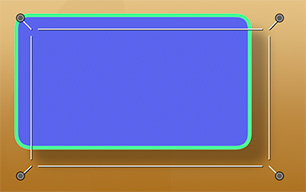
A drop shadow applied to a shape using the Drop Shadow tool.

Topic $TipTopic

Sometimes you overlook something REALLY obvious. I sure did and here’s what it does.

The drop shadow settings in Inspector > Properties can be applied to any selected element. I use them all the time.

However, as I was writing Tip #955 about the Anchor Point tool, I discovered – immediately below it in the Tools palette – the Drop Shadow tool. Wow! Who knew?

This tool applies a 75% opacity drop shadow to whatever object you have selected, then allows you to adjust its position and feathering.

To use it:

  • Select a layer in the Layers panel.
  • Select the Drop Shadow tool. This automatically puts a bounding box around whatever element is selected.
  • Drag the middle of the bounding box to move the shadow to a new location.
  • Drag one of the four corner dots to increase feathering.

NOTE: The four modifier keys have no impact on this setting.

EXTRA CREDIT

  • The color and opacity of the drop shadow can only be changed using the Inspector controls.
  • To modify an existing drop shadow, reselect the layer and the Drop Shadow tool.
  • To remove a drop shadow, go to Inspector > Properties and reset the Drop Shadow parameter settings. (Click the small downward-pointing arrow to the right of the Drop Shadow title.)

Please rate the helpfulness of this tip.

Click on a star to rate it!

… for Apple Motion

Tip #932: Where Motion Stores Custom Effects

Larry Jordan – LarryJordan.com

Storage locations are set by default, but you still have a lot of control.

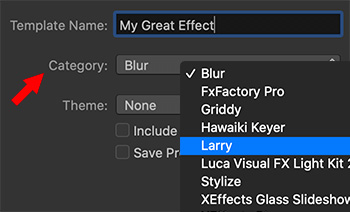
This dialog determines effect name and storage location.

Topic $TipTopic

When you create a custom effect, transition, generator or title in Motion, where does it get stored?

While you determine the category in which a new effect is stored, Motion saves all effects in:

[ Home Directory ] > Movies > Motion Templates.

Inside that folder are folders for the five different groups:

  • Compositions
  • Effects
  • Generators
  • Titles
  • Transitions

Within each of these group folders are different category folders.

EXTRA CREDIT

  • You can move effects from one location to another within the same group (i.e. titles) simply by dragging.
  • To remove an effect, make sure FCP X and Motion are not running, then drag the effect you no longer want to the trash. This removal does not affect any clips to which this soon-to-be-deleted effect is applied.
  • You can duplicate an effect to share with different categories within the same group (i.e. titles),  but you can’t move an effect between groups (i.e. move a title into generators). It won’t work..

Please rate the helpfulness of this tip.

Click on a star to rate it!

… for Apple Motion

Tip #933: An Easier Way to Time Audio

Larry Jordan – LarryJordan.com

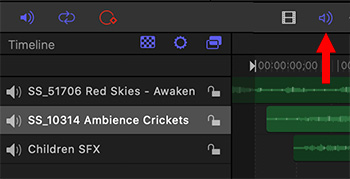
The audio timeline displays timing and location of individual audio clips.

Individual audio clips are displayed in the timeline when this icon is clicked.

Topic $TipTopic

I’ve written before that working with audio in Apple Motion is a frustrating experience. However, this hidden interface makes finding and timing multiple audio clips a lot easier.

On the right side of the timeline is a speaker icon. (Indicated by a red arrow. However, I moved the icon from the right corner so it would fit into this screen shot.) Click it to display the audio timeline.

The timeline now displays all imported audio clips and allows you to adjust placement and timing, as well as add behaviors and audio filters.

If you have struggled to control your audio, this hidden portion of the timeline will make a big difference.


Please rate the helpfulness of this tip.

Click on a star to rate it!

… for Apple Motion

Tip #934: Working with Regions

Larry Jordan – LarryJordan.com

Moving the In and Out to create a work region simplifies reviewing complex sections of a project.

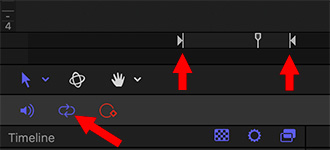
Loop playback (left arrow) repeats playback between the In (center) and Out (right).

Topic $TipTopic

When you are working on a complicated transition, Motion has a hidden control feature that allows you to focus on just a portion of a project. Here’s how this works.

At the bottom left of the timeline, left red arrow, is a loop icon. When enabled (blue), this tells the playhead to continuously play from the beginning to the end of a project; looping from the end to the beginning.

Well, ah, not the beginning to the end, but the In to the Out. These two icons (center and right red arrows) mark the In and Out of a Motion project.

Drag them to bracket the section you want to concentrate on, then, when you press the spacebar, Motion will continuously loop between those two points until you tell it to stop.

EXTRA CREDIT

  • I. Set the In.
  • O. Set the Out.
  • Option + X. Clear the In and the Out.
  • Control + L: Enable/disable Loop playback.

Please rate the helpfulness of this tip.

Click on a star to rate it!

… for Apple Motion

Tip #913: A Quick Way to View Media

Larry Jordan – LarryJordan.com

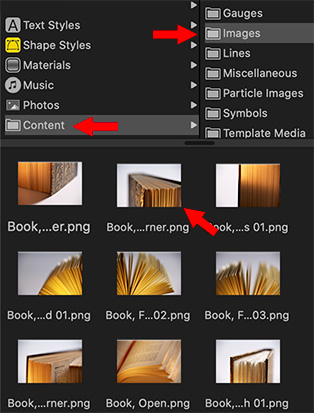
This should work for any media displayed in the Media tab of the Project pane.

Double-click an image in the Library to view it full size.

Topic $TipTopic

This is something I just discovered today as I was writing tips. There’s a “Quick Look” viewer buried in Apple Motion. Here’s where to find it.

I first found that if you go to Library > Content > Images, then double-click any image, it will open full-size in its own window in Motion. However, no other category in the Library seemed to act the same way.

Then, I wondered if this Quick View would also work for imported media. And the answer is: Yes!

Click the Media tab – to the right of Layers tab in the Project Pane – and double-click any video, audio, still or image. Motion will display at 100% size in its own window.

This is a nice way to see what your media looks like, when you need to see the details.


Please rate the helpfulness of this tip.

Click on a star to rate it!