… for Apple Motion

Tip #1048: What Does Publishing a Template Do?

Larry Jordan – LarryJordan.com

Publishing a template is a fast way to reuse settings and media between projects.

A custom template displayed in Project Browser > Categories.

Topic $TipTopic

If you find yourself creating similar projects time after time, creating a custom template can save you time. The trick is to know what to save. Templates can include:

  • Project settings
  • Media
  • Behaviors and filters
  • Anything else you save in a “normal” Motion project

When you choose File > Publish Template, you can assign it a name, pick a category in which to store it, and, if you want to use it in Final Cut, you can publish it as a Final Cut Generator.

But, if all you want to do is create a file with basic settings and, say, logos or other common graphics:

  • Choose File > Publish Template
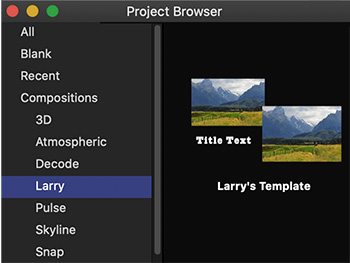
  • Give it a name and create a category to store your templates. My custom category is named “Larry” – because it is easy for me to remember.
  • Leave all checkboxes unchecked.

Now, as you can see in the screen shot, the template shows up in Project Browser > Compositions, but does NOT show up in Final Cut.

Creating reusable templates is a great way to save time when you are creating similar projects.


Please rate the helpfulness of this tip.

Click on a star to rate it!

… for Apple Motion

Tip #1019: Effects Playground: Circle

Larry Jordan – LarryJordan.com

The Circle filter converts any image – still or moving – into a series of circles.

Source image (left), then with the Stylize > Circle filter applied.

Topic $TipTopic

This week, I decided to explore some of the filters included with Apple Motion. This article looks at Filters > Stylize > Circle.

This converts an image – the more color variation the better – into a grid of circles. You can adjust the circle size, the amount of blur (falloff) and whether to invert them which shows the underlying grid.

For this image, I used:

  • Size: 147
  • Falloff: 0.22
  • Invert: Off
  • Mix: 100

EXTRA CREDIT

You can animate this effect by setting keyframes for Mix (part of all filter settings in the Inspector) from 0 to 100.


Please rate the helpfulness of this tip.

Click on a star to rate it!

… for Apple Motion

Tip #1020: Effects Playground: Add Textures

Larry Jordan – LarryJordan.com

Stencil Luma provides the illusion of texture mapping in 3D – provided nothing moves.

A flower image “mapped” to the Spiral 3D object using Stencil Luma.

Topic $TipTopic

While we can’t apply textures to 3D objects in Motion, then move with the object, we can create the illusion of texture mapping, The problem is that we can’t track how the surface of a 3D object moves in Motion. But… if we don’t need an object to move – or move much – we can easily fake it.

  • Add a 3D object to the Layers panel. (A solid white one will work best.)
  • Below it, in the same group, put the texture you want to “map” to the surface.
  • Select the 3D object and choose Inspector > Properties > Blend mode: Stencil Luma.

This blends the background image into the foreground shape based upon grayscale values. I found Stencil Luma preserves the 3D effect of the shape better than Stencil Alpha.

EXTRA CREDIT

Make this even more interesting:

  • Replace the lower image with a video or animated background and watch as it moves inside the shape.
  • SLOWLY rotate the group containing the 3D image. You can’t go far with this because you’ll lose the effect, but a small, slow spin – especially with moving video under it – should work fine.
  • Add a Stylize filter to the underlying image.

You get the idea – experiment!


Please rate the helpfulness of this tip.

Click on a star to rate it!

… for Apple Motion

Tip #1021: Effects Playground: Sunset Butterfly

Larry Jordan – LarryJordan.com

Most effects are not complicated. Rather. they combine multiple settings to create something cool.

A composite of a butterfly, clear vase and a sunset, in Motion.

Topic $TipTopic

OK, I confess. I didn’t plan this effect, I just kept asking “What happens if I do this?” … and I ended up with this sunset butterfly.

Here’s what I did. In the same group in Motion combine:

  • Library > Content > Images > Folio > Clear Vase 01
  • Library > Content > Particle Images > Butterfly

Make sure the vase is on top then select the Clear Vase:

  • Apply Inspector > Properties > Blend Mode: Soft Light
  • Apply Filters > Color > Gradient Color. Then set the gradient to Burnt Ember from the “rectangles” icon to the right of the gradient itself.

Adjust the size and angle of the butterfly so it looks good to you.

Done.

EXTRA CREDIT

Apply Filters > Color > Levels to the butterfly and adjust it, again, so it looks “right” to you.


Please rate the helpfulness of this tip.

Click on a star to rate it!

… for Apple Motion

Tip #999: Change the Direction of a Gradient

Larry Jordan – LarryJordan.com

The Inspector controls colors, the onscreen tool controls direction.

Control-click an element in the Viewer to edit a gradient.

Topic $TipTopic

I was asked recently how to change the direction of a gradient in Motion. It is easy to do, but not easy to find. Here’s how.

  • Select an element with a gradient in the Layers panel.
  • Control-click the element in the Viewer and choose Edit Gradient. (See screen shot.)
  • Use the on-screen controls to change gradient direction, the distance between the colors and the colors themselves.

It’s easy, once you know how.

EXTRA CREDIT

Use the Gradient color controls in Inspector > Image > Fill to change the colors in the gradient itself.


Please rate the helpfulness of this tip.

Click on a star to rate it!

… for Apple Motion

Tip #1011: Create Unique Backgrounds FAST!

Larry Jordan – LarryJordan.com

The Parallelogram Tile filter creates unique backgrounds from stills or video.

The Parallelogram Tile effect applied to a shot of a city street at night.

Topic $TipTopic

Motion has a filter that can create a unique, visually-interesting background out of any still or video clip. Here’s how to use it.

  • Import a still image or video clip, then select it in the Layers panel.
  • Apply Filters > Tiling > Parallelogram Tile.
  • In Inspector > Filters adjust Center > Y and Acute Angle to create an image that doesn’t look overly rectangular.

If this filter is applied to a video, the image will change as the video changes.

If this filter is applied to a still image, you can animate it by selecting the Parallelogram Tile filter in the Layers panel, then keyframing Center > Y. Slower moves look better. Adding a Gaussian Blur will also help.

EXTRA CREDIT

If you want to be especially daring, apply an Oscillate parameter behavior to Center > Y.


Please rate the helpfulness of this tip.

Click on a star to rate it!

… for Apple Motion

Tip #1012: Create a “Ripple in Time”

Larry Jordan – LarryJordan.com

As with all filters, apply this, then tweak it. Pick what looks good to you.

Keyframe settings for Filters > Distortion > Fun House.

Topic $TipTopic

Here’s another Motion filter that’s fun to play with – especially if you are creating a science fiction story where things are moving through time.

  • Import a clip into Motion, then select it in the Layers panel.
  • Apply Filters > Distortion > Fun House.
  • Position the playhead in the mini-timeline where you want the effect to start, then set a keyframe for Inspector > Filters > Fun House > Center so that X = -1200 and Y = 0.
  • Position the playhead where you want the effect to end; this looks best if the duration of the effect is short.
  • Then, change the X value to 1200, Y = 0.

You may need to tweak the values for Center depending upon the size of your project. In general, though, you want this effect to go quickly – 1-2 seconds – as well as start and end well offscreen.

EXTRA CREDIT

I also liked changing the Width for this filter to 300… just because.


Please rate the helpfulness of this tip.

Click on a star to rate it!

… for Apple Motion

Tip #988: Add Custom LUTs in Motion

Larry Jordan – LarryJordan.com

LUTs provide a fast way to create custom looks. Now, Motion supports them.

The LUT menu in Filters > Custom LUTs.

Topic $TipTopic

One of the key new features in the Motion 5.4.6 update is the ability to add custom LUTs to any imported video. A LUT (look-up table) is used to interpret the numbers stored on your hard disk into the visual image displayed on your monitor.

NOTE: Stylized LUT effects are available from a variety of third-party sources. Camera LUTs, used to convert “flat” or “log” footage from high-end cameras to standard color spaces, are available from many camera manufacturers and other sources.

With the 5.4.6 update, we can now apply custom LUTs to any imported video. To do so:

  • Select the clip you want to adjust in the Layers panel.
  • Choose Filters > Color > Custom LUTs
  • Go to Inspector > Filters > Custom LUT and choose the LUT you want from the LUT menu. (See screen shot.)

NOTE: Unlike Final Cut, Motion does not include camera LUTs, you will need to download the ones you need from the manufacturer of your camera.

Motion stores custom LUTs in the same location as Final Cut Pro X:
/Users/username/Library/Application Support/ProApps/Custom LUTs/

EXTRA CREDIT

Because Motion stores third-party LUTs externally (outside of Motion projects), it’s inadvisable to use LUTs in templates created for Final Cut Pro X.


Please rate the helpfulness of this tip.

Click on a star to rate it!

… for Apple Motion

Tip #989: Add Character – Distress Your 3D Text

Larry Jordan – LarryJordan.com

Text doesn’t have to be perfect. In fact, distressed text is often more compelling.

Plain 3D text (top), distressed text (middle) and the distress menu.

Topic $TipTopic

Nothing adds character to text like making it look worse. A lot worse. A hidden feature in Motion makes “distressing” your text simple and fun. Let me show you how this works.

NOTE: This option is only available for 3D text, but that doesn’t mean your text needs to look 3D.

To apply distress:

  • Create a 3D text clip.
  • Select Inspector > Text and scroll down until you see the Material section.
  • Below the Material section, select Options:Basic > Add Layer > Distress.
  • From the Distress menu, choose an effect (see screen shot).
  • In the settings for that option, select different looks from the Type menu. Drag sliders and watch what happens.

EXTRA CREDIT

You can apply as many different “distresses” as you want. The screen shot shows three applied to the text: Wrinkles, Dents and Stains.

Like many 3D text effects, you need to play with these to see what works best for your project. And, yes, these settings will travel to FCP X if you are creating templates.


Please rate the helpfulness of this tip.

Click on a star to rate it!

… for Apple Motion

Tip #990: Add Reflective Paint to 3D Text

Larry Jordan – LarryJordan.com

3D text provides almost unlimited design options for customizing text to fit our story.

Distressed 3D text, with a reflective pink paint applied. A blue spotlight was added to highlight the texture.

Topic $TipTopic

As I was playing with distressing 3D text (Tip #989) I discovered another setting: Reflective Paint. Even if you never create your own lights – and especially if you do – adding sheen to the surface of 3D text can make it “pop” more effectively.

To apply different paint surfaces to your text:

  • Create a 3D text clip.
  • Select Inspector > Text and scroll down until you see the Material section.
  • Below the Material section, select Options:Basic > Add Layer > Paint.
  • From the Paint menu, choose a surface that appeals to you.
  • In the settings for that surface option, select different looks from the Type menu. Drag sliders and watch what happens.

EXTRA CREDIT

In the screen shot, I applied a pink reflective paint, then added a deep blue spotlight from the side to highlight the texture of the text.


Please rate the helpfulness of this tip.

Click on a star to rate it!