… for Apple Motion

Tip #208: How to Use the Bezier Tool in Motion

Larry Jordan – LarryJordan.com

The Bezier tool creates straight lines, curves and arbitrary shapes.

Drawing a path in Apple Motion with the Bezier tool.
Control-click a red dot to reveal control point options.

Topic $TipTopic

Motion has a Bezier tool that can be used to draw paths, create shapes, or define a non-geometric mask. It is both flexible and powerful. Here are some tips on how to use it.

  • Select the Bezier tool (it looks like a pen and is located immediately above the timecode display.)
  • Click in the Viewer to add a starting point.
  • Move the cursor and click again to create a straight line. To create a curve, click and drag the mouse.

NOTE: Press the Shift key to create straight lines, or lines at 45° angles.

  • Drag a white control handle to change the shape of a curve. Press Shift and Option to discover how they modify how white control line moves.

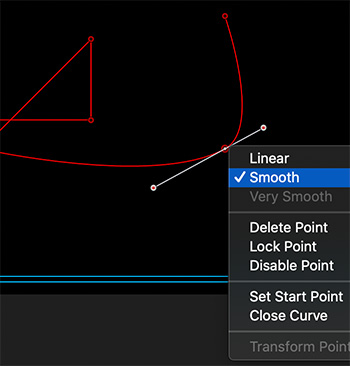
Control-click a red dot to reveal options:

  • Linear creates straight corners.
  • Smooth creates curves.

Please rate the helpfulness of this tip.

Click on a star to rate it!

… for Adobe Premiere Pro CC

Tip #277: Source Monitor Audio Zooming…!

Larry Jordan – LarryJordan.com

There are three different ways to zoom into audio in the Source Monitor.

An audio waveform with a modified display in the Adobe Premiere Pro Source Monitor.
Four different controls over waveform display in the Premiere Source Monitor.

Topic $TipTopic

The Source Monitor can tell us a lot more about our audio than you might, at first, suspect. It all relates to “zooming” and here’s how it works.

  • Double-click a clip in either the Project panel or Timeline to load it into the Source monitor.

Then, looking at this screen shot:

  • Click the waveform icon (left-most arrow) to display the waveform.

NOTE: A waveform is the visual representation of the volume of the sound. Bigger waveforms are louder.

  • To zoom into a portion of the waveform, drag one of the white dots (second arrow from left). Or, type [plus] or [minus].
  • To increase, or decrease, the display height of a waveform, drag the thin light horizontal line (third-arrow from left).
  • To magnify the size of the waveform, drag the small gray dot at the top right of an audio channel (arrow on right). Each audio track has this control on the right.

NOTE: These last two options only change the waveform display, they do not alter the audio itself.

EXTRA CREDIT

To reset a clip back to its normal display, simply load a different clip in the Source Monitor. The next time you display an altered clip, the waveforms will be back to normal.


Please rate the helpfulness of this tip.

Click on a star to rate it!

… for Adobe Premiere Pro CC

Tip #276: A Faster Way to Create a Split Edit

Larry Jordan – LarryJordan.com

Split edits are used constantly in drama.

Create a split edit in the Premiere timeline.
The Option (Alt) key is the secret of a fast split edit.

Topic $TipTopic

A split edit is used when we want to see one thing, but hear another. These are used constantly in drama when someone is talking, but we want to see another actor’s reaction before the first speaker has finished talking.

Premiere makes creating split edits easy – you just need options…

With the Roll trim tool selected, press the Option key (Alt on Windows). Then drag either the video edit point or the audio edit point.

Ta-DA!

A split edit.

There are other ways to create a split edit – but nothing is faster than this.

EXTRA CREDIT

  • An edit where the video precedes the audio is called an “L-edit” because the two edit points form the shape of an “L”.
  • An edit where the audio precedes video is called a “J-edit” because it forms a rough letter “J”.

Please rate the helpfulness of this tip.

Click on a star to rate it!

… for Adobe Premiere Pro CC

Tip #275: Faster Trims by Changing a Preference

Larry Jordan – LarryJordan.com

Change one preference to make trimming smarter… and faster.

Preferences - Trim options in Adobe Premiere Pro CC.
Check the top option to enable “smart” trimming in Premiere.

Topic $TipTopic

Recently, Adobe added a preference setting that makes timeline trimming much faster and easier, but this preference is turned off by default. Here’s what happens when you turn it on.

  • Open Premiere > Preferences > Trim (Edit > Preferences > Trim on Windows).
  • Check the top box (“Allow Selection tool to choose…”) to enable this option.

Now, when you hover the cursor over an edit point:

  • If the cursor is just to the left of the edit point, the cursor switches to the Ripple trim tool, allowing us to adjust the Out of the out-going clip.
  • If the cursor is just to the right of the edit point, the cursor changes to the Ripple trim tool, allowing us to adjust the In of the in-coming clip.
  • If the cursor is centered over the edit point, the cursor switches to the Roll trim tool, allowing us to adjust both the In and Out settings at the same time.
  • Press the Cmd key (Control on Windows) to switch between Ripple and Trim modes.

This “smart” selection of the correct trim tool based upon its position relative to the edit point is a huge time-saver when trimming.


Please rate the helpfulness of this tip.

Click on a star to rate it!

… for Apple Motion

Tip #206: Export a Still Frame in Motion

Larry Jordan – LarryJordan.com

Saving a still frame is as easy as “Share.”

Apple Motion Save Current Frame Dialog
PNG and TIFF offer the highest quality. JPEG is the smallest file.

Topic $TipTopic

You are in the middle of creating the perfect motion graphic… except, the client wants to see your interim work before everything gets locked. No problem. Here’s a fast way to create a high-quality still.

  • Put the playhead on the frame you want to save.
  • Choose File > Share > Save Current Frame.

Export. PNG or TIFF are the highest quality, but largest files. JPEG is best for emailing.

Color Space. Virtually all the time, “Use Canvas Setting” is fine.

Color Channels. If you want to retain transparency, include the Alpha channel. If not, select Color.

Give the file a name and location and you’re done.

EXTRA CREDIT

You can create a custom keyboard shortcut using the Commands menu.


Please rate the helpfulness of this tip.

Click on a star to rate it!

… for Apple Motion

Tip #205: Quickly Add Motion Blur to a Motion Project

Motion Blur tends to blend foreground with background.

Apple Motion Inspector Project Properties
The Project Motion Blur settings in the Motion Inspector.

Topic $TipTopic

Motion Blur softens the edges of moving objects. Whether you use it or not is purely a matter of personal taste. But creating it is easy in Motion. Here’s how.

  • Select the Project in the Layers panel
  • Go to Inspector > Properties > Motion Blur
  • Set Samples to 16.
  • Set Shutter Angle to 180°

NOTE: If the effect is not visible during playback, go to the top right corner of the Viewer and choose Render > Motion Blur. Playing Motion Blur is GPU intensive, if the project slows down too much, export the file to lock in the blur.

EXTRA CREDIT

  • The higher the samples, the smoother the blur, for example, compare 8 to 32.
  • The higher the shutter angle, the larger the effect, for example, compare 90° to 420°.

Please rate the helpfulness of this tip.

Click on a star to rate it!

… for Apple Final Cut Pro X

Tip #305: What’s the “Skin Tone Line?”

Larry Jordan – LarryJordan.com

Color is more than skin-deep.

The Vectorscope in Apple Final Cut Pro X.
The skin tone line indicates the color of red blood under skin.

Topic $TipTopic

An interesting quirk about color is that the dominant factor giving our skin its color is not the skin, but the red blood under it. From a colorist’s point of view, blood provides color, while skin provides gray-scale.

NOTE: Yes, individuals are different. And, yes, you can apply whatever color you want to achieve a specific look. However, these general guidelines can help you get your actors to look believable and natural when you need to fix a color cast or bad lighting.

This line – see the screen shot – in the Vectorscope is called the “skin tone” line because it represents the color of red blood under skin. Whether an actor is caucasian, asian, hispanic or black, we all have the same color blood.

While there are individual variations, if you want an actor to look “normal,” make sure the color of their skin is plus or minus 2° of this line. Asians are slightly below the line, everyone else is on or slightly above the line.

Here’s a table that illustrates different ethnic groups, along with the saturation and gray-scale levels for normally-lit skin. (Think lighting for a studio talk show.)

Ethnic Group Saturation Gray-Scale
Caucasian 40% 50-70%
Asian 35% 40-60%
Hispanic 30% 35-50%
Black 20% 15-35%

Men are, generally, 5% darker and 5% less saturated than women.


Please rate the helpfulness of this tip.

Click on a star to rate it!

… for Apple Final Cut Pro X

Tip #302: How to Reset a Color Wheel

Larry Jordan – LarryJordan.com

A simple trick to reset any color wheel setting.

A color wheel for color correction in Apple Final Cut Pro X.
To reset any color wheel control to its default, double-click it.

Topic $TipTopic

I’d been using Final Cut Pro X for years before I discovered this tip.

To reset any setting in a color wheel back to its default, double-click it.

So simple! And it took me so long to discover.

Sigh…


Please rate the helpfulness of this tip.

Click on a star to rate it!

… for Apple Final Cut Pro X

Tip #294: Automate Stills Using FCP X Image Exporter

Larry Jordan – LarryJordan.com

This 3rd-party utility simplifies creating stills from an FCP X project.

The main screen from FCP X Image Exporter.

Topic $TipTopic

Do you need to export a lot of images from your Final Cut Pro X timelines but aren’t excited about sitting there and manually doing it?

There’s a very cool 3rd-party utility that can help: FCP X Image Exporter, created by Adam Teale. This provides a blindingly-fast way to create a whole bunch of stills in a hurry.

Simply place markers in your FCP X timeline for each still you want to export, export an FCPXML file, and fcpxImageExporter will do the rest. It accesses your source media, then exports still images at either the source media, project or a custom resolutions.

Learn more here.

CAUTION!

This program works well, however, if you’ve added color grading or effects to your clips, this program won’t apply them to the stills it creates, as it only accesses your source media.

BONUS

Here’s a video tutorial that shows the application in action.


Please rate the helpfulness of this tip.

Click on a star to rate it!

… for Visual Effects

Tip #211: 5 Creative Ways to Use Mirrors on a Video Shoot

Larry Jordan – LarryJordan.com

Mirror tricks to make your productions look bigger.

Image courtesy Shutterstock.com
Use a mirror to capture extreme low-angle shots. (Courtesy: Shutterstock.com)

Topic $TipTopic Jason Boone first wrote about this for Shutterstock.

Mirrors are surprisingly helpful on video shoots – and for far more than checking hair and makeup. As cameras get smaller, mirrors can help you get shots you’d otherwise miss.

Here are some examples:

  • Overhead rig. Put a mirror, rather than the camera, on a C-stand then shoot into it, using it for an overhead angle. A 45° angle tends to work best, because then the camera can shoot directly into it.

NOTE: Remember to flip the video in post to compensate for the reversed image in the mirror.

  • Low angle. Lean the mirror against a book placed on the ground for an extreme low angle.
  • Extra depth. Hang the mirror from a C-stand where the camera would normally be placed. Then, put the camera next to the talent and shoot into the mirror to get extra depth.
  • Fake background. Put the mirror near the talent and use it to create a fake background, if the actual background is uninteresting or objectionable.
  • Reaction shot. When using two or more actors position a mirror to show one actor reacting to another actor. This is a clever way to capture a reaction shot without using or cutaway – or wasting time in shooting a different angle.

EXTRA CREDIT

  • Remember to keep the mirror extra clean all the time.
  • Use a large mirror
  • Bring along an assistant to help with mirror wrangling.

Please rate the helpfulness of this tip.

Click on a star to rate it!