… for Random Weirdness

Tip #527: 5 Tips to Run a Smooth Set

Larry Jordan – LarryJordan.com

Planning and consideration of your crew go a LONG way to a smooth shoot.

Topic $TipTopic

This article, written by Jourdan Aldredge, first appeared in PremiumBeat.com. This is an excerpt.

We’ve all been there. Whether it’s in film school or just shooting short videos with our friends, those “I just got a DSLR, come over on Saturday to help me shoot my short film!” shoots where the director shows up with nothing planned and everything goes wrong happen all the time. It can be a horrifying experience to say the least.

Here are five tips to avoid catastrophe:

  1. Familiarize Yourself with Your Camera
  2. Scout the Location — Don’t Just Show Up!
  3. Compensate Your Actors and Crew
  4. Plenty of Storage and Extra Batteries
  5. You Can’t Fix Everything in Post!

Watch the video linked at the top of this article. There are some great example videos.


Please rate the helpfulness of this tip.

Click on a star to rate it!

… for Apple Motion

Tip #538: What Does “Four Corner” Do?

The “Four Corner” setting determines image distortion.

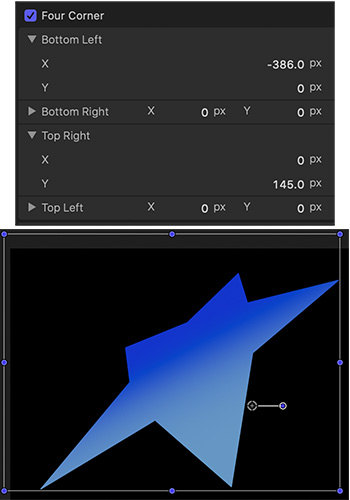
The Four Corner settings (top) determine image distortion (bottom).

Topic $TipTopic

When you select an object in Motion, one of the adjustments you can make is Four Corner. Inspector > Properties > Four Corner allows you to distort whatever you have selected. Here’s how it works.

When you adjust Inspector > Properties > Position, you can modify the position of the frame containing whatever you have selected.

However, when you adjust Inspector > Properties > Four Corner, you can distort the object itself, as illustrated in this screen shot.

Four Corner also provides separate control over the horizontal and vertical position of each corner.

EXTRA CREDIT

Keep in mind that all these distortion settings can be keyframed to animate a shape over time.


Please rate the helpfulness of this tip.

Click on a star to rate it!

… for Apple Motion

Tip #536: Add an Audio Fade in Apple Motion

Larry Jordan – LarryJordan.com

Keep all your audio work very, very simple in Motion.

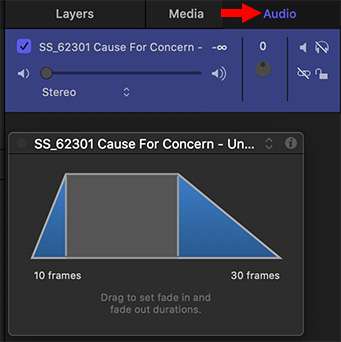
Select the audio clip in the Audio panel, then apply and adjust effects.

Topic $TipTopic

Apple Motion really doesn’t like audio. A good operating rule is: Only import final mixes into Motion. Don’t try to do a mix in Motion itself; it will drive you nuts.

However, sometimes you still need to add a fade. Here’s how.

  • Import the audio clip you need.
  • Select Layers > Audio to display the clip. (It’s actually called the Project Panel, but no one remembers that.)
  • Select the clip in the Audio panel.
  • Apply Behaviors > Audio > Fade In/Fade Out.
  • Display the HUD and adjust the open and closing fade durations.
  • Just as with any other effect, adjust the timing using the Mini-Timeline.

EXTRA CREDIT

If you hear an audio pop at the end, trim the audio clip to end one frame before the fade ends. That pop should not be there, but Apple has never gotten around to fixing it.


Please rate the helpfulness of this tip.

Click on a star to rate it!

… for Apple Motion

Tip #522: The Missing Motion Shortcut

Larry Jordan – LarryJordan.com

Switch sets or create your own shortcuts to fix this problem.

Change keyboard shortcuts by switching sets in the Motion menu.

Topic $TipTopic

Of all the keyboard shortcuts that have ever existed in the history of the world, NONE have bothered me more than these two in Motion:

  • A enables automatic keyframe creation
  • Shift + S selects the Arrow tool

This shortcut combination has destroyed more student work than any other single thing I know; as well as countless projects of my own.

However, there’s hope!

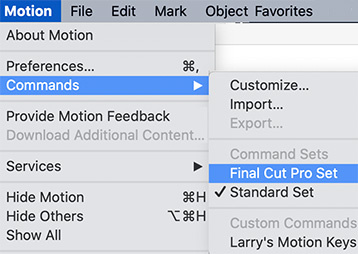
While the current version of Motion supports changing keyboard shortcuts, there’s an even better solution: Changing shortcut command sets from Standard Set to Final Cut Pro Set. This resets the Arrow tool shortcut to A.

Go to Motion > Commands and switch sets:

  • The Arrow tool is now: A
  • The automatic Record Animation shortcut is now: Control + Option + Shift + Command + A

Finally.


Please rate the helpfulness of this tip.

Click on a star to rate it!

… for Visual Effects

Tip #543: What is Planar Tracking?

Larry Jordan – LarryJordan.com

Planar tracking solves problems with lost tracking points.

Topic $TipTopic

A planar tracker uses planes and textures to track as opposed to points or groups of pixels. This allows the tracker to stay on track even if your shot contains motion blur or a very shallow depth of field. Here’s a quick overview.

Planar tracking was developed by Allan Jaenicke and Philip McLauchlan in the University of Surrey. They founded Imagineer Systems in 2000 to provide commercial applications for this technology.

“Planar Tracking” gains its name from how the system analyzes the source video. It seeks out different ‘planes’, isolating surfaces that can be followed through a shot. The user can define a plane for the computer to follow, and if tracked successfully, the movement of the ‘tracked’ object can be used to drive the motion of newly composited elements, or inversely to stabilize footage within a frame.

Mocha, by Imagineer Systems, is an example of this technology. Once tracking information is derrived from a videoclip within Mocha, it can be used in After Effects to animate the motion of any composited layer. Virtual elements can use this tracking information to control what is essentially a camera move that mimics that of the original shot, so that the virtual and live action elements appear to have been shot by the same camera.

EXTRA CREDIT

While mocha was the first planar tracker, similar technology can be found in:

  • Nuke, The Foundry
  • Syntheyes, Andersson Technologies
  • Flame, Autodesk
  • fayIN, fyateq

Learn more from BorisFX, who acquired Imagineer Systems, here.


Please rate the helpfulness of this tip.

Click on a star to rate it!

… for Visual Effects

Tip #542: What is Rotoscoping?

Larry Jordan – LarryJordan.com

Rotoscoping allows us to transfer an object onto a different background.

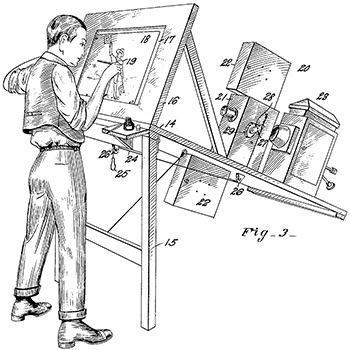
Image in the public domain.
Max Fleisher’s original rotoscope (1915).

Topic $TipTopic

Rotoscoping is an animation technique that animators use to trace over motion picture footage, frame by frame, to produce realistic action. Originally, animators projected photographed live-action movie images onto a glass panel and traced over the image. This projection equipment is referred to as a rotoscope, developed by Polish-American animator Max Fleischer. This device was eventually replaced by computers, but the process is still called rotoscoping.

In the visual effects industry, rotoscoping is the technique of manually creating a matte for an element on a live-action plate so it may be composited over another background.

Rotoscoping has often been used as a tool for visual effects in live-action movies. By tracing an object, the moviemaker creates a silhouette (called a matte) that can be used to extract that object from a scene for use on a different background. While blue- and green-screen techniques have made the process of layering subjects in scenes easier, rotoscoping still plays a large role in the production of visual effects imagery. Rotoscoping in the digital domain is often aided by motion-tracking and onion-skinning software. Rotoscoping is often used in the preparation of garbage mattes for other matte-pulling processes.

Rotoscoping has also been used to create a special visual effect (such as a glow, for example) that is guided by the matte or rotoscoped line. A classic use of traditional rotoscoping was in the original three Star Wars movies, where the production used it to create the glowing lightsaber effect with a matte based on sticks held by the actors. To achieve this, effects technicians traced a line over each frame with the prop, then enlarged each line and added the glow.

Learn more at Wikipedia.


Please rate the helpfulness of this tip.

Click on a star to rate it!

… for Visual Effects

Tip #509: How to Create Line Boil Animation

Larry Jordan – LarryJordan.com

Line Boil used to be considered a mistake. Now, it’s a way to add life to animation.

Topic $TipTopic

The PremiumBeat folks posted a YouTube video illustrating how to create a line boil animation.

“Line boil” animation is where lines in an animated figure shiver, or “boil,”” as though every frame was drawn by hand. It gives life and energy to a line drawing by emphasizing rough edges.

Here are the steps:

  • Using any drawing tool you prefer, create an original image. Line drawings of geometric shapes work best.
  • Trace the original image by hand, or mouse, create 4 or 5 new images – either as layers or separate images, depending upon the software you are using.

NOTE: It is important that these different iterations not look the same. It’s the variations between them that adds life to the animation.

  • Loop playback of these frames and watch your simple line drawing come to life.

EXTRA CREDIT

Watch the video linked above to see an illustration of this technique.


Please rate the helpfulness of this tip.

Click on a star to rate it!

… for Codecs & Media

Tip #541: What is Bit Depth?

Larry Jordan – LarryJordan.com

Bit depth is always expressed as a power of 2.

An illustration of 8-bit vs. 10-bit depth. (8-bit is on top).

Topic $TipTopic

Bit depth determines the number of steps between the minimum and maximum of a value. The bit depth number (8, 16, 24) actually describes a power of 2.

  • A bit depth of 4 = 2^4 = 16 steps
  • A bit depth of 8 = 2^8 = 256 steps
  • A bit depth of 10 = 2^10 = 1,024 steps
  • A bit depth of 16 = 2^16 = 65,536 steps

In the screen shot, the top row represents an image with a bit depth of 8. The lower image represents an image with a bit depth of 10.

NOTE: These are illustrations, actual bit depth variations don’t look quite this bad.

Where higher bit depths help image quality is in color grading, gradients and anywhere smooth shading from one value to another is important.

EXTRA CREDIT

In audio, bit depth determines the dynamic range; the amount of variation in audio levels between soft and loud. Bit depth is only meaningful in reference to a PCM digital signal (i.e. WAV or AIF). Non-PCM formats, such as lossy compression formats (i.e. MP3), do not have associated bit depths.


Please rate the helpfulness of this tip.

Click on a star to rate it!

… for Codecs & Media

Tip #539: What is a Sidecar File?

Larry Jordan – LarryJordan.com

Sidecar files track data that the main image file can’t.

Image courtesy of Pexels.com.
Sidecars hold stuff the main file can’t.

Topic $TipTopic

Sidecar files are XML computer files that store data (often metadata) which is not supported by the format of a source file. There may be one or more sidecar files for each source file.

In most cases the relationship between the source file and the sidecar file is based on the file name; sidecar files have the same base name as the source file, but with a different extension. The problem with this system is that most operating systems and file managers have no knowledge of these relationships, and might allow the user to rename or move one of the files thereby breaking the relationship.

Examples include:

  • XMP. Stores image metadata.
  • THM. Stores digital camera thumbnails
  • EXIF. Stores camera data to keep it from becoming lost when editing JPG images.

EXTRA CREDIT

Rather than storing data separately, it can be stored as part of the main file. This is particularly done for container files, which allow certain types of data to be stored in them. Instead of separate files on the file system, multiple files can be combined into an archive file, which keeps them together, but requires that software processes the archive file, rather than individual files. This is a generic solution, as archive files can contain arbitrary files from the file system.

Container formats include QuickTime, MXF and IFF.


Please rate the helpfulness of this tip.

Click on a star to rate it!

… for Codecs & Media

Tip #535: How to Convert 32-bit Media


Media based on 32-bit codecs needs to be converted before it can be played.

Kyno allows conversion of older media even when running on Catalina.

Topic $TipTopic
Since the release of macOS Catalina (10.15) older media based on 32-bit codecs no longer plays. If you were able to convert all your media before updating, great. If not, read this.

There’s nothing you can do in Catalina that will allow you to play older media based on 32-bit codecs. Catalina doesn’t support 32-bit anything. However, you are not totally out of luck.

If you have older media, you have two options:

  1. Transfer it to an older system, or borrow or rent one, and convert your media.
  2. A 3rd-party utility – Kyno – can find and convert older media, even if Kyno is running on a Catalina system.

Link to Kyno: Kyno.software.


Please rate the helpfulness of this tip.

Click on a star to rate it!