… for Adobe Premiere Pro CC

Tip #279: A Faster Way to Enable Tracks

Larry Jordan – LarryJordan.com

Sometimes, doing something faster simply requires a shift in thinking.
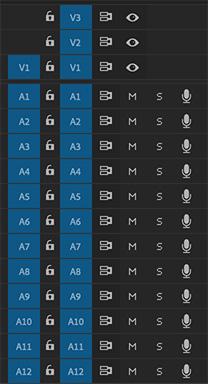
The timeline track header in Adobe Premiere Pro CC.
When a box in the track header of Premiere Pro is blue, it is enabled.

Topic $TipTopic

The blue boxes in the timeline track headers in Premiere Pro CC have two very different functions: The blue boxes on the left control signal patching between the Source monitor and the timeline, while the blue boxes on the right determine active tracks. Both are essential to fast editing. Here’s a cool trick to disable, or enable, them.

NOTE: We have separate tips covering how these work.

In both groups, to disable or enable all the video boxes, or all the audio boxes, click any box while pressing the Shift key.

Poof.


Please rate the helpfulness of this tip.

Click on a star to rate it!

… for Codecs & Media

Tip #310: A Fast Way to Set a Poster Frame

Larry Jordan – LarryJordan.com

Three steps to poster frame happiness.

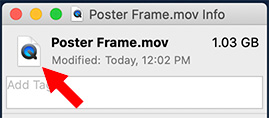
The Get Info box in the Macintosh Finder.
Paste the image you want to use for a poster frame into this icon.

Topic $TipTopic

In an earlier tip I illustrated one way to create a poster frame for a QuickTime movie. After reading it, a reader pointed out an even faster way to create a poster frame. Here are the steps:

  • Open the movie in QuickTime Player that you want to create a poster frame for.
  • Move the playhead to the frame you want to use, then copy it to the clipboard (Edit > Copy).
  • Close the file.
  • Select the file in the Finder.
  • In the Finder, chose File > Get Info.
  • In the top left corner, select the small icon to the left of the name.
  • Choose Edit > Paste.

Poof! Instant poster frame.


Please rate the helpfulness of this tip.

Click on a star to rate it!

… for Random Weirdness

Tip #163: Measure GPU Performance on Your Mac

Larry Jordan – LarryJordan.com

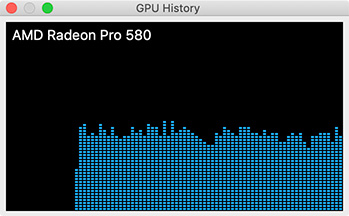
Hidden in Activity Monitor is the ability to monitor GPU performance.

Topic $TipTopic

We’ve already seen (Tip 156) how to use Activity Monitor to measure the performance of the CPU. However, hidden in a menu is also the ability to display GPU (Graphics Processing Unit) performance in real-time!

  • Type Shift + Cmd + U to open the Utilities folder. Double-click Activity Monitor to start the app.
  • Choose Window > GPU History.

As you can see in this screen shot, this displays current GPU performance with a new column every 5 seconds.

NOTE: The higher the bar, the harder the GPU is working. Bars that fill the screen represent 100% of total GPU output.

Energy usage related to GPU activity is incorporated into the energy-impact measurements in the Energy tab of Activity Monitor.


Please rate the helpfulness of this tip.

Click on a star to rate it!

… for Apple Motion

Tip #313: Animate a Generator with a Behavior

Larry Jordan – LarryJordan.com

Generators provide animation without keyframes.

Almost every parameter in Apple Motion can be animated.
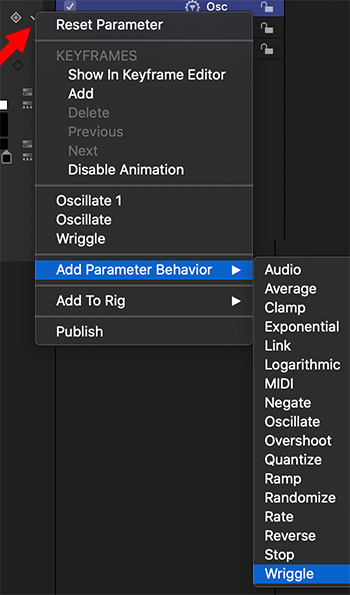
Applying a behavior to a specific parameter in Motion.

Topic $TipTopic

The big benefit to using behaviors to create movement in Motion is that they can be applied without also using keyframes. Behaviors are fast, easy and flexible. Keyframes, though, are more precise.

Generators are elements which are combined with other elements to create visual effects. For example, Cellular is a randomly animated series of dots which can be colorized as needed. Or add Noise to provide texture to text. Or Caustics to simulate light bouncing off rippling water.

Another intriguing feature of generators is that many of them are already animated. So, adding a Behavior simply adds to the visual interest.

There are two ways to add a Behavior to a generator:

  • Apply it to the entire generator. For example, adding Basic Motion > Spin to cause the generator to rotate.
  • Apple the Behavior to a single setting of the generator. For example, to apply Oscillate to cause one setting – say size – to change size. This use is also called a “Parameter Behavior” and is illustrated by this screen shot.

As with all behaviors, once you’ve applied it, play the timeline, adjust a setting and watch what happens.

I find behaviors are a great way to explore the answer to the question: “What happens if I do this?”


Please rate the helpfulness of this tip.

Click on a star to rate it!

… for Adobe Premiere Pro CC

Tip #255: Multiple Shortcuts for One Menu

Larry Jordan – LarryJordan.com

This technique is great when one shortcut just isn’t enough.

Detail from the keyboard shortcuts panel in Adobe Premiere Pro CC.
Here, I’ve assigned THREE! shortcuts to the same menu.

Topic $TipTopic

I use both Premiere and Final Cut on a regular basis. And if there’s one thing that drives me nuts it’s trying to remember which keyboard shortcuts apply to each program.

Premiere provides an amazingly elegant solution: You can assign more than one shortcut to the same menu item. In fact, you can assign more than SIX!!

  • Open Keyboard Preferences.
  • Find the shortcut you want to modify.
  • Click just to the right of any existing shortcuts, then add your new choice.

NOTE: I was able to do this six times, with six different shortcuts applied to the same menu choice!

  • To delete a shortcut, click the small “x” next to it.
  • To save your modified shortcuts, click OK in the bottom right corner of the Keyboard Shortcuts panel.

Very, very, VERY cool!


Please rate the helpfulness of this tip.

Click on a star to rate it!

… for Apple Final Cut Pro X

Tip #309: Export Multi-Channel Audio

Larry Jordan – LarryJordan.com

FCP X supports exporting multi-channel audio, provided you use Roles.

Topic $TipTopic

Normally, when we export a project from Final Cut Pro X, we are creating a master file, ready for distribution. But, sometimes, you need to export multiple channels of audio – either for an upcoming audio mix or to deliver stems to the distributor.

FCP X supports multichannel export, but it requires Roles.

The steps necessary are more complex than will fit in a tip, but I wanted to share a link with you if this is something you need to do. Here’s the link.

EXTRA CREDIT

If you need to export files for ProTools, you’ll need to export an XML file. Then, use an excellent utility called X2Pro to convert this into the AAF format that ProTools can read. Here’s the link.


Please rate the helpfulness of this tip.

Click on a star to rate it!

… for Apple Final Cut Pro X

Tip #312: New Export Options

Larry Jordan – LarryJordan.com

Exporting is both faster and easier.

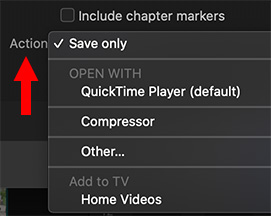
Detail from the Share Settings screen in Apple Final Cut Pro X.
The options in File > Share > Settings have changed … and simplified.

Topic $TipTopic

New with the 10.4.8 update to Final Cut Pro X are new, and simplified, export options. In the past, we had a confusing set to choose from, especially when all we wanted to do was save a master file.

Now, as indicated by the screen shot, the default option is to save the file at the location you specify. Other options, such as automatically sending a file to YouTube or Facebook, still exist as part of the Share menu, but creating a master file is now much more straight-forward.

Also, after a file is exported, you can have it automatically open in QuickTime Player, Compressor, or the application of your choice.

Even, if you want, store it in the new Apple TV application.

EXTRA CREDIT

The keyboard shortcut to export a master file remains the same: Cmd + E.


Please rate the helpfulness of this tip.

Click on a star to rate it!

… for Adobe Premiere Pro CC

Tip #275: Faster Trims by Changing a Preference

Larry Jordan – LarryJordan.com

Change one preference to make trimming smarter… and faster.

Preferences - Trim options in Adobe Premiere Pro CC.
Check the top option to enable “smart” trimming in Premiere.

Topic $TipTopic

Recently, Adobe added a preference setting that makes timeline trimming much faster and easier, but this preference is turned off by default. Here’s what happens when you turn it on.

  • Open Premiere > Preferences > Trim (Edit > Preferences > Trim on Windows).
  • Check the top box (“Allow Selection tool to choose…”) to enable this option.

Now, when you hover the cursor over an edit point:

  • If the cursor is just to the left of the edit point, the cursor switches to the Ripple trim tool, allowing us to adjust the Out of the out-going clip.
  • If the cursor is just to the right of the edit point, the cursor changes to the Ripple trim tool, allowing us to adjust the In of the in-coming clip.
  • If the cursor is centered over the edit point, the cursor switches to the Roll trim tool, allowing us to adjust both the In and Out settings at the same time.
  • Press the Cmd key (Control on Windows) to switch between Ripple and Trim modes.

This “smart” selection of the correct trim tool based upon its position relative to the edit point is a huge time-saver when trimming.


Please rate the helpfulness of this tip.

Click on a star to rate it!

… for Adobe Premiere Pro CC

Tip #276: A Faster Way to Create a Split Edit

Larry Jordan – LarryJordan.com

Split edits are used constantly in drama.

Create a split edit in the Premiere timeline.
The Option (Alt) key is the secret of a fast split edit.

Topic $TipTopic

A split edit is used when we want to see one thing, but hear another. These are used constantly in drama when someone is talking, but we want to see another actor’s reaction before the first speaker has finished talking.

Premiere makes creating split edits easy – you just need options…

With the Roll trim tool selected, press the Option key (Alt on Windows). Then drag either the video edit point or the audio edit point.

Ta-DA!

A split edit.

There are other ways to create a split edit – but nothing is faster than this.

EXTRA CREDIT

  • An edit where the video precedes the audio is called an “L-edit” because the two edit points form the shape of an “L”.
  • An edit where the audio precedes video is called a “J-edit” because it forms a rough letter “J”.

Please rate the helpfulness of this tip.

Click on a star to rate it!

… for Adobe Premiere Pro CC

Tip #277: Source Monitor Audio Zooming…!

Larry Jordan – LarryJordan.com

There are three different ways to zoom into audio in the Source Monitor.

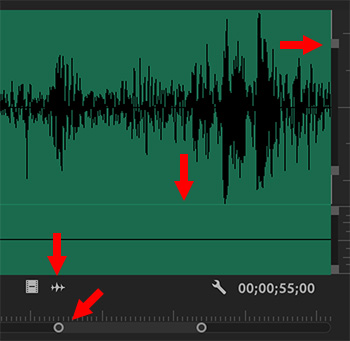
An audio waveform with a modified display in the Adobe Premiere Pro Source Monitor.
Four different controls over waveform display in the Premiere Source Monitor.

Topic $TipTopic

The Source Monitor can tell us a lot more about our audio than you might, at first, suspect. It all relates to “zooming” and here’s how it works.

  • Double-click a clip in either the Project panel or Timeline to load it into the Source monitor.

Then, looking at this screen shot:

  • Click the waveform icon (left-most arrow) to display the waveform.

NOTE: A waveform is the visual representation of the volume of the sound. Bigger waveforms are louder.

  • To zoom into a portion of the waveform, drag one of the white dots (second arrow from left). Or, type [plus] or [minus].
  • To increase, or decrease, the display height of a waveform, drag the thin light horizontal line (third-arrow from left).
  • To magnify the size of the waveform, drag the small gray dot at the top right of an audio channel (arrow on right). Each audio track has this control on the right.

NOTE: These last two options only change the waveform display, they do not alter the audio itself.

EXTRA CREDIT

To reset a clip back to its normal display, simply load a different clip in the Source Monitor. The next time you display an altered clip, the waveforms will be back to normal.


Please rate the helpfulness of this tip.

Click on a star to rate it!