… for Apple Motion

Tip #447: Move Text Along an Unusual Path

Larry Jordan – LarryJordan.com

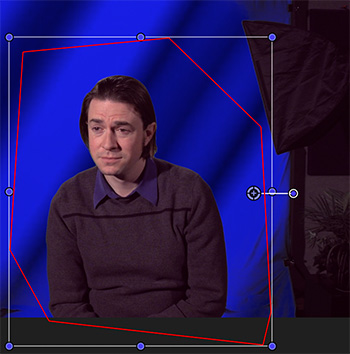
Any shape can form a path for text to travel around the screen.

The Text Inspector in Apple Motion 5.x.
Change the Layout Method to Path, then lower down, change the Path Options.

Topic $TipTopic

This article is an excerpt from an Apple KnowledgeBase article.

Most of the time, we want text in Motion to travel in a straight line. But, when you want that text to take strange shapes, Motion makes it easy. Here’s how to use a shape as a path for text.

  1. In Motion, import or draw the shape you want to use as the path source.
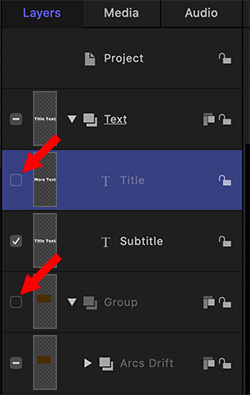
  2. Select text in the Layers list, canvas, or Timeline.
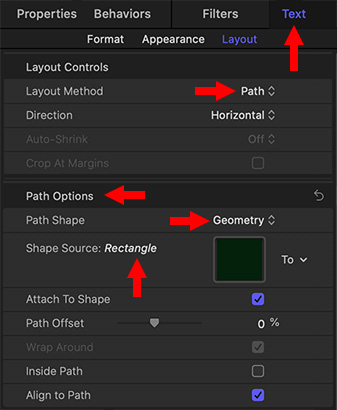
  3. In the Layout pane of the Text Inspector, click the Layout Method pop-up menu, then choose Path.
  4. In the Path Options section of the Layout pane, click the Path Shape pop-up menu, then choose Geometry. The Shape Source well appears in the Inspector.
  5. From the Layers list, drag the shape into the Shape Source well.
  6. When the pointer becomes a curved arrow, release the mouse button.
  7. A thumbnail of the shape appears in the well and the shape is used as the source shape for the text path.

NOTE: You might want to disable (deselect) the original source shape in the Layers list so it’s not visible in your project.


Please rate the helpfulness of this tip.

Click on a star to rate it!

… for Apple Motion

Tip #432: Create Your Own Templates in Motion

Larry Jordan – LarryJordan.com

Templates allow you to speed repetitive tasks.

Templates are listed on the left side of the Project Browser in Motion.

Topic $TipTopic

If you find yourself creating the same projects over and over in Motion, here’s fast way to create a template to speed your work.

When you are creating the same thing over and over, only to vary one small detail – for example, the text – a template can save you time and improve your accuracy.

Here are the steps:

  • Create a new Motion project (or open an old one).
  • Make all the changes you want, including adding all media, effects and text.
  • When it is done, choose File > Publish Template.
  • Give your template a name and, ideally, a new Category. In my screen shot, I created a category called “Larry” which is the location where I store all my unique templates.
  • If you want to use this template in Final Cut Pro X, also check Publish as Final Cut Generator.

Once you’ve created a template, it will always be available on the left side of the Project Browser when you first start Motion. Double-click it to open.

Done.


Please rate the helpfulness of this tip.

Click on a star to rate it!

… for Apple Motion

Tip #433: Why Display Alpha Channels

The alpha channel displays the transparency in a clip.

The top image is in color, the lower image shows its transparency.

Topic $TipTopic

One of the options in the top right corner of the Motion Viewer is the ability to display the alpha channel of the current project. (You’ll find it in the menu under the color square.) But, why would you need this?

The alpha channel, like the red, blue and green channels, displays the amount of transparency associated with each pixel. For instance, in this screen shot, does the gradient in the top, color, image fade to black or transparent? It’s impossible to tell.

However, when you look at the bottom image, which displays transparency, it is easy to see that the image fades from solid black (transparent) to solid white (opaque). (Shades of gray represent differing amounts of translucency.)

Remember, the alpha channel doesn’t show color, it shows transparency.


Please rate the helpfulness of this tip.

Click on a star to rate it!

… for Apple Motion

Tip #434: Create Smoother Gradients in Apple Motion

Larry Jordan – LarryJordan.com

The default gradient settings in Motion are not that good. These are better.

Changing Start and End to equal, but opposite, values creates a much smoother gradient.

Topic $TipTopic

This tip was suggested by a comment from Mark Spencer to Tip #93.

In that original tip, I wrote that the gradients in Motion are not particularly smooth; rather, I recommended that you create smooth gradients in Photoshop, then import them into Motion. While this works, Mark pointed out that we can create much smoother gradients if we “play with the numbers.”

For instance, in this screen shot, I’ve created a gradient where the same color (lower blue bar) fades from transparent to fully opaque (top white bar).

The problem is that the default settings for a gradient create a very abrupt change.

To fix this:

  • Twirl down the small arrow to the left of the word “Gradient”
  • Change both the Start and End values to equal, but opposite, larger numbers.

For example, to create a smooth gradient that fills the frame, change Start to a positive value equal to 1/2 the horizontal width of your project and End to a negative value equal to 1/2 the width of your project. In this screen shot, I created a smooth gradient for a 1280 x 720 project. Half of 1280 is 640.


Please rate the helpfulness of this tip.

Click on a star to rate it!

… for Apple Motion

Tip #401: Define a Play Range in Motion

Larry Jordan – LarryJordan.com

Play ranges allow you to concentrate on a section of your project.

A modified play range in Apple Motion.

Topic $TipTopic

This article first appeared as an Apple KnowledgeBase article. This is an excerpt.

Ordinarily, clicking the Play button plays your project from the current position of the playhead to the last frame. However, you can change the play range of your project by modifying the In and Out points in the Timeline ruler or by using Menu commands. You might do this to focus on a specific section as you fine-tune your project or make other changes.

To customize the In or Out in Motion, do one of the following:

  • In the ruler, drag the In marker from the left edge of the timeline ruler to the frame where you want to set the new In. (Or, drag the Out marker from the right side of the timeline to a new position.) As you drag, the playhead moves with your pointer. When you release the mouse button, the playhead snaps back to its previous position.
  • In the timeline ruler, move the playhead to the frame where you want to set the In point, then choose Mark > Mark Play Range In. (Or, Mark > Mark Play Range Out.)
  • In the timeline ruler, move the playhead to the frame where you want to set the In point, then press Option-Cmd-I. (Or, press Option-Cmd-O).

EXTRA CREDIT

To reset the In and Out:

  • Choose Mark > Reset Play Range.
  • Press Option-X.

The In and Out points reset themselves to the beginning and end of the project.


Please rate the helpfulness of this tip.

Click on a star to rate it!

… for Apple Motion

Tip #402: Enable or Disable Layers in Motion

Larry Jordan – LarryJordan.com

Disable a layer to make it invisible.

A disabled element (top) and group (bottom), both indicated by red arrows.

Topic $TipTopic

This article first appeared as an Apple KnowledgeBase article. This is an excerpt.

In the Layers list, you can enable or disable layers or groups to make them visible or invisible in the canvas without removing them from your composition. For example, if a large image layer obstructs other layers you want to adjust in the canvas, you can temporarily disable the offending layer. Similarly, you can disable effects objects—filters, behaviors, masks, and so on—to temporarily remove their effect on layers and groups.

Enable or disable objects:

When you disable an image layer or group, it becomes invisible in the canvas. When you disable an effects object (such as a behavior or filter), its effect is disabled.

Do one of the following:

  • In Motion, deselect the activation checkbox to the left of an object in the Layers list; indicated by red arrows in the screen shot.
  • Select an object, then choose Object > Active (or press Control-T).
  • Control-click an object, then choose Active from the shortcut menu.

When disabled, objects are dimmed in the Layers list. Disabled layers are hidden in the canvas; disabled effects objects no longer modify the group or layer they’re applied to. Disabled layer do not export.

NOTE: If you disable layers in a group, the enclosing group’s checkbox displays a dash instead of a checkmark, indicating that some layers are not visible.


Please rate the helpfulness of this tip.

Click on a star to rate it!

… for Apple Motion

Tip #410: Solo or Lock Layers in Motion

Larry Jordan – LarryJordan.com

Solo or lock elements in Motion

Topic $TipTopic

This article first appeared as an Apple KnowledgeBase article. This is an excerpt.

To solo an object:

You can “solo” a layer or group to hide all other layers and groups in the project. This technique can be useful to isolate a single layer or group in the canvas to animate or manipulate it without interfering with other objects in your composition.

  • In the Layers list in Motion, select layers or groups to solo.
  • Choose Object > Solo (or press Control-S).

NOTE: You can also Control-click an object in the Layers list, then choose Solo from the shortcut menu.

All other layers or groups are deactivated, and only the soloed object is visible in the canvas. When the selected item is soloed, the solo menu item displays a checkmark.

EXTRA CREDIT

Locked objects cannot be modified or moved, and their parameters cannot be altered or animated. However, animation and behaviors previously applied to a layer or group still play. Locking a group also locks all layers and groups nested in it.

To lock an object, or group, click the Lock icon on the right side of the element you want to lock.


Please rate the helpfulness of this tip.

Click on a star to rate it!

… for Apple Motion

Tip #386: Filters that Blur Alpha Channels

Larry Jordan – LarryJordan.com

Blurring the alpha channel blurs a foreground image.

Image courtesy of Apple, Inc.

Topic $TipTopic

This is an excerpt from the Apple Motion user guide.

Blurring the alpha channel allows you to blur a foreground object into a background element. In fact, there are filters you can use to manipulate or even replace a layer’s alpha channel.

The process of improving a keying effect or of customizing an alpha channel created using shape or image masks may require the use of special filters. Although you can apply any filter to a shape or image mask to modify that mask’s effect, the filters described in this section modify a layer’s entire alpha channel, including the sum of all masks and other filters applied to that layer.

For example, if you’ve applied a keying filter, you can use the following filters to modify the resulting alpha channel even though no mask appears for that layer in the Layers list or Timeline:

  • Channel Blur: This filter, found in the Blur category of the Filters library, lets you selectively blur the alpha channel. You can set the amount of horizontal and vertical blur independently.
  • Matte Magic: This filter, found in the Keying subcategory of the Filters library, lets you manipulate various qualities of an alpha channel, shrinking, feathering, and eroding the alpha channel to fine-tune it.

Please rate the helpfulness of this tip.

Click on a star to rate it!

… for Apple Motion

Tip #387: Motion Tracking Strategies

Larry Jordan – LarryJordan.com

These tips from Apple can help improve your motion tracking.

Image courtesy of 2ReelGuys.com.

Topic $TipTopic

This is an excerpt from the Apple Motion User Guide. Motion tracking in Apple Motion isn’t always perfect. Here are some tips that can improve the quality of your tracks.

Find a Good Reference Pattern

In Motion, play the footage several times to locate a reference pattern that satisfies as many of the following rules as possible:

  • Contains perpendicular edges, such as dots, intersections, and corners. (Lines and straight boundaries should be avoided.)
  • Is a high-contrast pattern.
  • Contains smooth or even changes in brightness or color. An example of an uneven color or brightness change is a sharp-edged shadow that passes over your reference pattern.
  • Appears in every frame of the clip (does not move offscreen or become obscured by other objects).
  • Is distinct from other patterns in the same region in the clip.

Ask Motion for a Hint

You can have Motion display suggested tracking points. You need at least one tracker in the Canvas to display suggested tracking reference points.

  • In Motion, press and hold the Option key, place the pointer over a tracker in the canvas, then press and hold the mouse button.
    The suggested reference points appear in the canvas and in the magnified inset as small red crosshairs.
  • When you move a tracker toward a suggested point, the tracker snaps to the point. The suggested points are not necessarily ideal tracking reference points for the feature you want to track in the clip. Motion merely picks locations in the current frame that meet the reference pattern criteria, such as an area of high contrast.

Other tips include:

  • Manually modify track points
  • Delete bad keyframes in the Keyframe Editor
  • Delete bad track points in the Canvas

Please rate the helpfulness of this tip.

Click on a star to rate it!

… for Apple Motion

Tip #388: Garbage Masks in Motion

Larry Jordan – LarryJordan.com

Virtually all keys benefit from a garbage mask.

This is Drew in a really, really bad key.

Topic $TipTopic

This is an excerpt from the Apple Motion User Guide. Garbage masks are really useful because they help you, ah, get rid of the garbage. Here’s how it works

After you apply a key, you may need to crop unwanted background elements that can’t be keyed, such as the edge of a blue screen stage, lighting rigs, or tape that appears in the background. Using the Mask tool, you can create a garbage mask that removes unwanted elements.

NOTE: The Mask tool is not a filter, its a tool; located in the Toolbar at the bottom of the Motion interface.

There are five masking tools in Motion:

  • Rectangle Mask
  • Circle Mask
  • Freehand Mask
  • Beziér Mask
  • B-spline Mask

Create a Garbage Mask

In Motion, select the keyed layer and use a mask tool to draw a mask around the foreground subject.

NOTE: If the subject is moving, the garbage mask must be animated using keyframes.

By default, the Mask Blend Mode is set to Add, which crops everything outside the mask, while leaving the transparent areas in the mask alone. To crop out areas within masks, choose Subtract from the Mask Blend Mode pop-up menu.


Please rate the helpfulness of this tip.

Click on a star to rate it!