… for Apple Motion

Tip #307: Archive Active Versions of Motion

Larry Jordan – LarryJordan.com

Archives allow future access to earlier versions.
Apple Motion logo
The file icon for Apple Motion.

Topic $TipTopic

It is often necessary, especially if you are working with different clients, to have earlier versions of Motion available to you. However, only one version of Motion can be active on your system at a time. Recently, I read an Apple KnowledgeBase article that explained how to create archives.

NOTE: While this won’t get you access to earlier versions of Motion, it does mean that you’ll have access to all versions going forward.

To back up the currently installed Motion application:

  1. Create a new folder in the Applications folder, and name it after the application (for example, “Motion 5.4.5”). To check your version of Motion, open the application and choose About Motion from the Motion menu.
  2. Select the Motion application in the Applications folder. Choose File > Compress “Motion.” It will take a few minutes to compress.
  3. Move the resulting “Motion.zip” file into the folder you created in step 1.
  4. Move the folder containing the .zip file to a backup drive.

EXTRA CREDIT

These ZIP files can be stored anywhere, but I generally try to keep all my program archives in the same place. Remember, before you revert back to an earlier version, archive or delete the version of Motion currently stored in your Applications folder.

Also, if you revert to an earlier version of Motion, it may also require an earlier version of the macOS, so keep a note of which version of Motion uses which version of the macOS.


Please rate the helpfulness of this tip.

Click on a star to rate it!

… for Apple Motion

Tip #313: Animate a Generator with a Behavior

Larry Jordan – LarryJordan.com

Generators provide animation without keyframes.

Almost every parameter in Apple Motion can be animated.
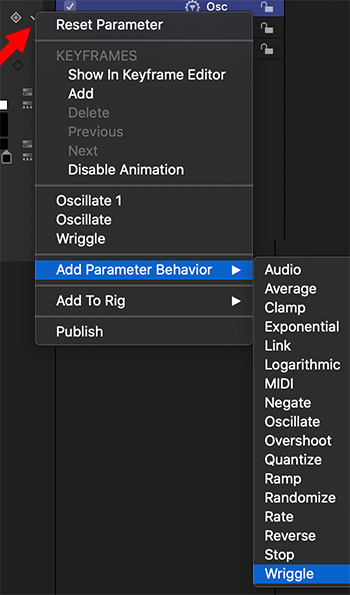
Applying a behavior to a specific parameter in Motion.

Topic $TipTopic

The big benefit to using behaviors to create movement in Motion is that they can be applied without also using keyframes. Behaviors are fast, easy and flexible. Keyframes, though, are more precise.

Generators are elements which are combined with other elements to create visual effects. For example, Cellular is a randomly animated series of dots which can be colorized as needed. Or add Noise to provide texture to text. Or Caustics to simulate light bouncing off rippling water.

Another intriguing feature of generators is that many of them are already animated. So, adding a Behavior simply adds to the visual interest.

There are two ways to add a Behavior to a generator:

  • Apply it to the entire generator. For example, adding Basic Motion > Spin to cause the generator to rotate.
  • Apple the Behavior to a single setting of the generator. For example, to apply Oscillate to cause one setting – say size – to change size. This use is also called a “Parameter Behavior” and is illustrated by this screen shot.

As with all behaviors, once you’ve applied it, play the timeline, adjust a setting and watch what happens.

I find behaviors are a great way to explore the answer to the question: “What happens if I do this?”


Please rate the helpfulness of this tip.

Click on a star to rate it!

… for Apple Motion

Tip #205: Quickly Add Motion Blur to a Motion Project

Motion Blur tends to blend foreground with background.

Apple Motion Inspector Project Properties
The Project Motion Blur settings in the Motion Inspector.

Topic $TipTopic

Motion Blur softens the edges of moving objects. Whether you use it or not is purely a matter of personal taste. But creating it is easy in Motion. Here’s how.

  • Select the Project in the Layers panel
  • Go to Inspector > Properties > Motion Blur
  • Set Samples to 16.
  • Set Shutter Angle to 180°

NOTE: If the effect is not visible during playback, go to the top right corner of the Viewer and choose Render > Motion Blur. Playing Motion Blur is GPU intensive, if the project slows down too much, export the file to lock in the blur.

EXTRA CREDIT

  • The higher the samples, the smoother the blur, for example, compare 8 to 32.
  • The higher the shutter angle, the larger the effect, for example, compare 90° to 420°.

Please rate the helpfulness of this tip.

Click on a star to rate it!

… for Apple Motion

Tip #206: Export a Still Frame in Motion

Larry Jordan – LarryJordan.com

Saving a still frame is as easy as “Share.”

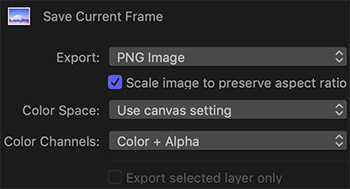
Apple Motion Save Current Frame Dialog
PNG and TIFF offer the highest quality. JPEG is the smallest file.

Topic $TipTopic

You are in the middle of creating the perfect motion graphic… except, the client wants to see your interim work before everything gets locked. No problem. Here’s a fast way to create a high-quality still.

  • Put the playhead on the frame you want to save.
  • Choose File > Share > Save Current Frame.

Export. PNG or TIFF are the highest quality, but largest files. JPEG is best for emailing.

Color Space. Virtually all the time, “Use Canvas Setting” is fine.

Color Channels. If you want to retain transparency, include the Alpha channel. If not, select Color.

Give the file a name and location and you’re done.

EXTRA CREDIT

You can create a custom keyboard shortcut using the Commands menu.


Please rate the helpfulness of this tip.

Click on a star to rate it!

… for Apple Motion

Tip #208: How to Use the Bezier Tool in Motion

Larry Jordan – LarryJordan.com

The Bezier tool creates straight lines, curves and arbitrary shapes.

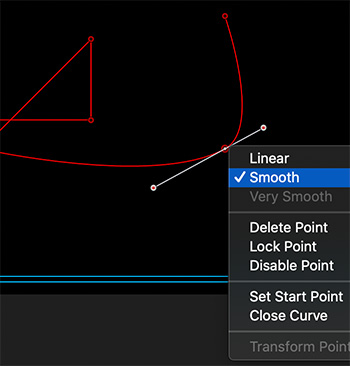
Drawing a path in Apple Motion with the Bezier tool.
Control-click a red dot to reveal control point options.

Topic $TipTopic

Motion has a Bezier tool that can be used to draw paths, create shapes, or define a non-geometric mask. It is both flexible and powerful. Here are some tips on how to use it.

  • Select the Bezier tool (it looks like a pen and is located immediately above the timecode display.)
  • Click in the Viewer to add a starting point.
  • Move the cursor and click again to create a straight line. To create a curve, click and drag the mouse.

NOTE: Press the Shift key to create straight lines, or lines at 45° angles.

  • Drag a white control handle to change the shape of a curve. Press Shift and Option to discover how they modify how white control line moves.

Control-click a red dot to reveal options:

  • Linear creates straight corners.
  • Smooth creates curves.

Please rate the helpfulness of this tip.

Click on a star to rate it!

… for Apple Motion

Tip #190: Fast Green-Screen Keys in Motion

Larry Jordan – LarryJordan.com

Four steps to better-looking keys.

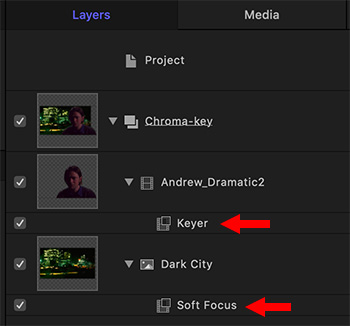
Green-screen foreground goes above the background.
Apply the Keyer filter to the foreground and Soft Focus to the background.

Topic $TipTopic

The chroma-key filter, also called a “green-screen key,” in Motion and Final Cut Pro X is excellent at creating a clean key, generally without needing to touch any settings.

Here’s how.

  • Import the foreground shot that has the green background. (The smoother and brighter this background is lit, the better your key. Remember, we are replacing all the green pixels.)
  • Import the new background shot you want to use in place of the original green and place it below the green-screen shot.
  • Apply Filters > Keying > Keyer to the foreground clip.
  • Apply Filters > Blur > Soft Focus to the background clip. Adjust the Amount setting so that you create the illusion of depth-of-field in the shot.

EXTRA CREDIT

Generally, to make a key look really believable, you’ll also need to add some color correction to the foreground. But, in terms of creating the key, these are the steps you need to know.


Please rate the helpfulness of this tip.

Click on a star to rate it!

… for Apple Motion

Tip #203: Create Split Screen Animation – Fast

Larry Jordan – LarryJordan.com

Use Motion to speed creating animated split screens.

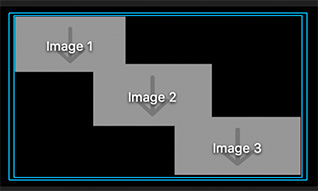
Three drop-zone placeholders in the Motion Viewer.
Size and animate the drop-zones in the Motion Viewer.

Topic $TipTopic

This technique uses Apple Motion to create an animated split screen template for Final Cut Pro X. If you only need to create split screens once, use Final Cut. If you need to create split screens more than once, it is much easier to create them as a template in Motion. Here’s how.

  • Create a new Generator in Motion. (Set the duration to a few seconds longer than necessary to allow room for transition handles.)
  • Choose Object > New Drop Zone. This adds an image placeholder that you will fill in Final Cut.
  • Size and position the Drop Zone as needed.
  • Add as many different Drop Zones as you have images.
  • To animate, select each layer and apply a Behavior. A good one to experiment with is Throw. Adjust using the HUD.
  • Choose File > Save. Give this new template a name and Category (folder).

Now, when you open Final Cut and go to the Generator browser, you’ll find this new template ready to go. Add images into the drop zones the same as any other Final Cut effect.

EXTRA CREDIT

Each drop zone can have filters applied, as well as much more extensive animation.

Normally, I put this effect over a background created in Final Cut. However, you can add the background in Motion and it will automatically transfer to Final Cut.

Additionally, you can add other elements such as lines, drawings… whatever sparks your imagination.


Please rate the helpfulness of this tip.

Click on a star to rate it!

… for Apple Motion

Tip #204: Fill an Element with a Gradient or Color

Larry Jordan – LarryJordan.com

This technique can be used for elements or groups.

On-screen gradient controls in the Motion Viewer.
Adjust the colors and direction for a gradient using the on-screen Viewer controls.

Topic $TipTopic

This technique allows you to quickly fill an element or all the elements in a group with a gradient or color, the only difference is whether you first select an element or a group.

  • Select an element.
  • Choose Library > Filters > Stylize > Fill
  • Go to Inspector > Filters and select a color or gradient.
  • If you choose a gradient, use the controls in the Viewer to change the direction.

Done.


Please rate the helpfulness of this tip.

Click on a star to rate it!

… for Apple Motion

Tip #151: Export a Transparent Effect from Motion

Larry Jordan – https://LarryJordan.com

Transparency can be displayed by any NLE.

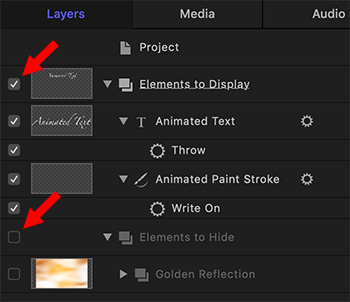
Unchecked layers in Motion are transparent.
Uncheck a group or layer in Motion to make it transparent.

Topic $TipTopic

You have two options to export an effect from Motion:

  • Export the entire composited movie. This creates a stand-alone movie.
  • Export just a portion of the effect – for example, a motion-tracked object, then composite it in the NLE.

Since exporting only exports visible layers, to export just an animated element, uncheck any layers you don’t want to export to make them invisible.

NOTE: To export the entire composite, make sure all layers are visible (checked) in the Layers panel.

Now, when you choose Share > Export Movie and accept the default settings, Motion creates a ProRes 4444 movie with an alpha channel, which means it includes any transparency.

That ProRes 4444 movie can then be imported into any editing software on Mac or Windows and retain all its transparency.

Very cool.


Please rate the helpfulness of this tip.

Click on a star to rate it!

… for Apple Motion

Tip #153: The Inspector Adds Perspective

Larry Jordan – https://LarryJordan.com

Precise controls for manipulating elements.

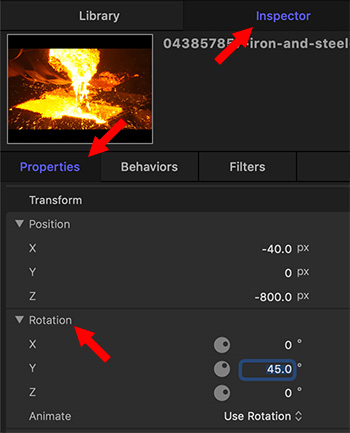
The Inspector adds 3D rotation or position changes.
Use the Motion Inspector to add 3D rotation or position changes.

Topic $TipTopic

There are two ways to add perspective to any element in Motion:

  • The Inspector
  • The 3D Transform tool

To use the Inspector:

  • Select an element in the Layers panel.
  • On the left side of the Interface, click Inspector > Properties.
  • Twirl down Position to move the selected element horizontally (X), vertically (Y), or to or from the viewer/camera (Z).
  • Twirl down Rotation to rotate the selected element horizontally (X), vertically (Y), or to or from the viewer/camera (Z).

Personally, I find myself using Y rotation the most of all these settings.


Please rate the helpfulness of this tip.

Click on a star to rate it!