… for Apple Motion

Tip #497: A Hidden Map in Motion

Larry Jordan – LarryJordan.com

These three maps can provide a variety of elements for effects.

Hidden deeply in Motion are three world maps you can use for effects.

Topic $TipTopic

Hidden deep inside Motion are three world maps that can be used for effects. Here’s where they are and an idea on how to use them.

In Motion, go to Library > Content > Images > Extras. Inside, you’ll find three maps:

  • Earth Color
  • Earth Transparent Outlines
  • Earth Transparent

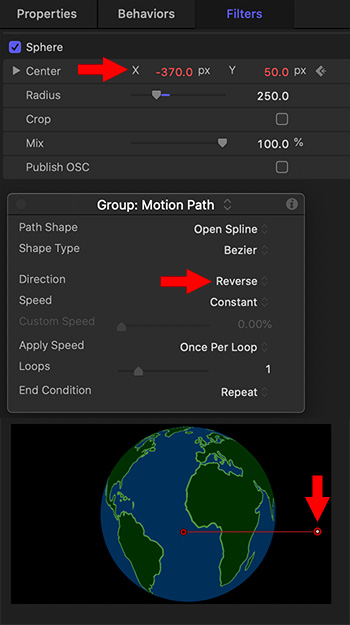
These three maps perfectly align and can be used for different effects, including a spinning globe.

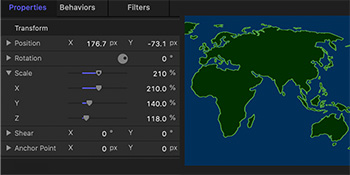
For example, in the effect in the screen shot:

  • Stack Earth Transparent Outlines on top of Earth Color.
  • Set the Opacity of Earth Color to 15%
  • Change the Scaling in the group that contains these two images to:
    • X = 210%
    • Y = 140%
    • Z = 118%

At this point, you’ll have a nice outline on your map, the countries will all look reasonably correct and you can use this in a variety of ways.

Cool.

EXTRA CREDIT

See Tip #498 to learn how to turn these maps into a spinning globe.


Please rate the helpfulness of this tip.

Click on a star to rate it!

… for Apple Motion

Tip #498: Create a Spinning Globe

Larry Jordan – LarryJordan.com

Create a spinning glove from elements in the Motion Library.

Here are the settings I used to create a spinning globe from elements in the Motion Library.

Topic $TipTopic

Tip #497 showed how to create a glowing map. This tip explains how to take those elements and turn them into a globe that spins. (Review Tip #497 for instructions on where these maps are located and how to create the initial effect.)

Starting with the map effect we created in Tip #497, select the group that contains the maps. Then:

  • Select the group containing the maps and change Inspector > Properties > Scale to 140% on all axes.
  • Apply Filters > Distort > Sphere. This converts the flat maps into a globe.
  • Set a starting keyframe for Sphere > Center X = 0.
  • Set an ending keyframe for Sphere > Center X = -370. This spins the globe, however, it slowly wanders off-screen.
  • Apply Behaviors > Basic Motion > Motion Track. Change Direction from Forward to Reverse.
  • Then, adjust the starting and ending point of the Motion Track so that it moves the globe in the opposite direction to Sphere. With a bit of tweaking, the movements of the two effects will cancel and cause the globe to spin motionlessly. (It took me about five minutes to get these to balance.)

At this point, you have a spinning globe you can scale and place anywhere in the frame.

COMMENT

There may be an easier way to do this, but I haven’t discovered it yet.


Please rate the helpfulness of this tip.

Click on a star to rate it!

… for Apple Motion

Tip #475: Fill Text with Video

Larry Jordan – LarryJordan.com

The secret is Stencil Alpha.

Property settings inside the Inspector put video inside text.

Topic $TipTopic

Text with animated video inside it is always fun to watch. Motion makes it easy to fill any text with any background. Here’s how:

  • Create and format your text. Thicker letters make this effect more visible.
  • Put the background you want to fill the text with in the same group, but behind the text.
  • Select the text and go to Inspector > Properties and change the Blend Mode to Stencil Alpha.

Done.

EXTRA CREDIT

The screen shot shows the Inspector settings to create this effect. I then added the text effect so you could also see it. The text is Kraash Black, the background is Two Color Ray,both found in the the Motion Library.


Please rate the helpfulness of this tip.

Click on a star to rate it!

… for Apple Motion

Tip #484: Put a Background Behind Filled Text

Larry Jordan – LarryJordan.com

The key is to change the blend mode of the group, not the text.

Switching the blend mode to “Normal” displays what’s behind a group.

Topic $TipTopic

In Tip #475, I illustrated how to fill text with an animated video. But, if you try to put a background behind that filled text, all you get is black. Here’s how to solve this dilemma.

Fill the Text

  • Add text into a group.
  • In the same group, put a background below the text that you want to fill the text.
  • Change the Blend Mode for the text to Stencil Alpha.

Add the Background

  • Create a new group and put it below the group containing the text.
  • Put the background you want to put behind the text effect into this second group.
  • Change the Blend Mode of the top group to Normal.

NOTE: In this last step, you are changing the Blend mode for the group, not the text inside the group.

EXTRA CREDIT

The screen shot shows the Inspector settings to create this effect. I then added the final effect so you could see it. The text is Kraash Black, the background inside the text is Two Color Ray, the blue background is Sudden Impression. All are found in the the Motion Library.


Please rate the helpfulness of this tip.

Click on a star to rate it!

… for Apple Motion

Tip #486: Add Drop Shadows to Text

Larry Jordan – LarryJordan.com

The secret to adding drop shadows is to add them to the group.

To add drop shadows, you apply them to the group, not the text, when blend modes are involved.

Topic $TipTopic

In Tip #475, I showed how to fill text with an animated background. In Tip #484, I showed how to put a background behind the filled text. Now, I want to show how to put a drop shadow on the text, because you can’t do it on the text itself.

Fill the Text

  • Add text into a group.
  • In the same group, put a background below the text that you want to fill the text.
  • Change the Blend Mode for the text to Stencil Alpha.

Add the Background

  • Create a new group and put it below the group containing the text.
  • Put the background you want to put behind the text effect into this second group.
  • Change the Blend Mode of the top group to Normal.

Add the Drop Shadows

  • Select the group that contains the text.
  • Go to Inspector > Properties, then enable and modify the drop shadow settings.

NOTE: If you try to apply a drop shadow to the text, it will disappear as soon as you change the blend mode.

EXTRA CREDIT

The screen shot shows the Inspector settings, plus the finished effect.


Please rate the helpfulness of this tip.

Click on a star to rate it!

… for Apple Motion

Tip #465: What is a Rig?

Larry Jordan – LarryJordan.com

Rigs simplify controlling effects in Motion.

A new Rig added to a Motion project.

Topic $TipTopic

Rigs are used to pass controls for Motion template effects from Motion to Final Cut Pro X. But they are also useful in Motion, itself, to simplify the control set of a complex project. Instead of making changes by manipulating individual parameters in various Inspectors, you can modify the Motion project using just a few widgets in a single rig.

NOTE: A “widget” is a single control contained in a rig.

A rig is especially helpful when you need to share a complex project with multiple users or when the project is designed to be updated each time it’s used. For example, you can create a basic project for an animated lower-third title that incorporates two text objects and a background replicator.

Each time the project is used, the size and position of the lower third (a replicator in this example) must change to match the length of the text, and the color must cycle through your project’s color scheme. By adding a rig to the project, you can create a small set of controls that modify only the parameters such changes require.

EXTRA CREDIT

To learn how to build a rig in Motion, open the Help files and search for “Build a Simple Rig?”


Please rate the helpfulness of this tip.

Click on a star to rate it!

… for Apple Motion

Tip #466: How to Display a Grid in Motion

Larry Jordan – LarryJordan.com

The grid is a very useful tool for aligning elements.

The View menu from inside Apple Motion.

Topic $TipTopic

Hidden in Motion is the ability to display a grid in the Viewer, which greatly simplifies aligning elements.

To reveal it, choose Grid from the View menu in the top right corner of the Canvas (Viewer).

EXTRA CREDIT

To adjust grid spacing and color, go to Preferences > Canvas.


Please rate the helpfulness of this tip.

Click on a star to rate it!

… for Apple Motion

Tip #467: Render Settings Improve CPU Performance

Larry Jordan – LarryJordan.com

These render options allow us to avoid overloading the CPU.

Render options in the Render menu of the Canvas.

Topic $TipTopic

(This is an excerpt from the Motion Help files.) Choose the render quality and resolution of the canvas display, and enable or disable features that can impact playback performance. When an option is active, a checkmark appears beside the menu item. If a complex project is causing your computer to play at a very low frame rate, you can make changes in this menu to reduce the strain on the processor.

The Render pop-up menu displays the following items:

  • Dynamic: Reduces the quality of the image displayed in the canvas during playback or scrubbing in the Timeline or mini-Timeline, allowing for faster feedback. Also reduces the quality of an image as it is modified in the canvas. When playback or scrubbing is stopped, or the modification is completed in the canvas, the image quality is restored (based on the Quality and Resolution settings for the project).
  • Full: Displays the canvas at full resolution (Shift-Q).
  • Half: Displays the canvas at half resolution.
  • Quarter: Displays the canvas at one-quarter resolution.
  • Draft: Renders objects in the canvas at a lower quality to allow optimal project interactivity. There’s no anti-aliasing.
  • Normal: Renders objects in the canvas at a medium quality. Shapes are anti-aliased, but 3D intersections are not. This is the default setting.
  • Best: Renders objects in the canvas at best quality, which includes higher-quality image resampling, anti-aliased intersections, anti-aliased particle edges, and sharper text.
  • Custom: Allows you to set additional controls to customize rendering quality. Choosing Custom opens the Advanced Quality Options dialog. For more information, see Advanced Quality settings.
  • Lighting: Turns the effect of lights in a project on or off. This setting does not turn off lights in the Layers list (or light scene icons), but it disables light shading effects in the canvas.
  • Shadows: Turns the effect of shadows in a project on or off.
  • Reflections: Turns the effect of reflections in a project on or off.
  • Depth of Field: Turns the effect of depth of field in a project on or off.
  • Motion Blur: Enables/disables the preview of motion blur in the canvas. Disabling motion blur may improve performance.

Note: When creating an effect, title, transition, or generator template for use in Final Cut Pro X, the Motion Blur item in the View pop-up menu controls whether motion blur is turned on when the project is applied in Final Cut Pro.


Please rate the helpfulness of this tip.

Click on a star to rate it!

… for Apple Motion

Tip #448: How to Use LUTs in Motion

Larry Jordan – LarryJordan.com

LUTs don’t require rendering, making them VERY fast!

The Filters menu in Apple Motion 5.x.

Topic $TipTopic

This article is an excerpt from an Apple KnowledgeBase article.

The Custom LUT filter in Motion applies stylized film and video “looks” (such as Summer, Old Timey, Sci-Fi, and so on), camera LUTs, or tone mapping (to convert footage from one color space to another).

To use LUTs in Motion, add the Custom LUT filter to a layer in your project, import third-party LUTs into the filter, then choose the LUT you want to apply to your footage.

Stylized LUT effects are available from a variety of third-party sources. Camera LUTs, used to convert “flat” or “log” footage from high-end cameras to standard color spaces, are available from many camera manufacturers and other sources.

NOTE: Because Motion stores third-party LUTs externally (outside of Motion projects), it’s inadvisable to use LUTs in templates created for Final Cut Pro X.


Please rate the helpfulness of this tip.

Click on a star to rate it!

… for Apple Motion

Tip #446: Move Text on a Path

Larry Jordan – LarryJordan.com

Text can move around paths or shapes.

Text following a path in Apple Motion.

Topic $TipTopic

This article is an excerpt from an Apple KnowledgeBase article.

The Path layout method lets you place text on a baseline path that you can warp to create curving or angular trails of text. After you create text on a path, you can modify or extend the path, add or remove control points, or animate text on the path.

CREATE TEXT ON A PATH

  1. In Motion, select text in the canvas, Layers list, or Timeline.
  2. In the Layout pane of the Text Inspector, click the Layout Method pop-up menu, then choose Path.
    The Path Options controls become available, near the bottom of the Layout pane.
  3. In the canvas toolbar, select the Text tool (shortcut: T), then click the text in the canvas.

NOTE: Step 3 is important—the Text tool must be selected to view or edit the text path.

  • The path appears below the text. The default path shape is a straight line (an open spline) with three control points.

NOTE: To add a control point, Control-click the path and choose Add Point.

Read the rest of the article to learn how to adjust, extend or modify the path.


Please rate the helpfulness of this tip.

Click on a star to rate it!