… for Apple Motion

Tip #1647: Create a Constant Speed Change in Motion

Larry Jordan – LarryJordan.com

Changing clip speed isn’t easy in Motion, but it is possible.

The clip Timing panel in Inspector > Properties.

Topic $TipTopic

Motion makes it possible for you to change the playback speed of clips, but this feature is pretty well hidden. Here’s how this feature works.

  • Select the video clip who’s speed you want to change in the Layers panel.
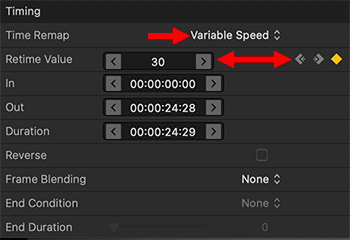
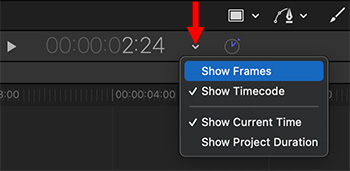
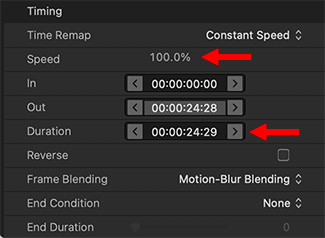
  • Go to Inspector > Properties and scroll to the bottom and show Timing (see screen shot).

Here is what some of the settings mean for a Constant speed change:

  • Time Remap switches between Constant and Variable Speed. (Tip #1648 discusses Variable Speed settings.)
  • To play a clip in reverse, check the Reverse checkbox.
  • To play a clip in slow motion, adjust the Speed setting.
  • To have a clip end on a certain frame, adjust either the Duration or Out timecode values. (These are paired, so if you adjust one, the other moves.)
  • If the speed goes below around 50%, change Frame Blending from None to Motion-Blur Blending.
  • If you increase the speed of a clip and don’t have enough frames to cover the total duration, set the End Condition to Hold, then add frames to the End Duration until the clip is as long as you need it.

Please rate the helpfulness of this tip.

Click on a star to rate it!

… for Apple Motion

Tip #1648: Create a Variable Speed Change in Motion

Larry Jordan – LarryJordan.com

Variable speed changes requiring using frame counts, not timecode.

A variable speed change in Motion. Note keyframes and Retime Value settings.

Topic $TipTopic

Creating a variable speed change to a video clip in Motion is involved and somewhat hidden. Also, the Help files don’t help.

NOTE: While this feature is called “Variable Speed Change,” you are not ramping into that speed. You are switching, instantly, from one speed – say 100% – to another – say, 50%.

Here’s how this works.

  • Select the clip you want to modify in the Layers panel.
  • Go to Inspector > Properties and scroll down to show the Timing panel.
  • Change the Time Remap setting to Variable Speed. This sets a 100% speed timing keyframe at the beginning and end of the clip.
  • Put the playhead where you want the speed change to start, then set a Retime Value keyframe.
  • Move the playhead where you want the speed change to end and set a second Retime Value keyframe.
  • Then, adjust the Retime Value (which is a frame counter) to adjust which frame appears at that keyframe.

NOTE: This is a good reason to switch the timecode display to frames, by clicking the small, down-pointing white arrow to the right of the timecode display. All timing changes are measured in frames.

For example, let’s say you want the clip to run at 50% speed for the first two seconds, then freeze for two seconds, then return to normal. The project is 30 fps. (You need to know the project frame rate for this to work.)

  • Set a keyframe on the starting frame (Frame = 0)
  • Set a keyframe at the two second mark (Frame = 60)
  • With the playhead parked on the second keyframe, change the Retime Value to 30. This slows clip playback so that the 30th frame in the clip appears at 60th frame of the project. In other words, the clip plays at 50% speed.
  • Move the playhead to Frame 120 and set another Retime Value keyframe.
  • Set the Retime Value to 30. This creates a still frame from the second keyframe to the third. Why? Because the Retime Values are the same.
  • When the still frame is done, the clip returns to 100% speed as it heads to the last keyframe. Remember, these keyframes represent instantaneous switches in speed, not ramps.

EXTRA CREDIT

This feature takes experimentation to learn what works. However, as a tip, don’t remove the starting and ending keyframes.

The frame rate of the source clip does not appear to be significant.

One other note, resetting the clip does not seem to remove keyframes. If you reset a parameter, you may need to remove keyframes manually.


Please rate the helpfulness of this tip.

Click on a star to rate it!

… for Apple Motion

Tip #1649: Shear vs. Rotation Effects

Larry Jordan – LarryJordan.com

Shear deforms the image, as well as add a 3D feel.

A rotated image (top), Shear image (bottom). The lower image lost perspective.

Topic $TipTopic

Shear is a Transform property that you probably haven’t played with. But it is quite different from Rotation. Here’s an illustration.

We have long had the ability to rotate elements in 3D, thanks to the 3D Transform tool (top image in screen shot).

However, Rotation keeps everything properly in perspective. Shear does not.

  • Select an element.
  • Go to Inspector > Properties > Transform. Then drag the X or Y value and watch what happens.
  • Shear distorts the clip in a variety of non-perspective ways, creating a sort of a deformed 3D rotation look.

This is easier to see as you play with it, especially when moving X and Y in combination.

EXTRA CREDIT

Remember, all Transform settings can be keyframed, so you can animate your weirdness, along with applying behaviors to it.


Please rate the helpfulness of this tip.

Click on a star to rate it!

… for Apple Motion

Tip #1637: An Invaluable Preference Setting

Larry Jordan – LarryJordan.com

This one preference setting can decrease your frustration.

An edited screen shot of the Motion > Preferences > Project pane.

Topic $TipTopic

If, like me, you add new elements to a Motion project only to discover that they seem to land anywhere EXCEPT where you want them, here’s a very simple fix.

By default, whenever you add a new element to a project – either by dragging into the Canvas or the Layers panel – that element starts at the position of the playhead in the mini-Timeline.

Which is great – except, I NEVER remember to move the playhead to the right spot until AFTER I add the element.

Grrr… I spend most of my time repositioning the In or the Out of an element.

So, here’s a FAST way to fix this:

  • Open Motion > Preferences.
  • Click the Project icon (see screen shot).
  • Change Create Layers at to Start of Project.

NOTE: The default setting Current frame, always places the In of a new element at the position of the playhead in the mini-Timeline.

Now, whenever you add something new, it will always start at the beginning of a project. This may not be where you want it, but it will always be where you expect it.

EXTRA CREDIT

In addition to dragging elements into position in the Timeline, you can also place the playhead where you want them to start and type I (in) or O (out).


Please rate the helpfulness of this tip.

Click on a star to rate it!

… for Apple Motion

Tip #1638: Create a Default Motion Project Duration

Larry Jordan – LarryJordan.com

Preset preferences control everything except project durations.

Project durations, which can be in frames or seconds, are set from Preferences > Project.

Topic $TipTopic

Here’s another Motion preference setting that can simplify your life.

When you create a new preset (Motion > Preferences > Presets), you can specify all sorts of different technical settings for your projects. This allows Motion to auto-configure projects quickly when you create new ones.

The only thing you CAN’T do from the Preset menu is set a default duration. That option is located in Motion > Preferences > Project. (See screen shot.)

Simply change the Project Duration in the Project pane to whatever you prefer for a default.

NOTE: Remember, you can always change this value when creating a new project using the Project Browser.

EXTRA CREDIT

You can specify durations using either frames or seconds.


Please rate the helpfulness of this tip.

Click on a star to rate it!

… for Apple Motion

Tip #1639: Switch Between Timecode & Frames

Larry Jordan – LarryJordan.com

Internally, Motion tracks everything in frames, but can easily display timecode.

Click the white arrow to change the timing display.

Topic $TipTopic

Video folks tend to think in timecode. Animators tend to think in frames. Motion supports both. Internally, Motion tracks everything in frames, but can easily display timecode.

To switch, click the small down-pointing white arrow to the right of the timecode / frame display at the bottom of the Canvas (see screen shot).

Using this popup menu, you can choose to display either frames or timecode, as well as current project time or total project duration.

You can change this setting whenever you want, it is display-only.


Please rate the helpfulness of this tip.

Click on a star to rate it!

… for Apple Motion

Tip #1611: Remove Keyframes in Motion

Larry Jordan – LarryJordan.com

Here’s how to get rid of keyframes you no longer want.

The small white arrow allows removing keyframes by resetting a parameter.

Topic $TipTopic

Sometimes, Motion creates keyframes when you don’t expect them. Here’s why and how to get rid of them.

There’s a keyboard shortcut in Motion that’s the culprit: A. Yup, one letter. And it is also the shortcut for the Arrow tool in Final Cut – one we use ALL the time! When you think you’re selecting the Arrow tool in Motion, you’re actually creating keyframes.

Sigh… Really. Dumb.

To turn off this setting, type A again.

If you see parameter values in red, that means that they are set using keyframes. (That’s the give-away.)

To remove keyframes that you don’t want, click the small arrow on the right of a parameter name (red arrow in screen shot) or setting and choose Reset Parameter.

EXTRA CREDIT

You can change this keyboard shortcut using Motion > Commands > Customize. Or use the Final Cut Pro command set.


Please rate the helpfulness of this tip.

Click on a star to rate it!

… for Apple Motion

Tip #1612: What Do Red Numbers Mean in Motion?

Larry Jordan – LarryJordan.com

Red numbers always indicate values set by keyframes.

Red numbers in the Inspector indicate a parameter that has keyframes applied.

Topic $TipTopic

You are happily creating stuff in Motion when, all of a sudden, red numbers appear. What do they mean?

Red numbers, illustrated in the screen shot, indicate parameter values that have keyframe settings applied.

Most of the time, you created the keyframes and all is good. But, sometimes, Motion creates them without you knowing about it.

Tip #1611 explains how to get rid of them.


Please rate the helpfulness of this tip.

Click on a star to rate it!

… for Apple Motion

Tip #1613: A Weird Effect to Cheer You Up

Larry Jordan – LarryJordan.com

Nothing like messing with text to create interesting backgrounds.

The Polar filter applied to text. Note that Polar to Rect is checked.

Topic $TipTopic

Here’s something weird – yet easy – to play with: the Polar filter.

  • Type some text – or use a Gauge, Gadget or Line
  • For text, apply a Gradient fill
  • Select the text in the Layers panel
  • Apply Filters > Distortion > Polar
  • Check the Polar to Rect checkbox

Done.

EXTRA CREDIT

To make this more interesting:

  • Animate the gradient colors
  • Apply a Z-axis rotation
  • Add Behaviors > Text Basic > Quiver
  • Apply a Blur

Please rate the helpfulness of this tip.

Click on a star to rate it!

… for Apple Motion

Tip #1592: A “Better” Way to Adjust Audio in Motion

Larry Jordan – LarryJordan.com

Nothing about audio in Motion is easy. Here’s proof.

Enable keyframe display (top), Audio timeline (middle), Keyframe Editor (bottom).

Topic $TipTopic

Audio always seems like an afterthought in Motion. Audio clips are impossible to find and almost impossible to adjust. But, here’s a trick that makes setting levels a bit easier.

Import an audio clip into Motion, then:

  • Reveal the Timeline (Shortcut: F6).
  • Click the Audio icon in the top right corner (top red arrow). This reveals the audio clip in the middle of the pane (middle section of screen shot).
  • Click the Keyframe icon (lower red arrow).
  • Put the playhead where you want the first keyframe to appear and select the audio clip in the Timeline pane.
  • Go to Inspector > Audio Track and add a keyframe for Audio Level. A small red dot appears below the audio clip in the Timeline pane. (Middle portion of the screen shot.)

NOTE: You would think you could adjust the keyframe audio level by dragging it. You would be wrong.

  • Adjust the audio level for that keyframe in the Inspector.
  • Move the playhead to where you want the next keyframe to appear and repeat the keyframe setting process.

NOTE: You would think the keyframes in the Timeline would indicate the different levels. You would be wrong.

  • To see audio levels once they are set, Control-click the keyframe and choose Show in Keyframe Editor. (Lower section of screen shot.)

NOTE: You would think Motion would make adjusting audio easier. You would be wrong.


Please rate the helpfulness of this tip.

Click on a star to rate it!