… for Apple Motion

Tip #1432: Secrets of the Spinning Gear

Larry Jordan – LarryJordan.com

Use the Background Tasks window to monitor exports.

Click the spinning gear to reveal the Background Tasks List.

Topic $TipTopic

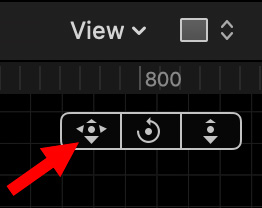
Have you ever noticed a small gear spinning in the lower right corner of the Viewer? Well, here’s what it means.

When you export a project from Apple Motion, a small spinning gear appears in the lower right corner of the Viewer. (Red arrow in the screen shot.)

This spinning gear disappears when the export is complete.

Click the spinning gear to display the Background Tasks List dialog. This window, which can’t be displayed any other way, shows the progress of an export.

Click the “X in a circle” to cancel the export.


Please rate the helpfulness of this tip.

Click on a star to rate it!

… for Apple Motion

Tip #1440: How to Export a Partial Motion Project

Larry Jordan – LarryJordan.com

Play ranges make it easy to focus on small sections of your project.

Keyboard shortcuts associated with play ranges.

Topic $TipTopic

Most of the time, when you finish a Motion project, you want to export all of it. But, what do you do if you only want to export some of it? Easy. Watch.

The area just above the mini-timeline, where the playhead slides back and forth, is home to two other icons:

  • Play Range In
  • Play Range Out

Many times, when you are working on somewhat longer projects, you may want to focus just on playback within a portion of the timeline. These play range markers make that happen.

But, they also control what gets exported.

Set these, either by dragging or typing Shift + Cmd + I or O, to set a play range In and/or Out.

NOTE: Using the keyboard shortcuts jumps the appropriate play range marker to the position of the playhead.

Then, choose Share > Export Selection to Movie. Only that portion of the project contained between those two markers export.

To reset the markers, type Option + X.

EXTRA CREDIT

The screen shot shows other shortcuts for working with these markers.

These markers do not support saving a portion of a project as a Final Cut template. To retime a template, you would need to reconstruct it.


Please rate the helpfulness of this tip.

Click on a star to rate it!

… for Apple Motion

Tip #1454: Expose Shows What’s In a Motion Project

Larry Jordan – LarryJordan.com

An easy way to remember “Expose” is “X”

An exposed project consisting of seven discreet elements.

Topic $TipTopic

Often, Motion projects get so complex, it can be hard to find and modify the element you need to adjust. The Expose feature helps solve that problem.

Motion’s expose commands provide a way of viewing multiple layers at once, “exploding” and re-scaling them. The expose commands allow you to access all layers in a project in the canvas without having to drill down into the Layers list. Expose commands also let you select inactive layers at the playhead’s current position or jump to a selected layer’s In point.

  • To expose layers that are active at the playhead position, type X.
  • To expose all layers in your project, type Shift + X.

In both cases, layers will temporarily scale down and spread over the canvas. Each layer is represented by a white frame in the canvas. Move the pointer over a frame to show the layer’s name.

Click anywhere in the Canvas to reset the display.


Please rate the helpfulness of this tip.

Click on a star to rate it!

… for Apple Motion

Tip #1448: 3D Navigation Controls

Larry Jordan – LarryJordan.com

These navigation controls appear once you add a camera to your project.

Enlarged view of the 3D navigation controls in Motion.

Topic $TipTopic

(I discovered this tip while researching a recent PowerUP webinar illustrating Cameras, Sets & Drop Zones in Apple Motion 5.5.)

Once you add a camera to a Motion project, three new navigation controls appear in the top right corner of the Canvas (Viewer). Here’s what they do.

The three controls – indicated by the red arrow in the screen shot – are designed to be clicked and dragged with the mouse. In all cases, these shift the display in the Canvas, they do not change the composition of elements in the project.

From left to right:

  • Move the Canvas up/down/left right.
  • Rotate the Canvas on the Z axis. (This is the traditional way to rotate anything.)
  • Move view either closer or farther away, again, along the Z axis.

EXTRA CREDIT

Double-click any icon to reset the screen to the default 0,0,0 centered location.

You can experiment with these by adding a camera (Object > New Camera), switch the Canvas from Active Camera to, say, Top view then tweak one of these controls.


Please rate the helpfulness of this tip.

Click on a star to rate it!

… for Apple Motion

Tip #1449: Add Depth of Field to a Camera

Larry Jordan – LarryJordan.com

Rendering Depth-of-Field is very processor intensive. Turn it off when you don’t need it.

Top view showing camera angle, far and near focus. Text displaying resulting depth of field.

Topic $TipTopic

(I discovered this tip while researching a recent PowerUP webinar illustrating Cameras, Sets & Drop Zones in Apple Motion 5.5.)

Depth of field (focus) can be added to any camera in Motion; though it is off by default. Here’s how to turn it on and adjust it.

  • Go to the Render menu in the top right corner of the Canvas (Viewer) and enable Depth of Field.
  • Add a camera to your project.
  • Select the camera, then, in Inspector > Camera, twirl down Depth of Field.
  • DOF Blur Amount. The amount of blurriness.
  • Near Focus. Indicated by a yellow line nearest the camera. This represents the nearest an object can be to the camera and still be in focus.
  • Far Focus. Indicated by a yellow line farthest from the camera. This represents the farthest an object can be to the camera and still be in focus.
  • Focus Offset. Drag this setting to roll the focus from foreground to background.

In this screen shot:

  • DOF Blur Amount: 60
  • Focus Offset: -2.0
  • Near Focus: 311
  • Far Focus: 0 (This is, generally, left at 0)
  • Camera Angle of View: 74°

EXTRA CREDIT

Use keyframes to animate Focus Offset to create a real-time roll focus.

Rendering depth-of-field is processor intensive. If playback is too slow, turn it on to set values, then turn off until ready to create final exports.


Please rate the helpfulness of this tip.

Click on a star to rate it!

… for Apple Motion

Tip #1450: Simple 3D Text Lighting Tricks

Larry Jordan – LarryJordan.com

Be sure to turn Environmental lighting off to get the full effect.

Lighting Styles for 3D text: Dramatic Top Right (top), Below, Medium Right (bottom).

Topic $TipTopic

(I discovered this tip while researching a recent PowerUP webinar illustrating Cameras, Sets & Drop Zones in Apple Motion 5.5.)

The more I play with 3D text in Motion, the more fun I have. Here is a very quick way to dramatically change the look of your text.

  • Create some 3D text, give it enough depth that you can see the edges.
  • In Inspector > Text > Appearance, uncheck Lighting > Environment.
  • Then, change Lighting Style and watch what happens.

For this screen shot, I set:

  • Font: Optima
  • Size: 300 points
  • Depth: 60

Then, I applied three different Lighting Styles, from top to bottom in the screen shot:

  • Dramatic Top Right
  • Below
  • Medium Right

EXTRA CREDIT

Once environmental lighting is turned off, if you plan to use other elements you’ll need to add lights to see them,


Please rate the helpfulness of this tip.

Click on a star to rate it!

… for Apple Motion

Tip #1423: Messing with Transitions in Motion

Larry Jordan – LarryJordan.com

Motion provides lots of flexibility in designing transitions; starting with durations.

The blue bar displays the duration of the Transition A drop zone.

Topic $TipTopic

A “drop-zone” is a placeholder in Motion for video to be inserted by Final Cut Pro. By default, when you create a new Final Cut Transition in Apple Motion, it creates two special drop zones:

  • The green Transition A will display the video from the out-going clip.
  • The red Transition B will display the video from the in-coming clip.

Each of these two drop-zones runs for exactly one-half the duration of the transition itself, each represented by a blue bar in the mini-timeline (red arrow in screen shot).

However, these durations can easily be changed, which gives you more time to do interesting things with each clip.

Simply drag the edge of the blue bar for the selected drop-zone in the mini-timeline to change the duration. Then adjust scale, position, rotation in the Inspector, or add Filters and Behaviors. For example, you could have the new clip fly on screen as a black-and-white clip, flip around a few times, then zoom full-screen while switching to full color to end the transition.

The results might look tacky, but, well, it would certainly be eye-catching. In any case, consider the duration of each of these elements as totally flexible.


Please rate the helpfulness of this tip.

Click on a star to rate it!

… for Apple Motion

Tip #1424: Lights Can Help 2D Video

Larry Jordan – LarryJordan.com

Motion lights can be colored and shaped to resemble actual lights, not simply colors.

A dark blue ambient glow combined with an amber spot light to create a night scene.

Topic $TipTopic

One of the most powerful, but little known, features in Apple Motion are its lights. These can benefit video clips in ways you might not expect.

For example, look at this shot from the film “Route 30, Too!”, directed by John Putch. The top image was the actual shot.

The bottom image applies a dark blue ambient light to change the time to late evening, while an amber spotlight creates the illusion of a porch light illuminating the hair and body of the actor.

The ability to use lights to create lighting shapes and colors that resemble bare bulbs, or spot lights, or lighting fixtures give us much more creative flexibility with key scenes than we could get with Final Cut alone.

Here’s a webinar that covers this in more detail.


Please rate the helpfulness of this tip.

Click on a star to rate it!

… for Apple Motion

Tip #1425: Cool 3D Text Lighting Tricks

Larry Jordan – LarryJordan.com

All lights can be animated with keyframes so colors and shadows move.

Text light with backlight only (top) and then adding a dim front light.

Topic $TipTopic

This tip started by asking: “What can I do with directional lighting in Apple Motion?” The answer is: “Quite a lot of very cool stuff!”

Create some 3D text. In the screen shot, I used Optima at 275 points. Enter the text for your title.

  • Select the text in the Layers pane.
  • Go to Inspector > Text and set Lighting Style to Off.
  • Uncheck Environment.
  • Everything should now go black because all lighting is turned off on the text.
  • Go to Object > New Light and add two new lights.
  • Select a light and, in Inspector > Light, set Light Type to Directional. Do this for both lights.
  • Point one light – using the 3D Transform tool – toward the text, with the other light pointed away from the text.

NOTE: Remember, with Directional lights, position is irrelevant. Only the rotation direction matters.

When the angles are set, adjust colors and intensity to suit. In my example, the front light (pointing to the text) is pale yellow with Intensity set to 10.

The back light is pointing down and toward the front. Intensity is 100 and the color is dark blue.


Please rate the helpfulness of this tip.

Click on a star to rate it!

… for Apple Motion

Tip #1405: Four Ways to Light in Motion

Larry Jordan – LarryJordan.com

Lighting in Motion is like lighting in real life; lots of creative options.

A spot light (red area) with a very dim ambient light filling in the rest of the set.

Topic $TipTopic

(I discovered this tip while researching a recent PowerUP webinar illustrating Lighting Techniques of Apple Motion 5.5.)

The default light for Apple Motion is “ambient.” This means that the light is white and illuminates everything in all directions equally.

However, we can add custom lighting to any Motion project from the Object menu. When we do, the default lighting is turned off and we can choose between four different lighting types:

  • Ambient. Just as the default setting, this illuminates everything equally in all directions. However, unlike the default, we can change the color and intensity of the light.
  • Directional. This shines the light in a specific direction (up, down, left, right). However, changing the position of the light has no impact. We can also change the color and intensity of this light.
  • Point. This is the default custom light. This light is like hanging a bare bulb from the ceiling, it has position, but the light flows evenly in all directions. We can change the color, intensity and falloff of this light.
  • Spot. This is the most flexible light. Similar to a Leko light in a theater, we can change the position, direction, color, intensity, light angle, edge softness and falloff of this light.

EXTRA CREDIT

We adjust light settings by selecting the light, then using the Inspector. There is no limit to the number of lights we can add to any Motion project.


Please rate the helpfulness of this tip.

Click on a star to rate it!