… for Adobe Premiere Pro CC

Tip #1042: Multiple Bugs in Proxy Export

Larry Jordan – LarryJordan.com

For now, use proxies, but avoid using proxy export.

The “Use Proxies” option in Premiere. My advice? Don’t use it.

Topic $TipTopic

New in the 14.4. update to Adobe Premiere Pro is the ability to export proxy files, instead of high-resolution camera masters. The only problem is, this doesn’t work.

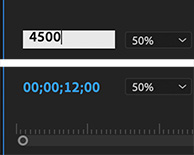
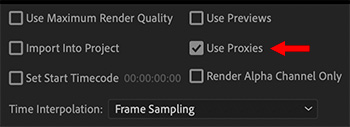
While Premiere has supported proxies for a while, new with this release is the ability to export proxy media. Prior, regardless of whether proxies were active or not, it would always export high-resolution media.

While exporting proxy files is a note-worthy feature, this feature does not work in the 14.4 release. After working with this for three days, and talking with Adobe, I have never gotten proxies to export. Instead, regardless of whether proxies are active or not, Premiere always exports high-resolution media.

For now, don’t use this function. Adobe acknowledges that their whole proxy workflow needs more work. I expect to see improvements to proxies in future releases.

EXTRA CREDIT

Compounding this problem, another bug in working with proxies is that if you create a custom proxy ingest setting – say to burn a watermark into the proxy media, Premiere will reject the custom setting due to enabling “Match frame size and frame rate.” However, even when these settings are turned off, Premiere still won’t accept a custom proxy ingest setting.

And, if you create proxies outside of Premiere using Adobe Media Encoder, Premiere will refuse to link to them because AME changes the audio channel mapping, which Premiere needs to link the files.


Please rate the helpfulness of this tip.

Click on a star to rate it!

… for Adobe Premiere Pro CC

Tip #1044: What Does “Clamp Signal” Do?

Larry Jordan – LarryJordan.com

Clamp scopes when doing creative work, unclamp when evaluating images technically.

The Clamp Signal checkbox in the Lumetri Waveform Monitor.

Topic $TipTopic

The Lumetri video scopes have a “Clamp Signal” checkbox. As I was researching my recent webinar on “New Features in Adobe Premiere Pro,” I talked with Adobe about this.

What the Clamp Signal checkbox does, when turned on, is compress, or clamp, any grayscale levels over 100 IRE or below 0 IRE that are displayed in the scopes. This means all grayscale values fall between 0 – 100 IRE.

NOTE: These excess values are called “super-white” or “super-black.” Both are illegal values for broadcast, DVD or digital cinema.

This clamping does NOT affect any clips in the timeline or browser display; or media being exported.

In general, when doing creative work, turn clamping on. When evaluating your final project technically, turn clamping off, then make sure no values are above 100 or below 0.

EXTRA CREDIT

If your color grade is done, and you still have illegal levels, apply Video Effects > Color Correction > Video Limiter to clean them up.

Here’s an older tutorial that explains what the limiter does.


Please rate the helpfulness of this tip.

Click on a star to rate it!

… for Adobe Premiere Pro CC

Tip #1022: The Pen Tool

Larry Jordan – LarryJordan.com

The Pen tool creates shapes we can use standalone or under text.

I have no idea what this it, but it’s kinda cute – and has a drop shadow.

Topic $TipTopic

The Pen tool allows us to draw shapes directly in the Program Monitor, fill them with color, add a border or drop shadow, then animate them. We are used to using the Pen tool as part of Effect Controls. But there is also the Pen tool in the Tools palette. We use this to draw shapes on-screen.

  • Put the playhead in the timeline where you want a shape to start, then, select the Pen tool from the Tools palette.
  • In the Program Monitor, click and draw a shape. Click to create a corner, click and drag to create a curve.
  • Re-click the starting point to create a closed shape, or don’t to create an open shape. (We most often use open shapes to create a curved line – it is a border with no fill.)
  • To move a shape, select the clip, then use the Move tool.
  • To adjust a shape, select the Pen tool, then, in Effect Controls, twirl down the Shape, and select Path.

NOTE: The shapes created by the Pen tool are vectors, which means they can be scaled as much as you want without losing edge sharpness.

EFFECT CONTROLS

The Shape controls, in the Effect Controls panel, provide:

  • Path. Redraw the shape, using the Pen tool.
  • Appearance. Change fill, stroke and shadow settings.
  • Transform. Change size, position and rotation, along with adding keyframe animation.

Please rate the helpfulness of this tip.

Click on a star to rate it!

… for Adobe Premiere Pro CC

Tip #1023: Tricks of the Zoom Tool

Larry Jordan – LarryJordan.com

The Zoom tool is the fastest way to zoom into a timeline segment.

The Zoom tool is located in the Hand menu. (Shortcut: Z)

Topic $TipTopic

Hidden, but accessible with a keyboard shortcut, is the Zoom tool. This is often faster than using keyboard shortcuts to zoom into the timeline! As a certified keyboard junkie, it often hard to believe that anything with the mouse is faster – but the Zoom tool may be the exception that proves the rule.

Click and hold the cursor on the Hand tool, then select Zoom tool from the menu that appears. (See screen shot.)

NOTE: The keyboard shortcut for the Zoom tool is: Z.

While we can simply zoom into the timeline by typing + [plus] or [minus], the Zoom tool is faster when we want to get more specific. To zoom into a specific section of the timeline, select the Zoom tool, then drag a rectangle around the section of the timeline you want to see.

Poof! That region instantly fills the timeline!

EXTRA CREDIT

The Zoom tool only works with clips in the timeline.

Type \ [back-slash] to fit everything back into the timeline again.


Please rate the helpfulness of this tip.

Click on a star to rate it!

… for Adobe Premiere Pro CC

Tip #1024: Moving the Anchor Point

Larry Jordan – LarryJordan.com

The Anchor Point can be easily moved using the Move tool.

The Anchor point (red arrow) is set by moving the cross-hair icon.

Topic $TipTopic

The Anchor point is that spot in an element around which it rotates or scales. Clips, shapes and text each have separate anchor points, but moving them is the same.

  • Select the clip who’s anchor point you want to move.
  • Select the Move tool.
  • In the Program Monitor, drag the small circle with the cross-hair to the position you want. The EXACT position is the center of the cross-hair.

If you need more precision, or need to match anchor points for multiple clips, select the clip, then, in the Effect Controls panel, enter the precise numbers you need for the Anchor point for the selected clip.

EXTRA CREDIT

Here’s where to find the appropriate Anchor point. Using the Move tool, select the object in the Program Monitor you want to adjust. It will highlight in the Effect Controls panel.

  • Video: Effect Controls > Motion
  • Shapes: Effect Controls > Shape > Transform
  • Text: Effect Controls > Text > Transform

Please rate the helpfulness of this tip.

Click on a star to rate it!

… for Adobe Premiere Pro CC

Tip #1003: The Slide Tool – Relic of the Past

Larry Jordan – LarryJordan.com

The Slip tool is essential. The Slide tool is a relic of the distant past.

The Slide tool moving the position of a clip, without changing content or duration.

Topic $TipTopic

Last week, I wrote about the Slip tool (Tip #986). Loren took me to task asking why I didn’t write about its cousin: the Slide tool. So, now, I am.

The Slip tool (Shortcut: Y) changes the content of a shot without changing its duration or location in the timeline.

The Slide tool (Shortcut: U) changes the position of a clip inside it’s track in the timeline, without changing its content or duration. It does this by trimming the Out of the clip before it and the In of the clip after it as you drag it in the Timeline.

The Slide tool was invented back in the earliest days of non-linear editing, when we only had one video track and one title track to work with. The Slide tool allowed us to slide clips along that single video track to find the best place to put a shot.

EXTRA CREDIT

You can only Slide a clip as far as you have handles on the clips before and after it.

While I use the Slip tool all the time, I never use the Slide tool anymore, simply because it is easier to raise a clip to a higher track where I can move it as much as I want without altering the clips on the main track.


Please rate the helpfulness of this tip.

Click on a star to rate it!

… for Adobe Premiere Pro CC

Tip #1004: A Faster Way to Jump

Larry Jordan – LarryJordan.com

We can jump to a specific timecode, or move to a spot relative to where we are now.

Click the blue numbers (bottom), then enter a new timecode to jump the playhead there.

Topic $TipTopic

As projects get bigger, finding faster ways to move around means you can get more done in less time. Here’s a cool trick.

Click directly on the blue timecode numbers at the bottom left of of the Program (or Source) Monitor, then enter the timecode where you want to move the playhead.

Press Return and the playhead jumps there instantly.

EXTRA CREDIT

Enter timecode as HHMMSSFF, without punctuation.

Type +, followed by a number and Return, and the playhead will add that duration to the current playhead location and move right.

Type , followed by a number and Return, and the playhead will subtract that duration to the current playhead location and move left.

If you enter a number greater than your frame rate, Premiere will automatically calculate the correct duration.


Please rate the helpfulness of this tip.

Click on a star to rate it!

… for Adobe Premiere Pro CC

Tip #1005: The Vertical Text Tool

Larry Jordan – LarryJordan.com

Vertical text is hard to read, but, used sparingly, can be eye-catching.

Here’s the vertical text tool and what it can do.

Topic $TipTopic

Adobe Premiere Pro provides the opportunity to create both horizontal and vertical text. Learn more.

  • Click and hold the Text tool to reveal the Vertical Text Tool.
  • Click anywhere in the Program Monitor to create text, the same as you would with the “normal” Text tool.
  • Format the text by switching to the Graphics workspace.
  • Select the text clip in the timeline, then click Edit, which is at the top of the Essential Graphics panel.

EXTRA CREDIT

As you can see in the screen shot, vertical spacing between characters is even more obvious than horizontal kerning. You tighten spacing using the Kerning control in the Text panel.

When entering text, type words in reverse order. (Smile… you’ll understand why the first time you add a second word.)

Please remember that vertical text is very hard to read quickly. Use this effect very sparingly!


Please rate the helpfulness of this tip.

Click on a star to rate it!

… for Adobe Premiere Pro CC

Tip #985: Hidden Sort Options

Larry Jordan – LarryJordan.com

Thumbnails can be sorted in far more than simple file name order.

The thumbnail sort options in the project panel.

Topic $TipTopic

Hidden in the Project panel is a wealth of sort options for all the elements in the Project panel or a bin. Here’s how to access them.

  • Open the Project panel.
  • Switch to thumbnail view.
  • To the right of the slider that determines thumbnail size, is an icon of three stacked lines with a down arrow. Click it.

From this menu, you can sort thumbnails on over 30 criteria.

EXTRA CREDIT

For you list junkies, the default sort is alphabetically on file name. However:

  • To sort on any column, click the column header.
  • To sort in reverse order, click the column header again.

Please rate the helpfulness of this tip.

Click on a star to rate it!

… for Adobe Premiere Pro CC

Tip #986: The Slip Tool is My Favorite

Larry Jordan – LarryJordan.com

The Slip tool lets you optimize content without changing durations.

The Program monitor display when using the Slip tool. See the text for details.

Topic $TipTopic

The Slip tool is one of those tools in Premiere that you either use constantly, or you puzzle over what it does. For me, it’s my favorite trimming tool.

The Slip tool (Shortcut: Y) allows us to change the content of a shot without changing its duration or location in the timeline.

To use it, select the tool, then drag the middle of a timeline clip. In the Program monitor (see screen shot) up to four images will appear.

NOTE: If the clip has clips on either side of it, you’ll see four images. If the clip has blank space on either side you may see only two.

These images, from left to right, are:

  • The Out of the out-going clip
  • The In of the clip you are slipping
  • The Out of the clip you are slipping
  • The In of the in-coming clip

As you drag, you display different portions of the slipped clip. For example, in a clip of a foot race, you could slip the clip to show the start, or where the 2nd-place runner takes the lead, or where runners cross the finish line.

When slipping, only the content changes, not the duration or location of the clip itself.

If you haven’t used the Slip tool, it is a great way to quickly select the best portion of a B-roll clip. I use this tool a lot!


Please rate the helpfulness of this tip.

Click on a star to rate it!